

Things are getting even more complicated as you progress to the second chapter in Boxes Lost Fragments, but I am here to help you once again with a complete text walkthrough for the entire chapter.
If you’re still trying to beat the first level, check out the previous article, Boxes Lost Fragments Chapter 1 walkthrough. If not, let’s jump right into the Boxes Lost Fragments Chapter 2 Walkthrough below.
- For the first box, zoom into the face of the man on the side toward you, and swipe right over his forehead, then press the button. Then you must rotate the face to the left until all the spikes align, as in my screenshot below (but simply rotating it to the left will do it):

- A new part will open on top, but we’ll ignore it for now. Instead, move to the right sided of the box and pick up the Screwdriver and Glasses. Inspect the Glasses and rotate the left lentil to the left, until you get the Optical Lens.
- Move to the back side of the box and interact with the items on top – pull up the hinges first, then the handles left and right and finally the middle handle downward.
- Use the screwdriver on the two screws on the hand, then remove the lid and pick up the Broken Mechanism.
- Now zoom back and look at the bottom right side of the box, it’s leg. Rotate the wheel there to reveal a handle – pull it, and the glass door to the side of the box will open. Click all the bottles and boxes to remove them, them pull down the switch. Puzzle time!
- Zoom in to the contraption to the left and fix the mechanism (pull the middle object to the left, then lift the one to the bottom, and finally pull right the middle object you just moved). A green light will appear under the handle. Pull the handle.
- Go back and look at the left side of the panel, where a plug appears. Pull it and place it into the socket with the hand.
- Go to to the top of the box and place the Broken Mechanism on the tray, then the Optical lens on top of the microscope thingie. Then zoom in (rotate the lens to the left) until you see the mechanism. You need to drag and drop the items there until you place all the lightbulbs correctly as seen below:

- You will receive the Fixed Mechanism. Go and place it on the glove thingie. To open its fingers, press the switches in this order (1 is leftmost, 4 is rightmost): 1, 2 and 4. Get the Electric Key and you’ll move to the second box.
- Pick the Crystal Ball to the right of the box. Zoom into the Crystal ball, switch the handle at the bottom all the way to the right and get the Intricate Mechanism.
- Go to the back side of the box and press the middle left button. Get the Tool. Go to the side of the box with the two large circles and interact with the small opening on the table, in front of the box. Get the Battery.
- Go back to the front side of the box and zoom in to see the thing in front of the box. Move the wheels to the left and right, then open the tray. Place the battery in. It’s a very simple puzzle where you need to match the colors. Simply start with the rightmost one (yellow) until it’s in the right position, then move the Puple one time to the left, then put the blue all the way left until it’s in the correct position. Finally, switch the Purple one again to the left.
- Press the green button that you can see now and take the Metal Lever. Go to the other side of the box and place it in the opening at the top, then pull it up. In the new area, place the Intricate Mechanism and rotate it until the arms to its sides match the symbols on the box. When they do, press its middle button.
- Use the Tool to open the screws on both sides of the front of the box. Then swipe left the top area on the door until you reveal a small Key. Take it. Zoom back and go to the side of the box, open the area there by swiping up and down and use the Key. Get the Mechanism Part.
- Go to the opposite side of the box and place the Mechanism Part on it. Now you need to rotate the wheels of the puzzle until the symbols on the middle wheel match up with the ones of the medium one, as you can see below:
- Finally, get the Mechanical Sphere from the top of the box and you’ll proceed to the third Box.
- Zoom in to the right side of the box and pull down the lid. Zoom into the new area and take the Ornament Piece. Move to the other side of the box and place the Ornament Piece where it fits, on the left side. Get the Mechanical Item. Zoom into it and rotate the button on its side to transform it into a Gear.
- Move to the back side of the box and zoom in to the top. Use the gear and rotate it to open the lid. Next, switch all of the three dials until you create an open path for the handle. When you do, pull it down. The sides of the box will the blown away.
- Go to one of the sides of the box and pull down the other handle, then take the red Valve. Go to the newly exposed side of the box and zoom in. Get the Wrench. Place the Valve on the spot above and a bit to the left of where the Wrench was, then rotate it to extend the tube.
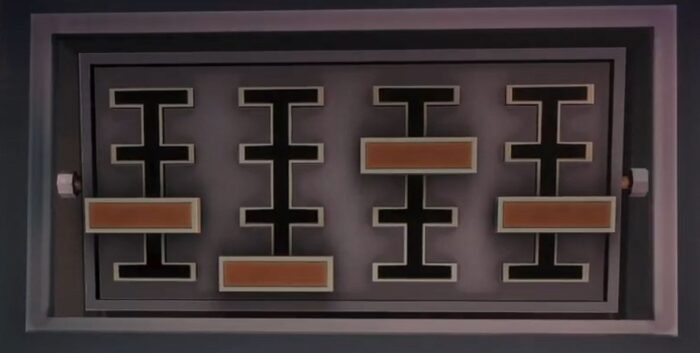
- Go to the front side of the box and use the Wrench on the screw. You need to switch those bars around until the colors match. My tip here is to start by solving the leftmost and rightmost one, since they’re the easiest to do, then focus on doing the middle three. When done, the train will start working and it will also reveal the position for the lids:

- Now, go to the right side of the Box and turn each of the lids to match the indicated positions above (left one all the way to the right; top one to 60; bottom one to 40). You will be taken to a new side of the box – simply pull the handle to the left of that indicator and the train will start moving.
- On the side with the doors, zoom in and pull the thing that’s keeping them close and open them. You will need to pick up all the gears, timing your pressing of the green button flawlessly: as soon as you see that the opening appears on the floor, press the button. Do it until you get all the gears. Collect the Mechanical Console. Now it’s time to move to the fourth and final box.
- Zoom right into the strange shape you see on the box and solve the puzzle by connecting all the signs to the middle of the box. It’s easy to do if you only focus on the top one, from the outermost layer towards the bottom. Here is what you should be aiming for:

- You will be taken to a new area that shows you one item complete (green) and two left to do (red). Zoom in to the panel to the right and move the handles up and down to reveal some connectors. Drag them upwards. This will solve the electricity problem.
- Zoom in to the top of the box and rotate the left and right handles so that there’s an opening on the inside. When both are placed correctly, the middle one will pop up and you can pick the Bulb.
- Zoom in to the side of the box that has the large gear like thingie on it and rotate the top gear until you see a missing bulb at the top. Place the one you just got in the opening. This solves the third and final problem – lights. Now pull the newly shown button all the way to the right and zoom in to solve the new puzzle.
- This is a more difficult one. You can drag out piece from the middle part only to the left and right sides. You will have to perform many moves, taking pieces out, rotating, putting some in, and so on until you move them all into position. Your goal is to have all the pieces, on each side, match:

- After the animation completes and you can see the glowing sphere, zoom in to the left side and take the Fuse. From the right side, get the Electric Plug. Zoom into the Plug and pull the button all the way to the side.
- Go to one of the sides of the box (the one with the lightbulbs) and on the bottom part, place the Fuse to light up all the bulbs.
- Move to the other sided and notice, at the top, a new puzzle. First, see that there’s a small lid on the left side – pull it over to reveal a button, then pull it down. You will have to note and remember the positions of the lights on the back, then drag the handles on the other sides to match them. Here is how the solution looked like in my case:
- Place the Electrical Plug in the area that opens down below, then pull the handle to the left to connect it. Grab the Power Source from the hand that appears.
- Now it’s back to the original room. Move right and zoom into the strange mechanism there. Place the Sphere in the middle, where the light bulbs are. The left and right buttons below will rotate the sphere, while the middle one will let you switch their colors. The goal is to match the small lids with the large bulbs:

- In the new scene, zoom into the large wheel on the wall and place your sphere in the middle. It will open the circular door – then press the blue button to reveal some symbols. We will need to remember them for our next puzzle (in my case, lightbulb, cogwheel, fan and plug).
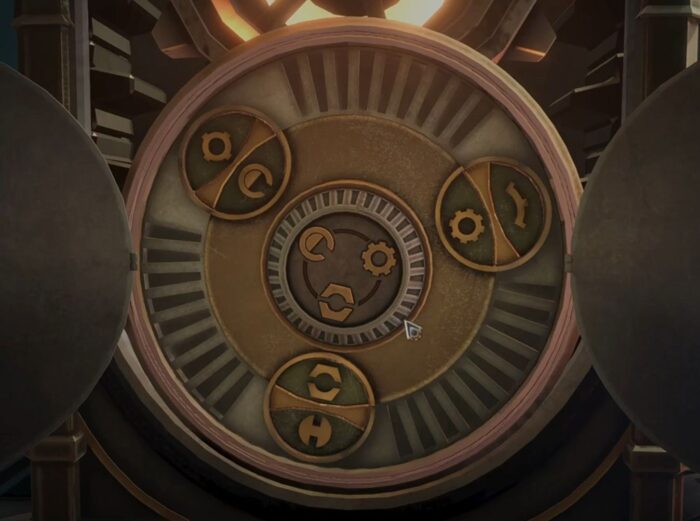
- Zoom out and back into the panel to the right of the mechanism. Place the scepter looking thing into the opening to reveal the next puzzle. Simply rotate each of the dials to match the symbols we’ve seen before (they might vary from player to player). After placing them correctly, new gear will be added to the spinning mechanism.
- Finally, zoom to the rightmost panel and place your final item in. Pull the handle down. Open the middle area of the newly revealed part and get the Token. Place it on the control table to the right to progress to the next chapter – Cognito.
The second chapter is now complete! If you still have any questions, let me know by commenting below and I will gladly help.
For all the walkthroughs published on this website, check out the Walkthroughs Index.
Until I beat the next chapter and post the walkthrough, I recommend reading some of my previous articles, where you can discover amazing games to play next: