
A brand new escape the room game was launched in the Dark Dome series: Beyond the Room! And today, I am here to share the complete text walkthrough for the game, including screenshots and in-depth details on what to do to complete all puzzles and, ultimately, the game.
I prefer text walkthroughs to video ones because it’s usually a lot faster and easier to find the place you’re stuck at – or simply follow it from start to finish. Either way, let’s not waste a second and instead let’s check out the full Beyond the Room walkthrough below!
IMPORTANT: As the game itself warns you before starting, the keys/codes for each game are randomized, so they might be different than those you can find below. You will still know how to get them though, as I will explain everything thoroughly. Now let’s begin!
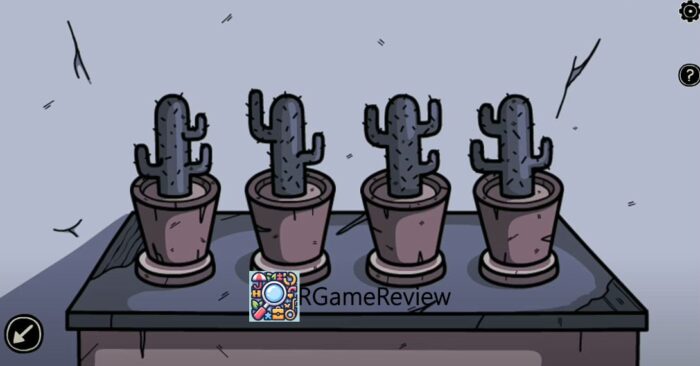
1. Tap the scroll on the table to zoom in, then tap again to reveal the symbols. This shows you how to arrange the cactus plants in the next room.
2. Zoom out and go to the right room. Tap the cactuses to zoom in and arrange them to match the image on the scroll on the table. Simply tap a cactus you want to switch, and the one you want to switch it with to complete this puzzle, as seen in the image below:
3. Take the Large Cork and Large Cracker from the section that opens. Go back and exit the room to the right.
4. Zoom into the parrot and feed it the cracker. It tells you the code: The Moon, A Star, An Eye and a Heart.
5. Go all the way to the left, into the room you started. Tap the cabinets to the right side of the room, then the right door and take the safe box handle wheel. Then, tap the door to the left and tap each of the squares using the info from the parrot to open it (remember: the symbols might vary in your case). Here are mine:

6. Open the room and get the key and the brick. Use the key to open the door to the left and use it.
7. Tap the bunk beds to the left and tap the sheet to reveal a piece of paper. Take it and read it (it talks about a yellow dress, purple tree, pink cloud, green wooden fence, and blue hair.) We will use this in the room with the painting – but we need to find a painting brush first.
8. Zoom into the safe in the room and place the handle in the middle. Go all the way to the last door on the right and look at the painting. Tap the face to see the code (Left, Right, Left, Right, Left, Left, Right). Go back to the safe and press the arrows in that order. The door opens – grab the Remote Control.
9. Go to the room with the TV and use the Remote Control on it. It will show you a sequence of symbols, like the ones below:

10. Go to the room to the right and use the code from the TV to open the dresser. Get the Blanket inside.
11. Zoom in to the hand on the wall and fill the holes with the Blanket, Large Cork and Brick. Get the Glasses.
12. Go left and give the Glasses to the man. He will tell you the time he woke up (34:85 in my case). Go to the leftmost room and write these numbers on the clock. Get the Paint Brush from the armchair.
13. Go to the room to the right and tap the painting. Tap the palette and use it to paint the picture as instructed by the note we saw earlier (yellow dress, purple tree, pink cloud, green wooden fence, and blue hair). Get the Key from the girl’s hand.
14. Use the key on the door near the painting and exit. After the cutscene, enter the room #1, then the other room at the back, and finally the door leading to the backyard. There, tap the paint bucket on the shelf and get the piece of paper with a code on it.
15. Tap the plank piece barely visible on the left side of the screen to zoom in, then tap the planks again to reveal one cat shadow (there are 10 hidden in the game).
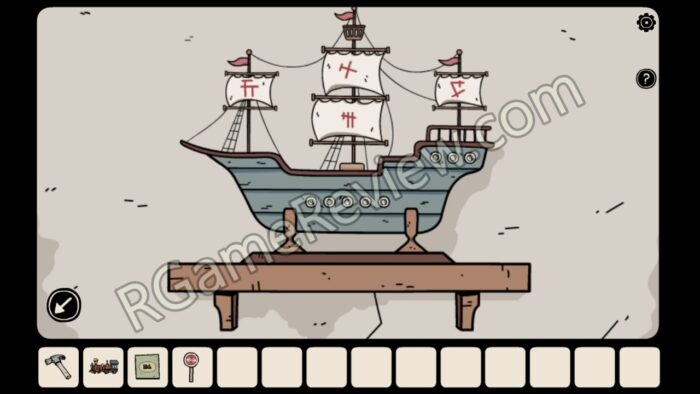
16. Tap on the tree’s trunk, where something is scribbled there. Note the Xs and go inside, then zoom into the ship near the door. Tap on it and press the buttons as seen in the image on the tree (or the screenshot below):
Get the Hook and Scroll.
17. Go back to the first room and tap the painting to the left of the door. Zoom into the small rocks on the photo (you will also see one shadow cat).
18. Now, we have a more complex puzzle. You can tap the scroll in your inventory and it will show you how the ship goes: skull island first, then palm tree, then tents and finally sea monster). Each photo in that room will also have a number of bones:
- Skull island: 8 bones
- Palm tree island: 3 bones
- Tents island: 5 bones
- Sea monster 4 bones
Go forward to the next room and zoom into the light blue cupboard to the left. Use the code above to open it (8, 3, 5, 4). From the cupboard, get the fingerprint scanner, shovel and rubber snake.
19. Go outside and zoom into the bird in the tree. Use the snake to scare it away and look at its nest. Get the Grey Key and piece of paper.
20. Zoom into the broken swing and use the hook to fix it. The boy will show you a place in the garden. Use the shovel and tap between the swing and the split logs. Get the railroad switcher.
21. Get inside and to the right. Zoom into the cabinet and open the top drawer with the help of the note, so that the symbols match. Get the token from the drawer, then open the other two and get the toy train engine and the train book.
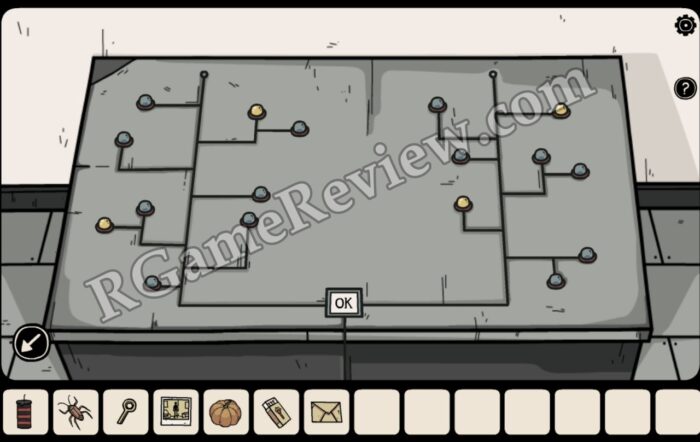
22. Zoom out and into the electrical panel. Use the small key to open it. We’ll have to solve the puzzle using the instructions on the first piece of paper we got. From left to right, you will need to light up the bulbs number 1, 3, 5 and 6.
We’ll do this one by one, using the arrow keys on the panel. Here is how to light up the required bulbs:
- Down, Left, Down, Left, Down – Enter
- Down, Left, Down, Right, Down – Enter
- Down, Right, Down, Left, Down – Enter
- Down, Right, Down, Left, Down – Enter
- Down, Right, Down, Down – Enter
23. Go to the left room and plug in the Arcade Machine. Insert the coin in the Machine. Play the game until you can collect 10 apples without missing any. When you do, you will get a perfect score and see the code: 5736. (Yours might differ).
24. Tap the yellow box next the arcade and open it with the code above. Get the Plastic Container.
25. Go to the room on the right and use the container on the spider. Using the icons next to the files, open them. Use the fingerprint scanner over each person’s fingerprint. The file also has another symbol on it. The results are, as follows:
- Laura: half circle & three dots connected by a line.
- Kay: Clock-like circle and the dots – 2 to the left and one to the right.
- Jim: Circle with bars and 2 dots at the bottom, one at the top.
- Bobby: Circle with triangle and another triangle-like set of dots, but with the lines forming a triangle.
26. Go back and to the red box on the shelf, and use the codes (circle with bars, half-full circle, circle with triangle and clock-like circle). Get the Hammer and the Ship Rudder.
27. Go back to the ship and use the wheel in the spot to the right to reveal another set of symbols:
28. Go outside and zoom into the box on the table. Match the symbols on the lock with the ones in the screenshot above. Get the rail.
29. Now, let’s go to the toy train puzzle! After zooming into it, look at the book in your inventory: it shows that the train should pass the tunnel, then the flags and arrive at the train station. Here’s what you need to do:
- Place the toy train in front of the station.
- Tap the railroad switcher to change the design of the rails.
- Go right and tap the railroad switcher again, then place the piece of rail from your inventory to complete the rail.
- Go down and use the hammer on the rock to break it. Then press the switcher to connect the tracks.
- Place the switcher you have in your inventory into the empty spot to the bottom left of the tunnel. Use the switcher to change the railways again.
- Optional: Zoom into the tunnel at the top to see one of the cat shadows.
- Go left and tap the switcher there.
- Go up and press the red button so that the train starts. Then QUICKLY, when it gets back to the screen where it started (the one with the train station), press the switcher so it goes back to the station. If you miss it the first time, wait for the animation to complete once more and try again.
30. When the train completes its ride, a code will be revealed below:

31. Go back and tap the blue box on the table to the right. Use the code above to open the box and get the key to the second floor. Climb up the stairs and enter the second floor room.
32. Open the window in the first room and exit. Zoom into the blue flower to the right and get one petal. Tap the stairs to go up and get the cord for the projector screen. Also tap the barely visible red flower in the top right of the screen to reveal a hidden cat.
33. Go back inside the room and open the cupboard under the window. From the left side, get the piece of paper with a code on it.
34. Enter the blue door room and zoom in to the toilet paper. Tap it until it’s gone and get the piece of cardboard with another code on it. Zoom out and tap the water reservoir above the toilet – remove the lid to see another hidden cat.
35. Go back and all the way to the right. Tap the cabinet and the small key and fan blades from the drawers.
36. Next, look at the paintings on the wall – each photo will show a symbol:
- Bella: rectangle
- Yichao: triangle
- Abbie: X
- Prince: Circle
37. Go to the room on the left and zoom into the red box. Use the symbols above to open it. Get the bubble wand and drinking glass.
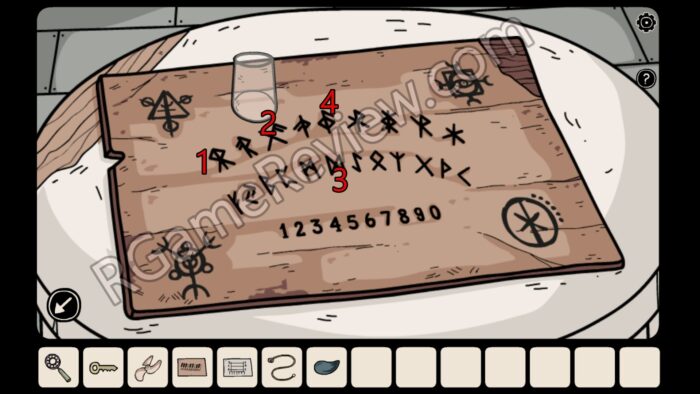
38. Go back and zoom into the wooden board on the table. Place the glass on it. After the cutscene, tap the glass again and remember the symbols it lands on. I have marked them in the screenshot below:
39. Go back to the bathroom and use the symbols marked above to open the blue cupboard’s doors. Get the cat food and memory card.
40. Go to the room with the cat and give it some cat food. While it is eating, tap it to get some cat hairs.
41. Go to the room to the right and place the memory card inside the camera. Play the video to see the correct order: up, left, up, down, right, left. Use this code to open the red box in the room (press the OK button after tapping the arrows). Get the yellow key and box of detergent.
42. Use the yellow key to open the glass door and exit. Using the first piece of paper in the inventory, arrange the clothespins to match the numbers:
- top line: 3 to the left, 5 to the right
- middle line: 1 to the left, 7 to the right
- bottom line: 6 to the left, 2 to the right
After the cutscene, get a feather from the raven.
43. Go back to the room with the cat and tap the table on the right. We’ll have to craft an invisibility potion. To do it, place in the glass of milk the raven feather, the petal and the cat hairs. Get the potion.
44. Go to the room on the left and use the key on the mouse cage to open it and get the mouse.
45. Go right and place the mouse on the vent pipe to the right, then use the invisibility potion on it. It will bring you a USB drive.
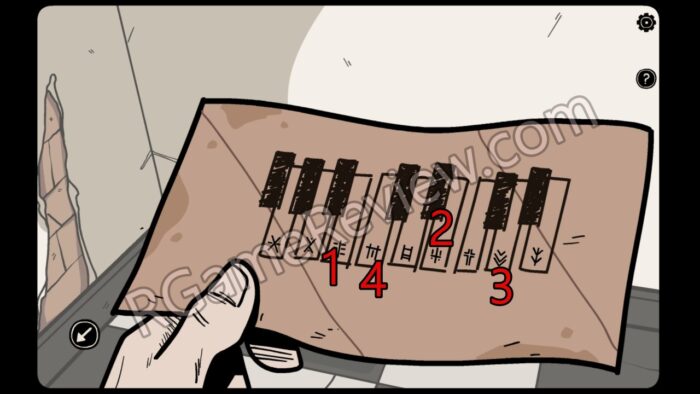
46. Go back to the left room and use the projector screen cable on the screen above the window. Then, place the USB drive in the projector and press the red button. You will see a hand touching the piano keys in a particular order. These give you the code from the remaining piece of paper in the inventory.
To make things easier, I have marked the symbols in the screenshot below:
47. Tap the purple box near the mouse’s cage and open it using the symbols above. Get the bathtub plug.
48. Get in the bathroom and use the plug on the tub, then turn the water on. Put the detergent in and use the bubble wand on the water.
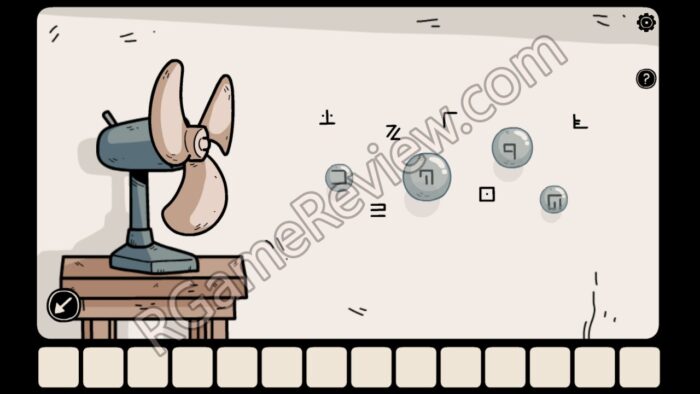
49. Go back to the room with the cat and tap the left table. Place the blades on the fan and turn it on. Then use the bubble wand on it to reveal the symbols. Pop the ones that can be popped – the remaining ones are your code.
50. Go to the room to the left and open the cupboard’s right door using the symbols from the bubbles:
51. Get the sickle. Now go out the window above the cupboard and then up the stairs. Use the sickle to cut the vines and get in.
52. Go right twice and zoom in to the bookshelf to count the gnome figures. 6 red, 3 blue, 5 green and 2 yellow. Now go once to the left and zoom into the cupboard. Write the gnome figure numbers to open it (6352). Get the rope and water valve.
53. Go back and from the top shelf near the door get the webcam. Go right and open the blue door. Under the sink, you will find a hacksaw. Open the fridge and take the orange. Also, remove all the foods from the right side of the shelf to reveal the cat. Finally, from the oven, get the kettle.
54. In the same room, combine the webcam with the rope and use that on the tube to the right. Go back to the room to the right and use the laptop. Scroll left to see a cat. Then all the way to the right to see the code below:
55. Go to the room to the left and zoom into the chest. Open it with the code above and get the apple, juicer and supermarket bill.
56. Go right and tap the table. Use the code from the bill (2384) to open the drawer and get the puppet of a man.
57. Go back all the way to the left and tap the shelf with a hand. Place the puppet on the hand. Tap the puppet and it will show you some specific squares to its left and right. In my case, it was this:
- left: 6, 2, 1
- right: 5, 4, 1
Now go to the safe in the room to the right and press the buttons indicated by the puppet. Get the lemon and the red key.
58. In the same room, zoom into the table with the helm and use the hacksaw to get its horn.
59. Go left and use the key to open the mailbox on the door. Get the envelope. Look at it for a clue. Go to the kitchen and zoom into the table. First, place the juicer component on the juicer. Then, juice all the fruits in your inventory – notice that each glass fills up to a specific number (lemon – 1, apple – 3 and orange – 5).
Combining the numbers from the envelope, we get the code: 6592. Use this code to open the red box on the table in the first room. Get the white key and roll of tape.
60. Use the key on the lock on the door, open it and go out. Get the matchbox from under the newspaper on the floor.
61. Now, go all the way back to the bathroom on the second floor and place the horn on the broken pipe. Also, use the tape on the broken pipe. Finally, place the valve on the red part of the pipe and tap it. Get the spoon.
62. Go back to the kitchen on the next level and fill the kettle with water from the sink. Place the kettle on the stove and heat it up using the matches. Get the kettle with boiling water.
63. On the cupboard next to the stove, there is a soup box. Pour the boiling water in it and use the spoon on in. You will reveal a code (ZHYU).
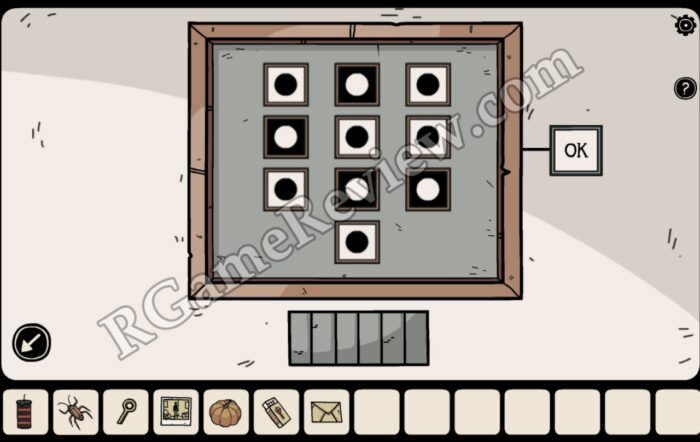
64. Go left and use the code above to open the closed door above the chest. Play the memory game – use the screenshot below as help, in case the positions are not randomized:

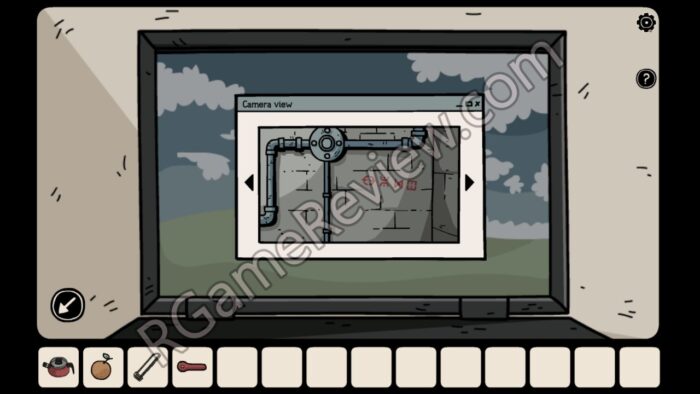
65. After you complete the puzzle, the second row will remain activated. Zoom into the table with the helmet and tap the smartphone. Use it to write the emoji code on the second row. It will send you a photo of an eye. Get the smartphone.
66. Go right and grab the smartphone, then tap rhe safe on the top shelf above the laptop. Get the yellow key inside.
67. Go all the way back to the first floor of the building and use the key to open the elevator. Use it to go to the fifth floor.

68. Tap the poster on the right wall to see what you need: a cockroach, a candle with lines, a crab claw and a pumpkin with a carved face.
69. Go back, right, and enter the gray door. Tap the boxes to zoom in, then tap the right box and get the pumpkin.
70. Go back and zoom in to the boxes near the blue shelves – you will see a hidden cat there. Then zoom in the shelves and get the photo behind the cactus. Finally, go back and zoom into the purple book on the table, then read it – the List of denizens turned shadow.
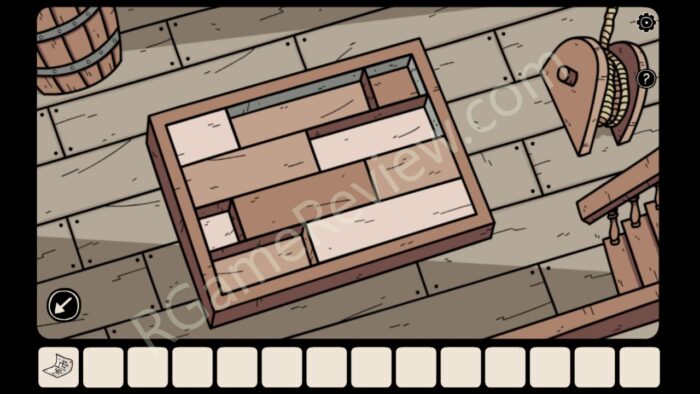
71. Go back, out the door and down the stairs. Solve the jigsaw puzzle on the table. It’s easy, just drag and drop the pieces, it should look like this:

72. The clue is the directions the hands are showing. Let’s go back and into the room forward (no door towards it). Zoom in on the cabinet by the wall and set the arrows as seen in the puzzle (top right, left, down, bottom right). Get the golden key handle.
73. Go right and tap the mat on the floor. Remove the broken tile and get the cockroach. Now let’s solve the puzzle on the wall in the next room!
74. Zoom into the trash bin and look at the pieces of paper to see the symbols and colors. Go back to the room to the left and click the wheel on the wall. Set the animals, colors and patters in order: purple fish with rainbow-like shapes, gray/blue apple with spots, and red frog with wires. Get the red key and black candle.
75. Go back and zoom into the painting on the wall. Use the red key to open the bird cage’s door and get the bird.
76. Go back and up the stairs, into the room with a gray door. Tap the paintings on the wall and place the bird on the tree to the right. Then tap the bird and remember the branches it lands on.
77. Under the paintings, there’s a shape similar to the paintings. You need to light the bulbs in the correct order, as seen in the image below, then press OK:
78. Get the screwdriver. Go back and down the stairs, then enter the elevator tot he right. Use the screwdriver to remove the lid under the control panel and get the door knocker.
79. Place the door knocker on the red door and tap to open. Tap each window on the house, as well as the door, to see the code. Also, tap the bottom of the red drape to see the hidden cat.
80. Go back up the stairs and through the gray door, then tap the big panel near the door. Using the hints from the house, solve the puzzle (as seen below) then press OK:
81. Get the electrical fuse. Go back through the red door and zoom into the area next to the blue coat on the hanger. Place the fuse there and count the lights of each color. (Note: in the area where you places the fuse, you can tap the corner of the newspaper to see another hidden cat).
82. Go downstairs and zoom into the safe. Using the number of colored lights from before, open it (code: 4 red, 8 blue, 3 purple, 6 green). Get the ticket and red paint.
83. Go back and right into the next room. Use the paint on the corner of the room (there are hints about this in the photo you picked up earlier, as well as the notebook on the desk in that room).
84. Tap the red shape of the man twice and he will start showing you some numbers on his fingers: 6, 9, 2, 4. Tap the board with dice on the left and press the dice with those numbers, then OK. Get the ice bucket.
85. Get back to floor #3 and all the way into the kitchen. Fill the ice bucket with water and place it into the freezer. Then place the key handle in the water and close the freezer. Then open it again and get the key handle with star-shaped ice.
86. Go back to the hallway (where the elevator is) and open the box on the wall with the star-shaped key. Get the knife. Use the knife on the pumpkin to get the pumpkin with a carved face.
87. Go up to the 5th floor and up the stairs. Tap the panel on the wall, between the doors, then grab the ticket and use it in the slot under the masks. Tap the stage and play the memory game. Look at the hats of the dwarves (correct answer: option 1 at the top), then option 4 (bottom), option 2, and 3. Get the crab claw.
88. Go back and into the red room. Tap the ceremonial thingie on the floor and place the black candle, cockroach, pumpkin and crab claw. Light up the candles using the matchbox. Enjoy the ending…
…Or NOT?
This is it! You have completed the spectacular Beyond the Room, and I am sure that this walkthrough came in handy. If you still have questions, let me know down in the comments section and I will help ASAP.
If you’re looking for other amazing escape the room or hidden object adventure games to play, I recommend taking a look at the Rooms & Exits game, the Rusty Lake games, the Doors Escape Series or the Escape Mystery titles from Haiku Games.