
Death at Fleming Manor is an adventure game right up my alley: it plays a bit like a hidden object mystery game, it is extremely challenging and makes you think. In today’s world of cheap entertainment, that’s a big thing.
Of course, this also means that we’re dealing with a difficult game to beat and, more often than not, you might get stuck. If that’s the case, you’re at the right place: today, I am here to share a complete Death at Fleming Manor walkthrough, episode by episode.
Today, I will take a different approach to the regular walkthrough-type article. Instead of showing you everything you must do, I will first offer some hints that will help you solve the case yourself. And if you still can’t figure it out, I’ll have the full solution as well.
This approach preserves the satisfaction and fun factor to the maximum and I hope you like it. Let me know what you think about it in the comments down below!
Now, let’s start the Death at Fleming Manor walkthrough with the first 5 episodes. Use the menu below to jump straight to the episode you care most about, and come back soon for the rest of the episodes!
- Episode 1: An Unexpected Accident Walkthrough
- Episode 2: The Clock Tower Incident Walkthrough
- Episode 3: The Iron Scalpel Walkthrough
- Episode 4: Breathless Death Walkthrough
- Episode 5: The Heirs Walkthrough
Episode 1: An Unexpected Accident

You need thirty-four clues before beating this episode, and each sits behind the shiny effect, so investigate anything that glints.
Since you’re just starting, I have to mention that bodies, purses, and the car’s glovebox matter, with the individual items inside the purse and the glovebox being clues. The final batch comes from the medical book, where you click every underlined word on the pages you can reach.
Apart from these things that get you closer to beating the level without any extra help, take note of the windshield on the passenger’s side, the alcohol bottle and the blood on the steering wheel. I skipped past these on my first look at the car and regretted it when the death certificate arrived.
Scene 1, Crashed Car
Here’s exactly what to look for (I will have screenshots of the solutions below, in case you still can’t figure things out):
- Glovebox, map: Oak Hill, Lakeside Junction, Fieldview Crossroad, Cedarvale Fork
- Glovebox, rental car information: Motor Car (from Motors), Derek, Walker
- Purse, lighter: Brown
- Purse, letter: Daisy, Stockbroker, Lauren
- Purse, newspaper (second page): Doctor, Sophia, Fleming, Nurse, Eleanor, Ainworth, Artist
Scene 2, Crash Site
- Bag, anatomy book: Rupert
- Bag, notebook: Bike
- Injured man’s body: Student
- Wallet, letter: Electrician
Scene 3, Medical Book
- Central, Peripheral, Brain, Spinal Cord, Dizziness, Memory Loss, Cervical, Tetraplegia, Thoracic, Lumbar, Paraplegia, Numbness
Form 1: Names
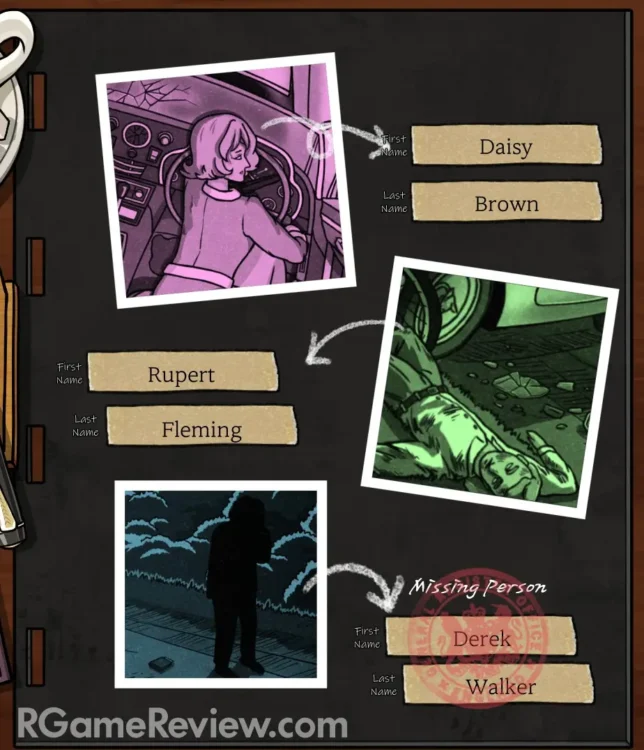
You have three photos: the victim, the person who got hit, and the missing person. The photo of the missing person focuses on the wallet. This form answers itself, but here it is:
- First picture: Daisy Brown
- Second picture: Rupert Fleming
- Third picture: Derek Walker
Form 2: Blood Testing
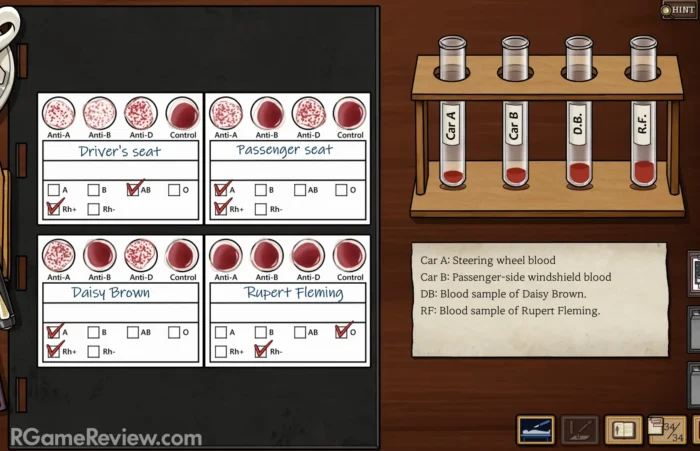
Once the names are done, talk to the forensic pathologist about the body and answer his three questions. If you took every blood sample, he will let you run blood tests, and you will discuss your evidence with him to receive the vials. Follow the chart in the medical book only.
- Driver’s seat: Car A vial, blood type AB with Rh+
- Passenger seat: Car B vial, blood type A with Rh+
- Daisy Brown: D.B. vial, blood type A with Rh+
- Rupert Fleming: R.F. vial, blood type O with Rh-
Forms 3 and 4: My Hints
The crash happened at a T-bone junction with a tree at the fork. The camera angle shows nothing but fields in the opposite direction, so there is no tree or landmark on that side, and the lack of landmarks tells you something as well.
The map does not share the orientation of the crash site, so use the sun for that. It sets in the west, and the path opposite the tree points toward the setting sun, which makes it the west road.
Flip the map 90 degrees to the right and compare. The crash has to be at Oak Hill, Lakeside Junction or Cedarvale Fork, because all three share a tree at a T-bone.
Form 3: Daisy Brown’s Death Certificate
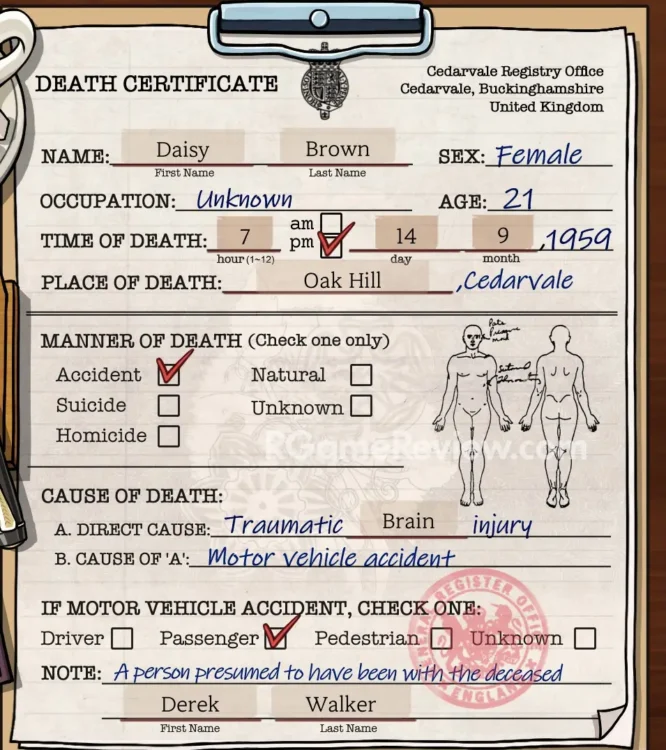
The cause of death comes down to one question: what did she hit her head on? The pathologist reports blunt force trauma to the head and none to the chest, and the driver’s side windshield is not cracked at all, so the passenger side windshield you made a note of earlier deserves a second look. Unless she drove off the road deliberately or the car was sabotaged, this reads as an accident.
The real crux is her role. Daisy was found in the driver’s seat, but nothing else proves she was driving. Blood matching hers was in the passenger seat, while blood that does not match hers sat in the driver’s seat where she was found. Connect those dots and the role field fills itself in.
- Name: Daisy Brown
- Time of death: 7 pm, Day 14, Month 9
- Place of death: Oak Hill
- Manner of death: Accident
- Cause of death: Traumatic Brain Injury
- Motor vehicle accident: Passenger
- Note: Derek Walker
Form 4: Rupert Fleming’s Emergency Medical Record
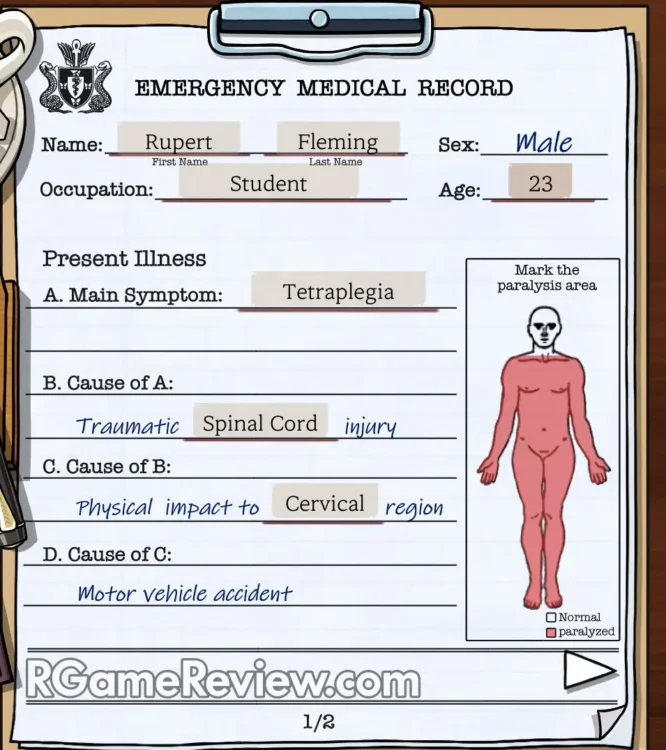
This form asks for Rupert’s age, and you have to calculate it yourself: the year on the newspaper minus the birth date on his ID. Rupert’s own dialogue is the only thing that tells you how bad his injuries are and what caused them, so listen to him. The accident type sounds odd on paper, since a cyclist hit by a car falls under a category you probably would not guess, and the answer below shows which.
On the first page of the form, click the body diagram and turn everything below the neck red.
- Name: Rupert Fleming
- Occupation: Student
- Age: 23
- Main Symptom: Tetraplegia
- Cause of A: Traumatic Spinal Cord injury
- Cause of B: Physical impact to Cervical region
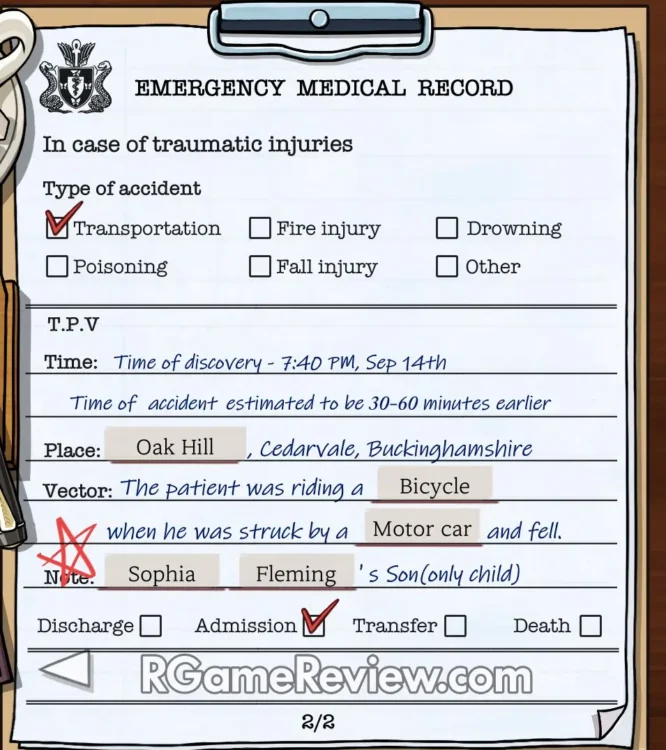
- Type of Accident: Transportation
- Place: Oak Hill
- Vector: Bicycle and Motor Car
- Note: Sophia Fleming
Episode 2: The Clock Tower Incident
Work from the upper floors down. Investigate the hanging body and the nursing locker room first, then take the ground level, where you should investigate every shiny item and talk to every character you can reach. The last clues come from underlined words in the medical book.
Scene 1, Clock Tower
- Note the note at the jump point
- Hanging body, Elite Motors: Elite, Motors, John, Walker
- Hanging body, letter: Derek
- Hanging body, clock repair manual: Clock Tower, Clockface, Hour Hand, Minute Hand
- Nursing locker room on the right, nursing shift: Nursing
- Nursing locker room on the right, locker and handover note: Green, Hawkins
Scene 2, Ground Level
- Doctor, pen: Henry
- Welcome to Fleming Manor sign: Visitors, Caretaker
- Man on the right, dialogue: Benedict
- Letter: Logan, Ashford, Sophia, Fleming, Inspector
- Logbook: Doctor, Palmer, Basement
Scene 3, Medical Book
- Neck, Hypoglossal Nerve, Thyroid Cartilage, Jugular Vein, Vagus Nerve, Carotid Artery, Amputation, Crush, Penetrating, Laceration, Asphyxia, Suffocation, Strangulation, Smothering, Choking, Hanging, Ligature, Manual, Complete, Incomplete, Hypovolemic, Cardiogenic, Distributive, Obstructive
Form 1: Names
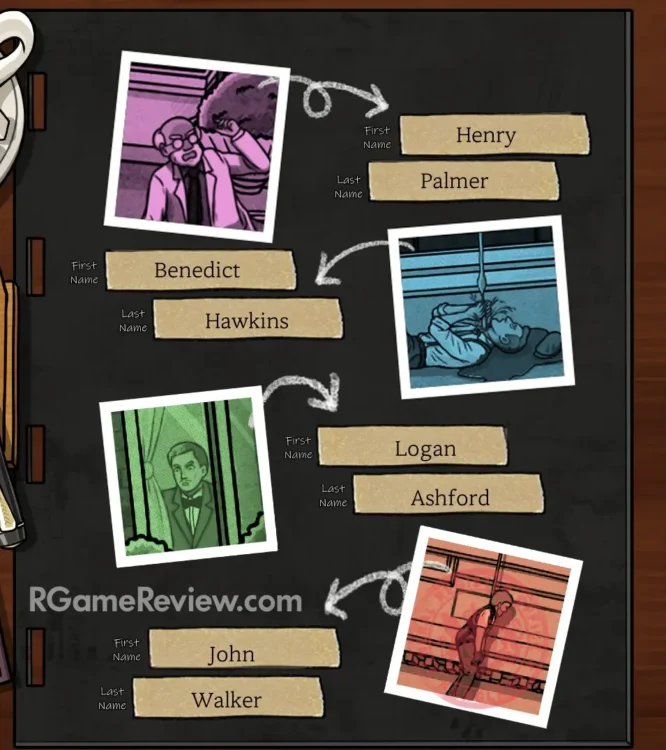
Everyone here carries something bearing their initials, with the exception of the man inside. Use that to match faces to names.
- First picture: Henry Palmer
- Second picture: Benedict Hawkins
- Third picture: Logan Ashford
- Fourth picture: John Walker
Form 2: Handwriting Analysis
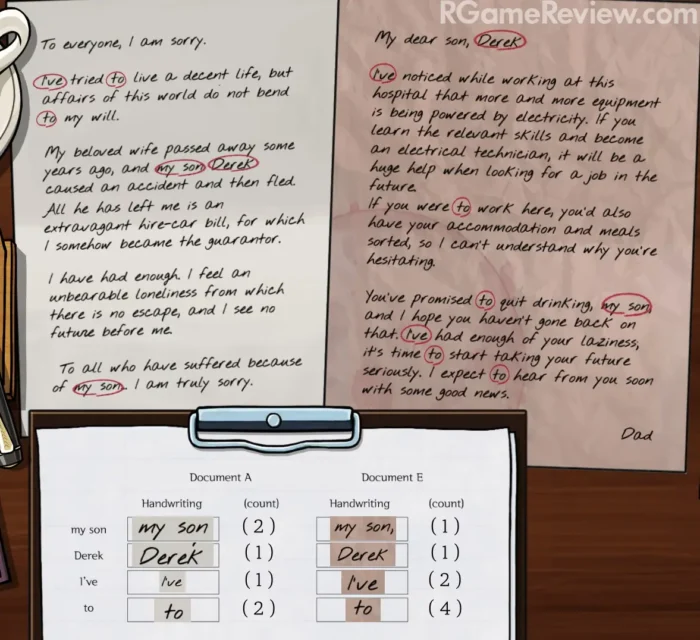
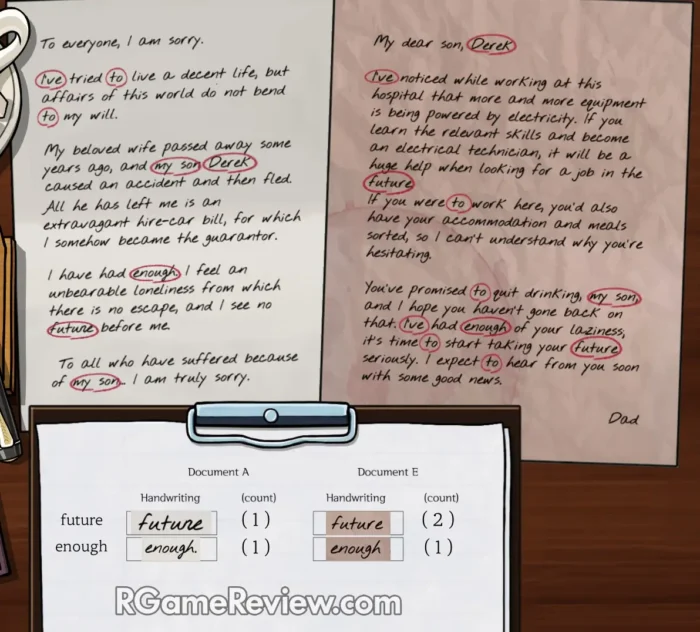
The note needs a second document to be compared against. Ask yourself who else has written to their son Derek, and select Document E when the game asks for the match.
Next comes the marking. On both documents that appear, click every instance of “my son”, “Derek”, “I’ve” and a lowercase “to”.
I fell into the trap with that last one: it only counts when it sits before a verb with a lowercase t.
A capital “To” used to address someone does not count. You should end up with 6 words marked on the first document and 8 on the second.
Here’s the screenshot of the completed Form 2:
Forms 3 and 4: My Hints
Both death certificates arrive partly filled in, but not with names. What you get is the cause of death with a photo of the deceased as the icon.
The hard part is the time and date of death, since the two men appear to have died at the same moment. Fill in AM or PM based on your findings. Form 4 needs only the date, while Form 3 needs the time, AM or PM, and the date.
Here is the chain of clues I followed:
- The doctor says Benedict has just come off his shift.
- The shift handover note in the locker urgently tells Benedict to mail a letter, and the note came from Green.
- The outgoing mail has not been collected yet.
- The cause of death is a clock hand, and a broken clock displays the exact time it broke.
- The nursing schedule shows only one day on which Benedict can follow after Green and also leave work before the mail is collected.
Form 3: Benedict Hawkins, Hypovolemic Shock Victim
The tricky part is which part of the neck took the fatal injury. Ask what would cause urgent, gushing bleeding, and refresh your memory on the difference between a vein and an artery before you pick.
- Name: Benedict Hawkins
- Occupation: Nurse
- Time of death: 3:30 pm, Day 18
- Manner of death: Accident
- Cause of A: Carotid D. [Verify]
- Cause of B: Penetrating
- Cause of C: Minute hand
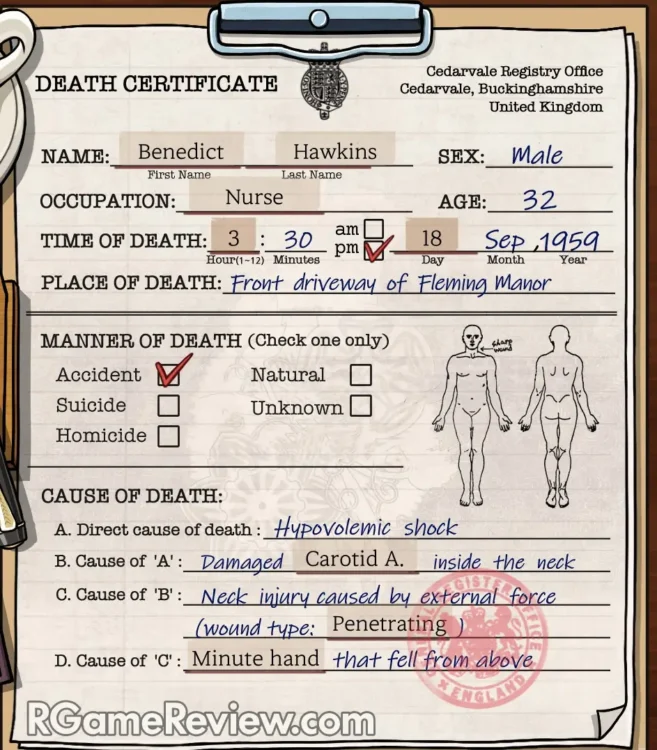
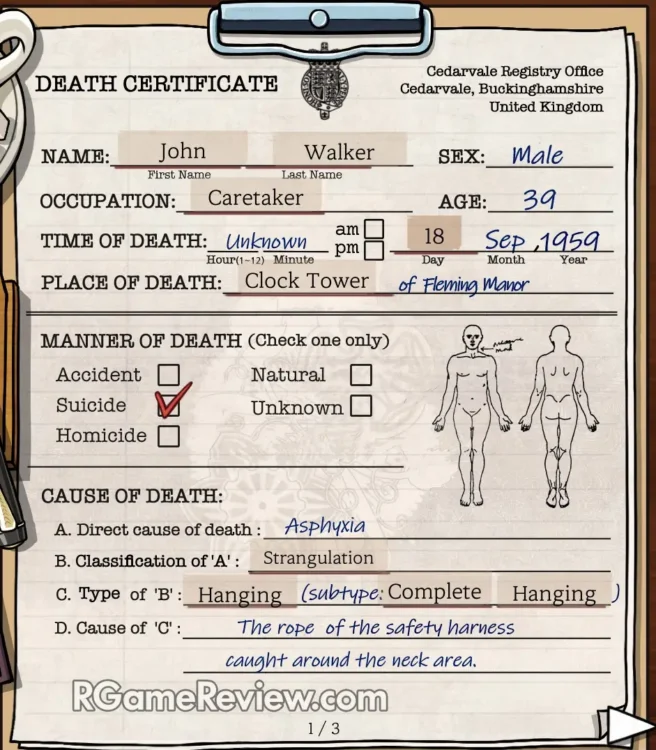
Form 4: John Walker, Asphyxia Victim
A fall protection harness has no business being wrapped around someone’s neck. The manual notes it wasn’t tied correctly, which rules out an accidental fall. Here is what you should fill up:
- Name: John Walker
- Occupation: Caretaker
- Time of death: Day 18
- Place of death: Clock Tower
- Manner of death: Suicide
- Classification of A: Strangulation
- Type of B: Hanging (Subtype: Complete Hanging)
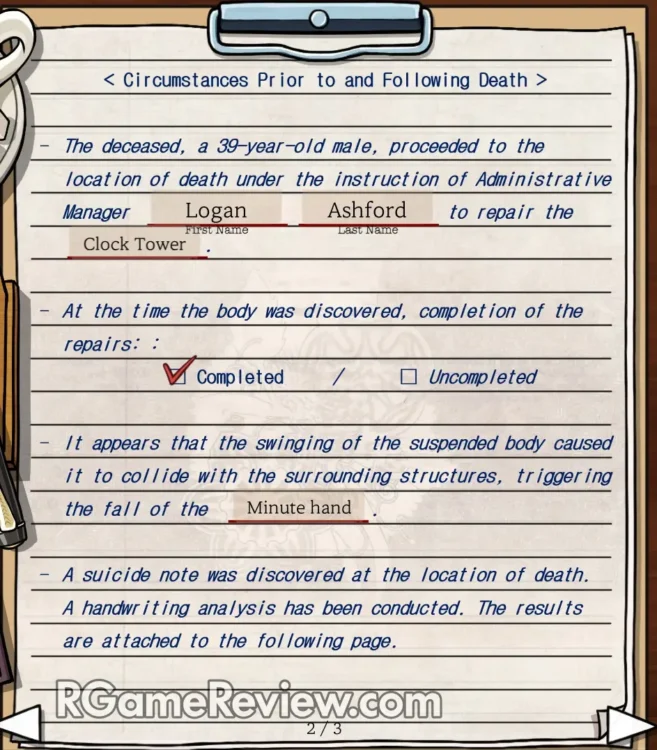
The next page covers what he was trying to repair, and his note mentions something about a gear. The entries are:
- First paragraph: the first two blanks are Logan Ashford, and the last blank is Clock Tower
- Second paragraph: tick the Completed box
- Third paragraph: Minute hand
After you submit the form, the chief inspector asks three questions. Here is how to answer them:
- Yes
- Yes
- No
Speak with the pathologist and review the body again. You recheck the notes and look for words of six letters or longer. Two words appear in both letters: “future” and “enough”. Mark every instance, which comes to 2 words on the first document and 3 on the second. Once that is done, things change:
Form 6
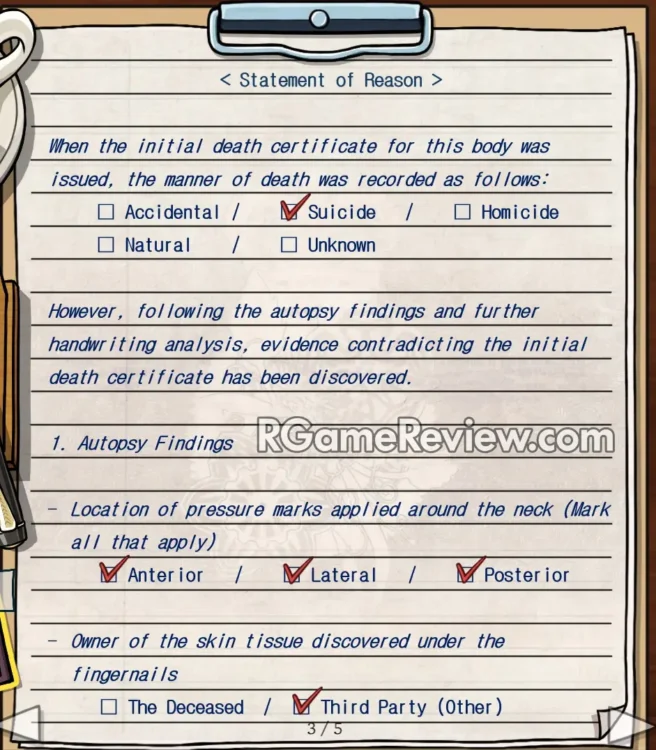
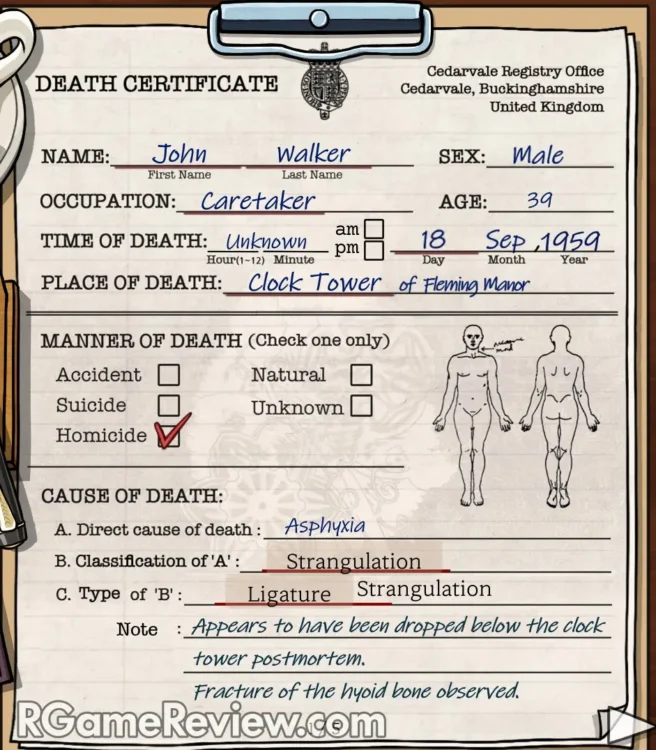
This is an amendment to the certificate you already filed for John Walker, with a new page asking for your reason for amending.
He was still strangled with a rope, and only a couple of fine details need changing. The reason for amending is partly based on your original report, so repeat what you ruled the first time.
- Name: John Walker
- Manner of death: Homicide
- Classification of A: Strangulation
- Type of B: Ligature Strangulation
Here are the screenshots with everything filled correctly:
Episode 3: The Iron Scalpel
Episode 3 moves you do a different, very complicated job. Now, you must fill in paperwork for injured soldiers, covering name, ID number, rank, section, injuries, state of consciousness and triage level.
You can fill in a tag and wander through the rest of the group, but every tag has to be correct before you hand the group over to Sophia.
Each tag below lists name, Army No, rank box, section, major injuries, consciousness and triage level, so you know exactly what to do if you can’t figure it out.
The Rules Worth Keeping in Mind
The paper on the right lists, from left to right, ID number, rank, name and duty, with duty meaning the soldier’s job or role. Soldiers are also sorted by section, which is their assignment. Each of these details can identify a patient.
The book on the right covers insignia, the triage levels, and the specific definitions of both the triage levels and consciousness.
Triage cares about one thing, which is how urgently someone needs help to stay alive. Extreme pain does not make someone Immediate unless the wound itself is urgent, and anyone who cannot be saved with the current state of medicine is Expectant.
The name list is finite, so process of elimination does a lot of work, especially with the small number of corporals. Once a soldier is injured he is out of commission, so the word bank shrinks each day.
When a patient cannot talk, you need their tags or you need to go back and listen to other soldiers.
With these in mind, let’s get into solving the episode!
Day 1
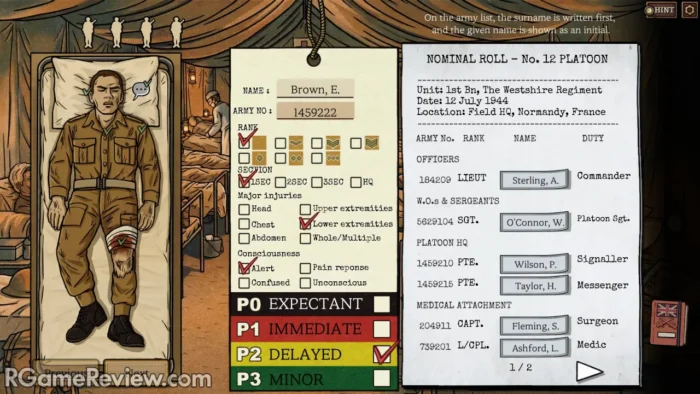
Patient 1. This patient is in too much pain to self-identify but can still hold a conversation, which makes them alert. The only visible wound is the leg. They need help, but they are not bleeding badly. Fill up:
- Brown, E. | 1459222 | first box | 1SEC | Lower extremities | Alert | P2 Delayed
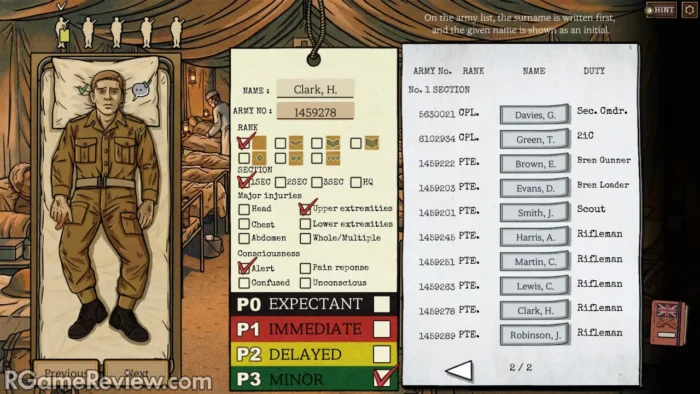
Patient 2. A freebie. He is perfectly lucid and can identify himself. Remember who he says protected him, because it matters for patient 3. Fill up:
- Clark, H. | 1459278 | first box | 1SEC | Upper extremities | Alert | P3 Minor
Patient 3. One of the two corporals. Patient 2 said his section commander took a grenade to the arm, so check whether that matches this patient’s condition. The abdomen entry on this tag tells you how that comparison turns out. Fill up:
- Green, T. | 6102934 | third box | 1SEC | Abdomen | Unconscious | P0 Expectant
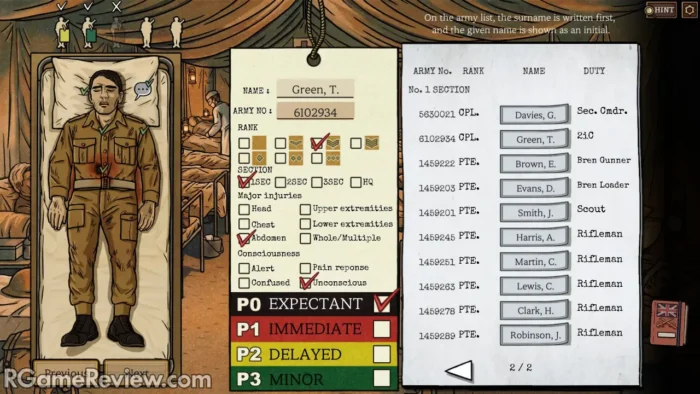
Patient 4. Severe abdomen damage, and otherwise easy to identify. Fill up:
- Martin, C. | 1459251 | first box | 1SEC | Abdomen | Pain response | P1 Immediate
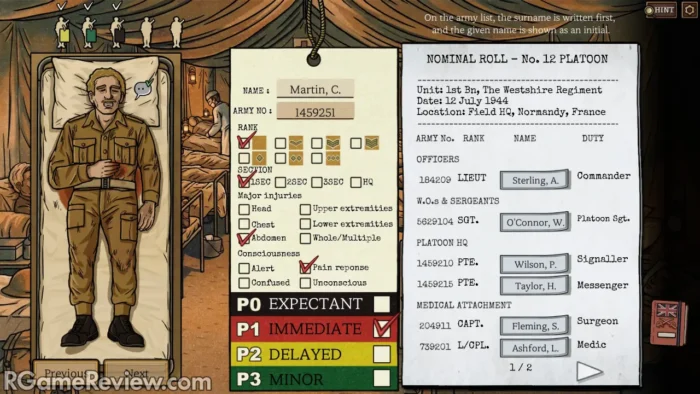
Patient 5. Every identifying detail has burnt away, and all you know is that something burnt this patient’s arm. They are lucid enough to ask for morphine. Fill up:
- Davies, G. | 5630021 | third box | 1SEC | Upper extremities | Alert | P2 Delayed
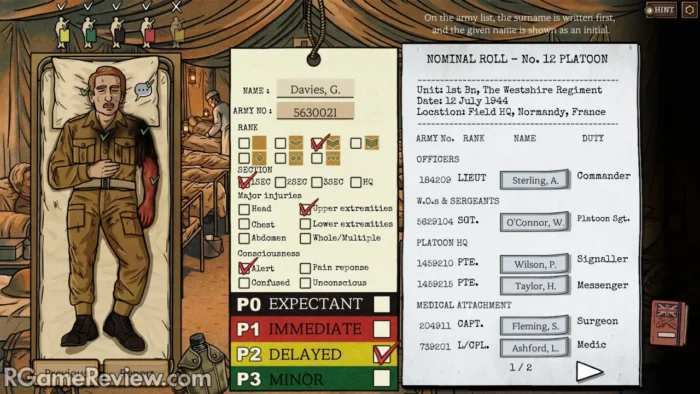
Casualty form. Write in how many of each tag you handed out:
- Immediate: 1
- Delayed: 2
- Minor: 1
- Expectant: 1
- Total Casualties: 5
Day 2
Patient 1. No pupillary response and an inoperable head wound, so this one is easy to identify. Pulse does not matter when the patient cannot be operated on.
- Harris, A | 1459245 | first box | 1SEC | Head | Unconscious | P0 Expectant
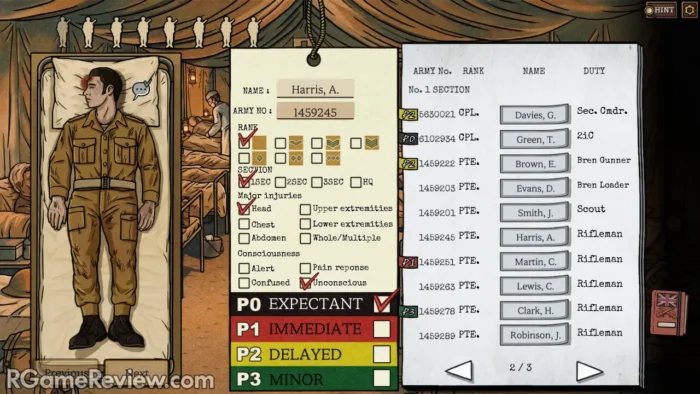
Patient 2. One of four No. 2 corporals (both No. 1 corporals were badly wounded yesterday). Check whether the tag is readable enough to identify them.
- Williams, R | 6103102 | third box | 2SEC | Lower Extremities | Pain response | P1 Immediate
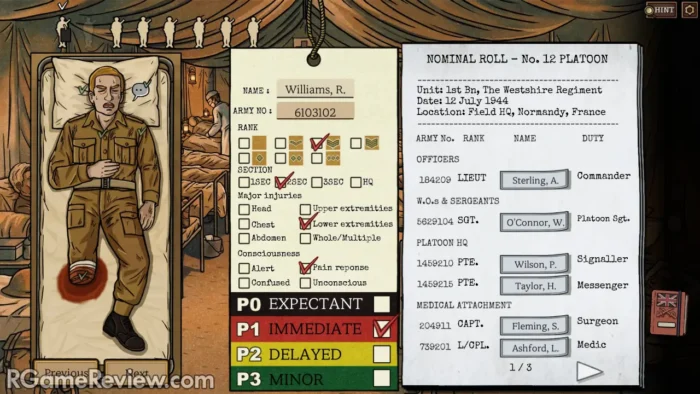
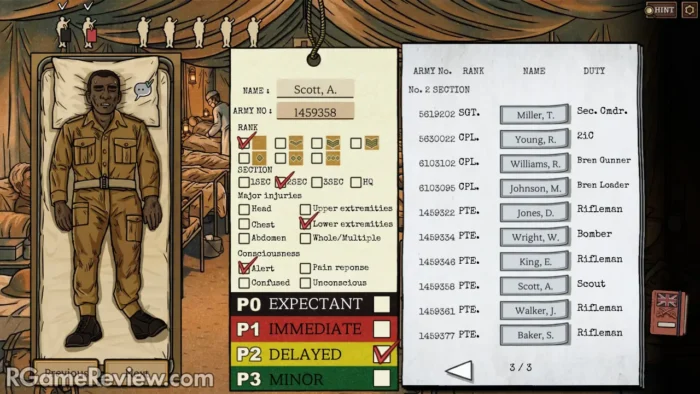
Patient 3. The ID tag has a 93 in the number, which narrows things down very little, so role becomes the tiebreaker. Ask what this patient was doing when they broke their ankle.
- Scott, A. | 1459358 | first box | 2SEC | Lower extremities | Alert | P2 Delayed
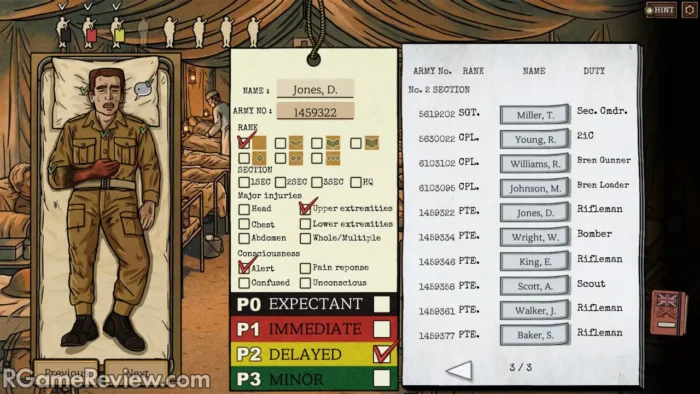
Patient 4. The last digit of the ID is 2.
- Jones, D. | 1459322 | first box | 2SEC | Upper extremities | Alert | P2 Delayed
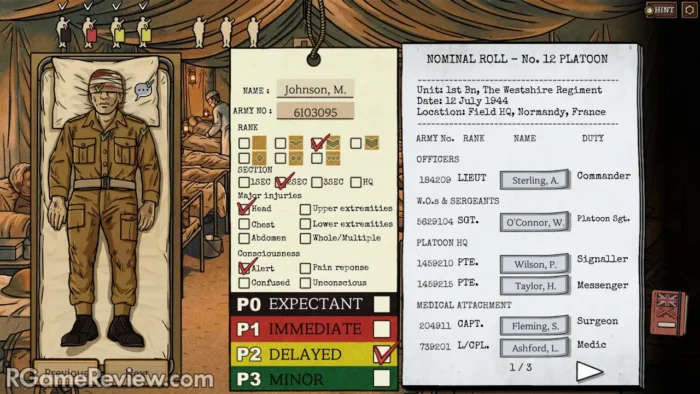
Patient 5. A corporal with the first initial M.
- Johnson, M. | 6103095 | third box | 2SEC | Head | Alert | P2 Delayed
Patient 6. The ID starts with 1459 and the first initial is C.
- Lewis, C. | 1459263 | first box | 1SEC | Abdomen | Alert | P2 Delayed
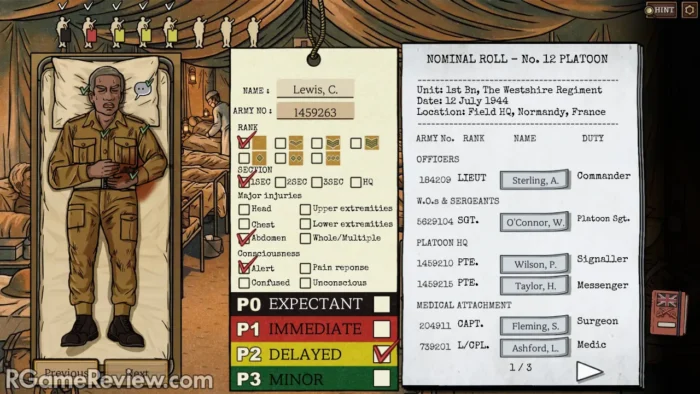
Patient 7. The only identifying detail is the last name, and the injury type is quirky. Ask which part of the body you would link to extreme stress, especially in a delirious patient.
- Baker, S. | 1459377 | first box | 2SEC | Head | Confused | P3 Minor
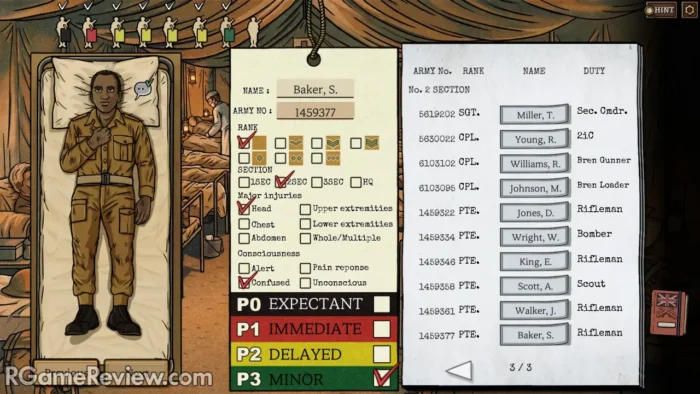
Patient 8. Our old friend. The surname should ring a bell.
- Walker, J. | 1459361 | first box | 2SEC | Lower extremities | Alert | P1 Immediate
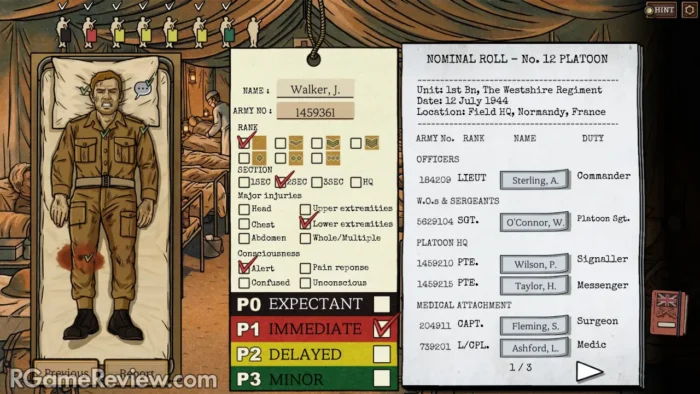
Casualty Report 2. Note: Yesterday’s patients are grayed out.
- Immediate: 2
- Delayed: 4
- Minor: 1
- Expectant: 1
- Total Casualties: 8
Day 3
I hope you’re ready for even more patients, because that’s what you get! Here is how to solve each case:
Patient 1.
- Stuart, A. | 1459459 | first box | 3SEC | Head | Alert | P2 Delayed
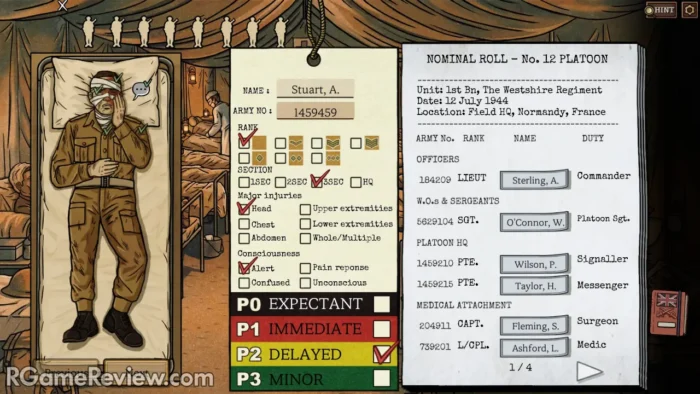
Patient 2.
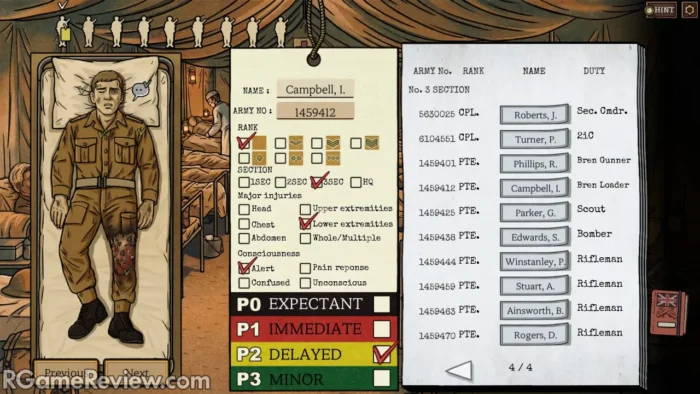
- Campbell, I. | 1459412 | first box | 3SEC | Lower extremities | Alert | P2 Delayed
Patient 3.
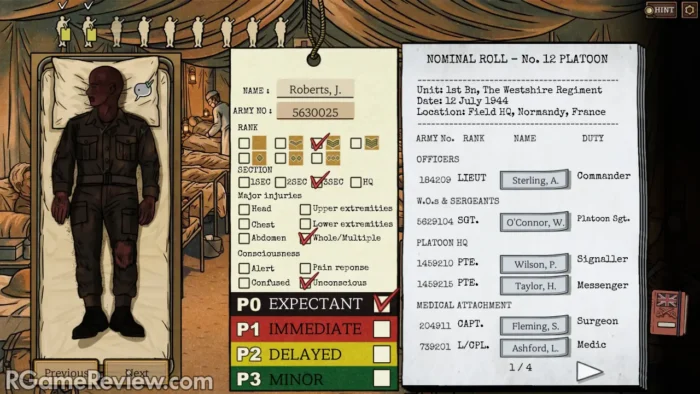
- Roberts, J. | 5630025 | third box | 3SEC | Whole/Multiple | Unconscious | P0 Expectant
Patient 4.
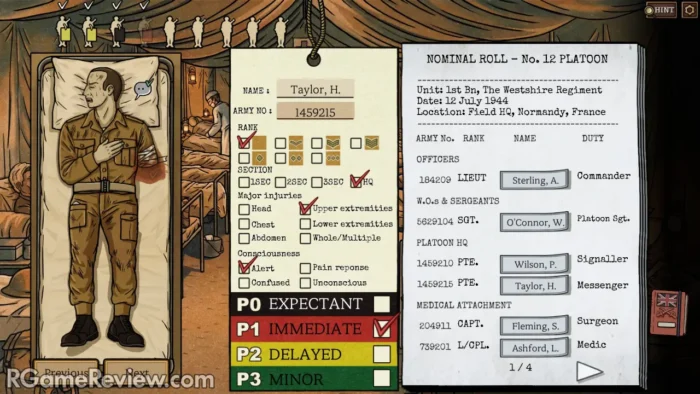
- Taylor, H. | 1459215 | first box | HQ | Upper extremities | Alert | P1 Immediate
Patient 5.
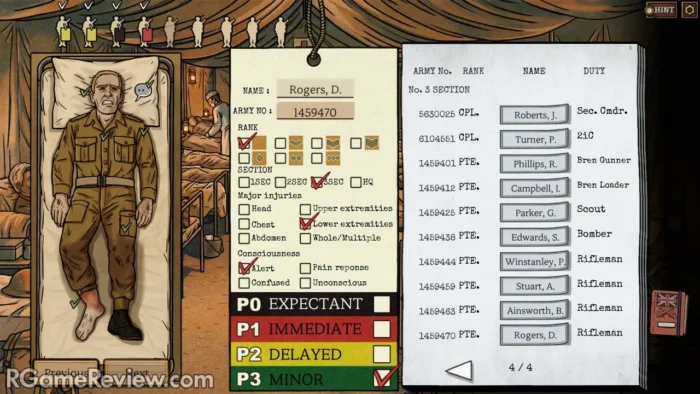
- Rogers, D. | 1459470 | first box | 3SEC | Lower extremities | Alert | P3 Minor
Patient 6.
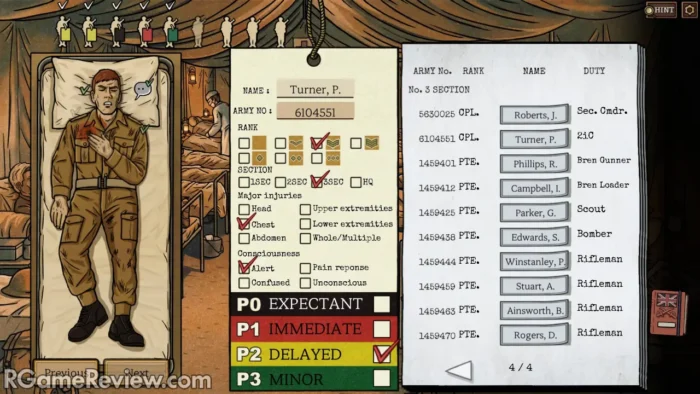
- Turner, P. | 6104551 | third box | 3SEC | Chest | Alert | P2 Delayed
Patient 7.
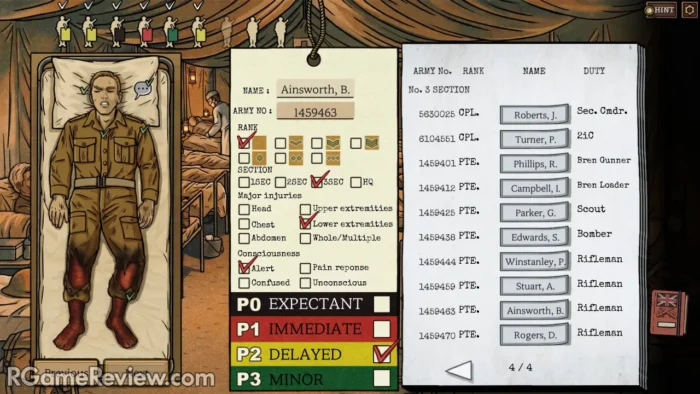
- Ainsworth, B. | 1459463 | first box | 3SEC | Lower extremities | Alert | P2 Delayed
Patient 8.
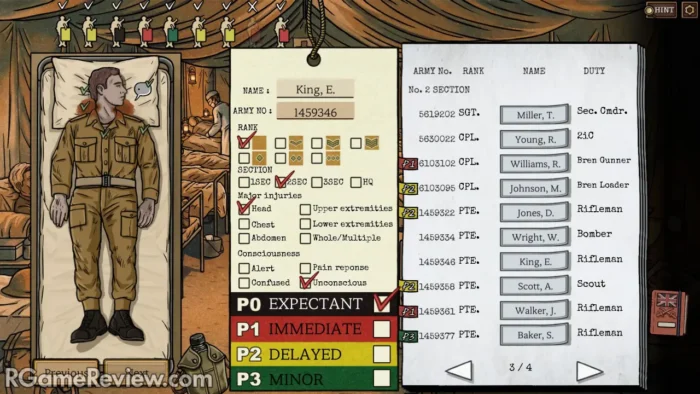
- King, E. | 1459346 | first box | 2SEC | Head | Unconscious | P0 Expectant
Patient 9.
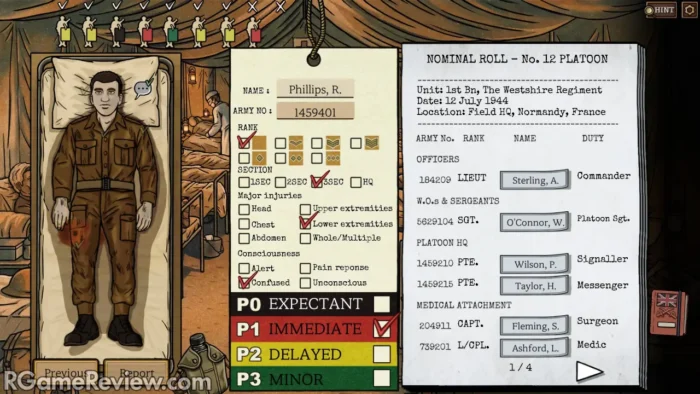
- Phillips, R. | 1459401 | first box | 3SEC | Lower extremities | Confused | P1 Immediate
Casualty Report 3“.“
- Expectant: 2
- Immediate: 2
- Delayed: 4
- Minor: 1
- Total Casualties: 9
Sophia’s Two Picks
Once the reports are in, Sophia asks you to choose two patients from the list.
- First patient: you need someone who is alive, on P0 status and has healthy skin to graft. The answer is Harris.
- Second patient: Sophia wants another set of hands and suggests the one whose leg she operated on yesterday. The answer is John Walker.
Episode 4 Walkthrough: Breathless Death
Treat the first phase like a vacuum cleaner. You need to hoard every specific word for the upcoming paperwork.
In Scene 1 (the Bedroom), note the old woman’s cyanotic fingertips immediately. Then grab these terms from the environment:
- Newspaper: Cigarette Holder, Hot Tea, Teaspoon
- Doctor: Penlight, Pocket Knife
- Nurse Dialogue: Hampton
- Inventory: Bandage, Thermometer
- How To Survive 3rd Floor: Violet, Nurse, Margaret, Pembroke, Lavina, Templeton, Elenor, Ainsworth, Artist
- Nursing Notes: Aspirin, Gipson, Morphine, Morris, Green, Tafenol, Jones
- Dog Food Bowl: Chester
- Loose items: Syringe, Palette Knife, Corkscrew, Brandy
- Shot Glass: Stirring Rod
In Scene 2 (Hallways), you need these:
- Lady: Barker
- Fallen Man: Playing Cards, Wilfred, Stanley, Keys
Scene 3 (the Medical Book): Click all the underlined words to add them to your pool: Hypovolemic, Cardiogenic, Distributive, Obstructive, Asphyxia, Suffocation, Strangulation, Smothering, Choking, Hanging, Ligature, Manual, Anaphylaxis, Epinephrine, Tracheostomy, Thyroid, Cricoid, Tracheal, Cricothyrotomy.
Form 1: Identifying the Cast
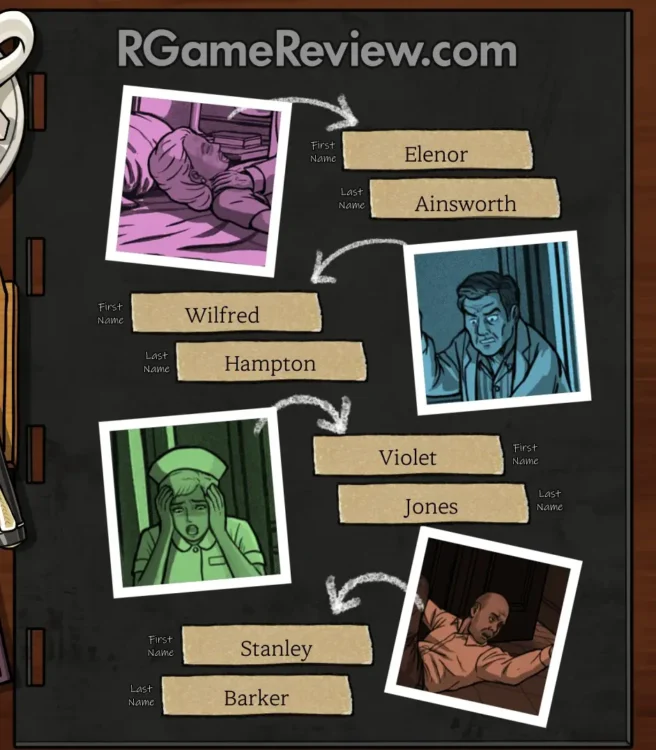
First off, you have to match the correct names with the given images. The current nursing notes are unsigned because the shift was interrupted mid-stride. You can deduce the current nurse from context clues since all the nurses have pretty distinct handwriting. The briefing already told us we are here for the death of Elenor Ainsworth, the woman currently in a bad state.
Match the pictures like this:
- First picture: Elenor Ainsworth
- Second picture: Wilfred Hampton
- Third picture: Violet Jones
- Fourth picture: Stanley Barker
The Doctor’s Witness Statement Trap
There are five pages in this witness statement, and you need to fill in the blanks after proper investigation. You are figuring out what improvised tools they used on the fly using the medical book and pathologist’s findings.
He needed a sharp object he had in his pocket (Pocketknife) and a disinfectant. Disinfectants are typically alcohol based, which points directly to Brandy.
The tube-like object has to be dull. It also needs to be long and thin. You need something shaped somewhat like a pen or pencil, making the Cigarette Holder your only answer.
Then comes the map puzzle, which drove me completely crazy. He went for the first aid kit. The statement asks what room it is in, but it actually means what room it is outside of.
The map in the hallway shows fire extinguishers, a first aid kit, stairs, restrooms, and layouts of each room. Each room type has two copies differing by windows, which way the door opens, size, and bed location. Only one room matches.
Pay attention to this warning: The map is not oriented the same way as the room!
Here are the exact answers for the five pages:
- Page 1: Dr. Wilfred Hampton comes at the top, with Mr. Barker as your second blank. The room is 304, and the patient’s name is Elenor Ainsworth, with the nurse being Violet Jones.
- Page 2: The room is 309, and you should tick the right box here.
- Page 3: Nothing to fill.
- Page 4: Brandy comes in the first blank, with Pocketknife in the second and Cricothyrotomy in the third. The last two blanks are Thyroid and Pocketknife. Tick the vertical box on this page.
- Page 5: Use the words Cigarette Holder for the first blank. Next comes Epinephrine and Penlight. This completes the doctor’s statement.
The Nurse’s Witness Statement
This section is nothing but a basic reading comprehension test. You already know the names of everyone involved. The medicine and the dog are readily available facts in your notes.
- Page 1: The nurse’s name, Violet Jones, comes in the first two blanks. Next is Elenor Ainsworth, and the final blank is Tafenol.
- Page 2: Dr. Wilfred Hampton comes in the first two blanks, with Chester coming in the last blank.
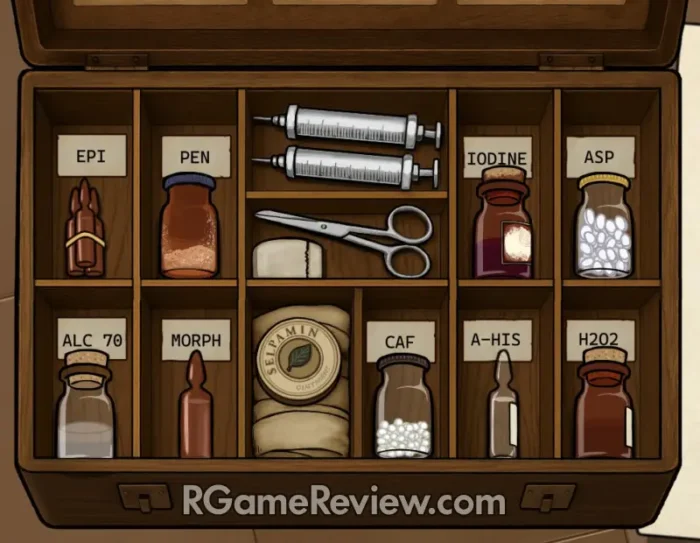
Arranging The Medicine Case
Baker refuses to give a statement until you organize the first aid kit. I failed this section multiple times before finally reading the actual storage rules.
The box features shortened labels, like H2O2 for hydrogen peroxide. Put the specific medicine bottles and containers in their respective locations based on these constraints:
- Anything photosensitive belongs in a brown bottle.
- All antiseptics go in multiuse bottles.
- Penicillin is the only powder in the kit.
- The ampoules are not labeled, but some are 1 ml and some are 2 ml. You have to eyeball the physical size to place them.
- Caffeine and aspirin are both white tablets. Caffeine is 100 mg based on the newspaper clue, and aspirin is 300 mg. The aspirin tablet is way bigger.
Here’s what it looks like, if you still can’t figure it out:
Caretaker’s Witness Statement
Now we have the context for the second flashback. The patient with the cat saw him drop the kit. The survival guide mentions other patients, specifically a woman with an anxiety issue that bothered the nurses.
She could not sleep, stole the kit, and kept it in her room. She was next to a specific place, and only one room matches the description.
- Page 1: The caretaker’s name is Stanley Barker, and the doctor is Wilfred Hampton.
- Page 2: The room is 303, and the name is Margaret Pembroke.
- Page 3: The first name is Lavinia Templeton, and the second name is Margaret Pembroke.
Form 2
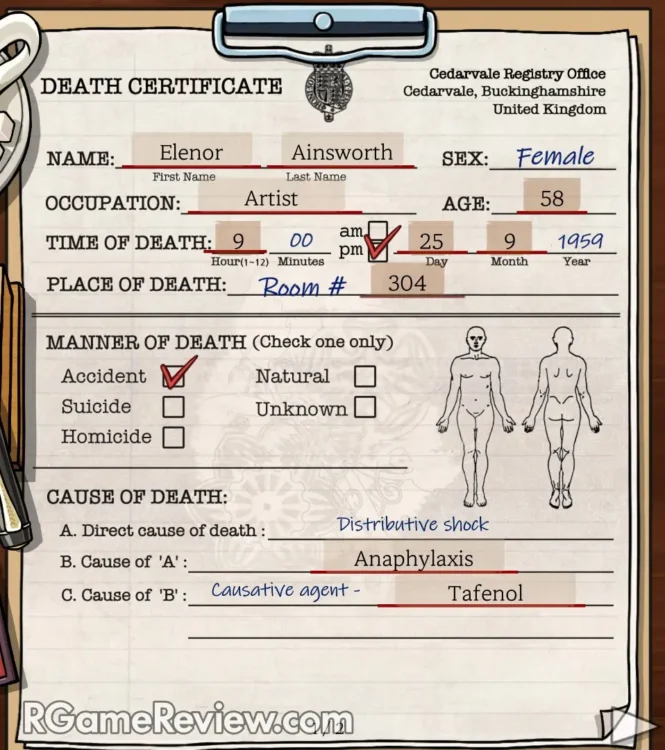
Now you have to create a proper death certificate using the information gathered so far. We lack Elenor’s age or birth year, but we do have the year of her first exhibition in the newspaper, which is 1927. Her autobiography states she was 26 at the time. Combine that math with the year of her death (Day 25, Month 9) to get her current age of 58.
The nursing notes are incomplete because they were interrupted. They are quite thorough and clearly dated, however. The witnesses mentioned the victim passed at the time of the final chime.
Fill out the certificate details as follows:
- Name: Elenor Ainsworth
- Occupation: Artist
- Age: 58
- Time of Death: 9 pm, Day 25, Month 9
- Place of Death: Room 304
- Manner of Death: Accident
- Cause of A: Anaphylaxis
- Cause of B: Tafenol
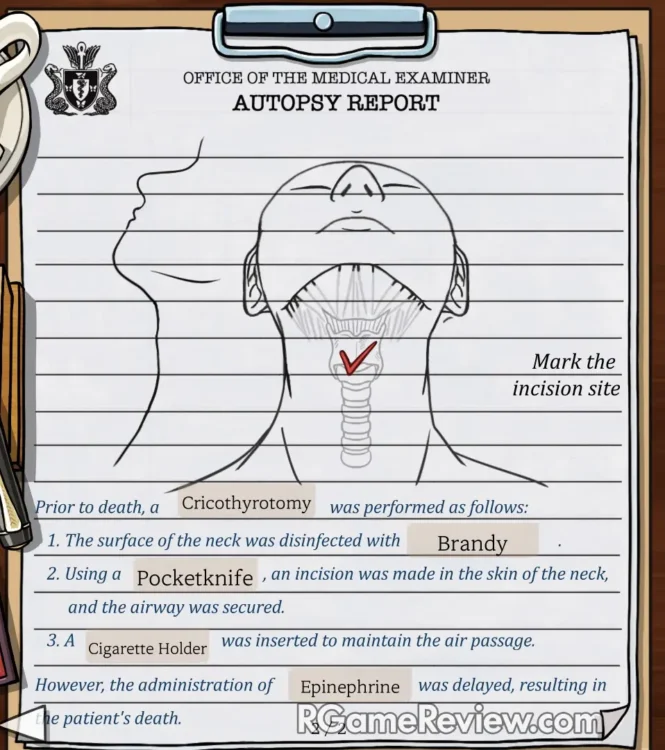
The blanks on the next page are Cricothyrotomy, Brandy, Pocketknife, Cigarette Holder, and Epinephrine. Finally, mark the location of the incision on the throat diagram to clear the challenge.
Episode 5 Walkthrough: The Heirs
Start by examining every available scene and clicking the shiny objects to collect their clues. Check the medical book too.
Names
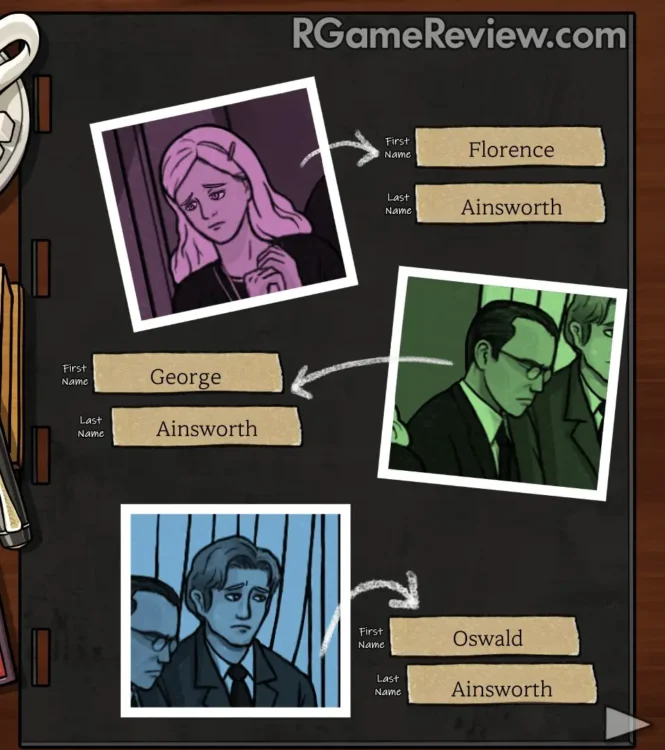
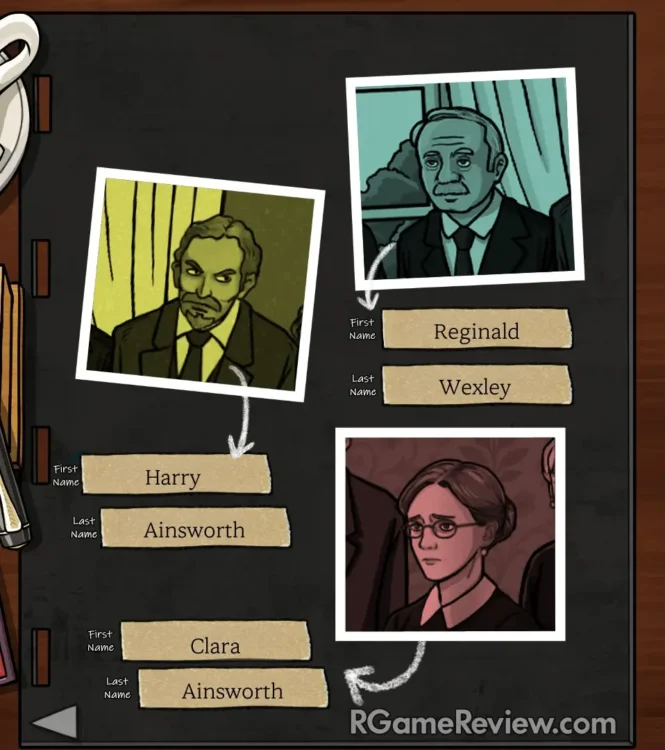
The funeral attendee list gives you four people with an A surname initial and one with W. Those resolve to Ainsworth and Wexley. Reginald is the lawyer and a funeral guest; Harry, George, and Oswald are Elenor’s three biological sons.
Leave the priest, janitor, blonde clerk, nurse, and Sophia Fleming out of this identification puzzle. The lawyer belongs in your answers; those other figures do not.
The women are where the guest list becomes slippery. Both have children, but only Clara appears by name. The attendance details explain why:
- Clara brought two children: Ernest and Thomas.
- George brought one adult and one child: Florence and Beryl.
- Florence’s letter identifies her, while her absence from the list is explained by her attending as George’s guest.
All three children signed their drawings, so use those signatures to connect their names to the family. Dialogue about guests arriving the night before the funeral and staying overnight also helps you cross-check identities.
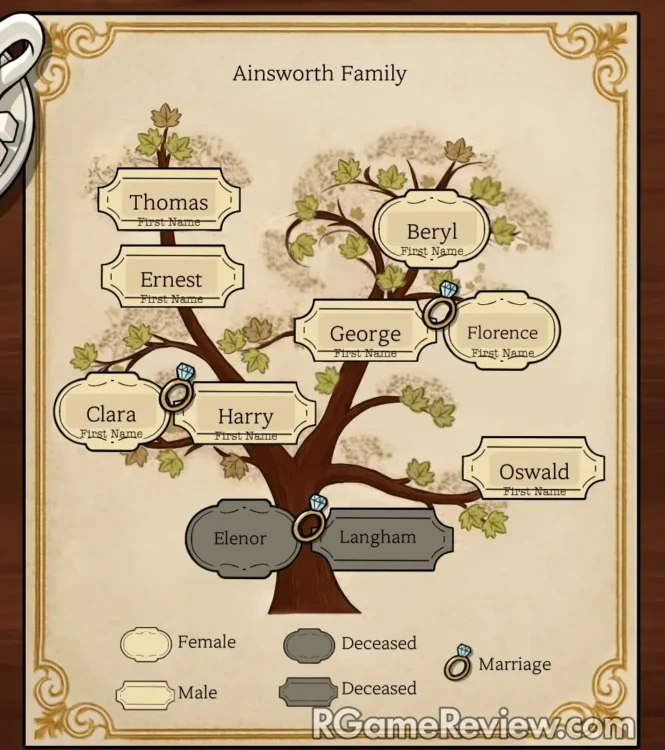
Pay attention to the brunette mother’s complaint that her violent older son takes after his father. That gives you more than a bleak family introduction: it helps distinguish the brothers and establish their order on the tree.
But first, we need the proper names:
- First picture: Florence Ainsworth
- Second picture: George Ainsworth
- Third picture: Oswald Ainsworth
- Fourth picture: Reginald Wexley
- Fifth picture: Harry Ainsworth
- Sixth picture: Clara Ainsworth
The Family Tree
Now that we have the names, it’s relatively easy to figure out the family tree. Here’s a screenshot of it solved:
Complete the Emergency Medical Record
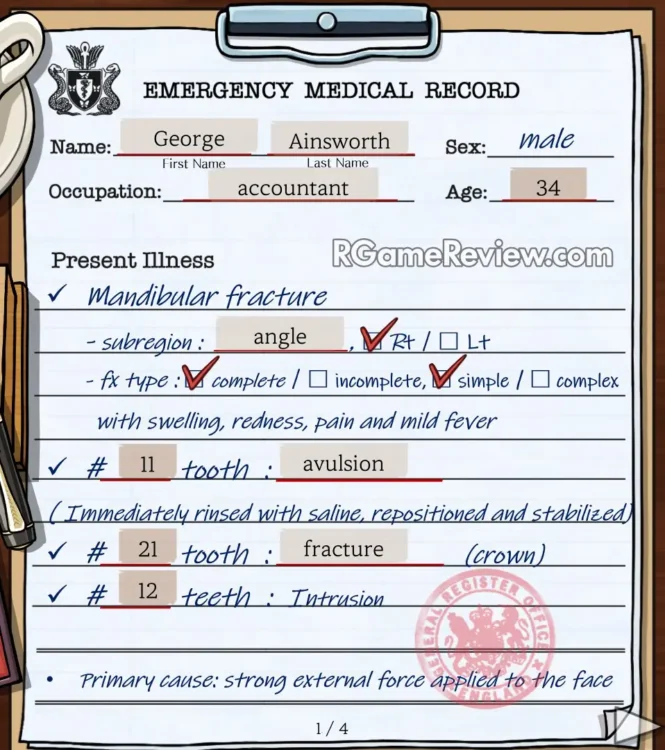
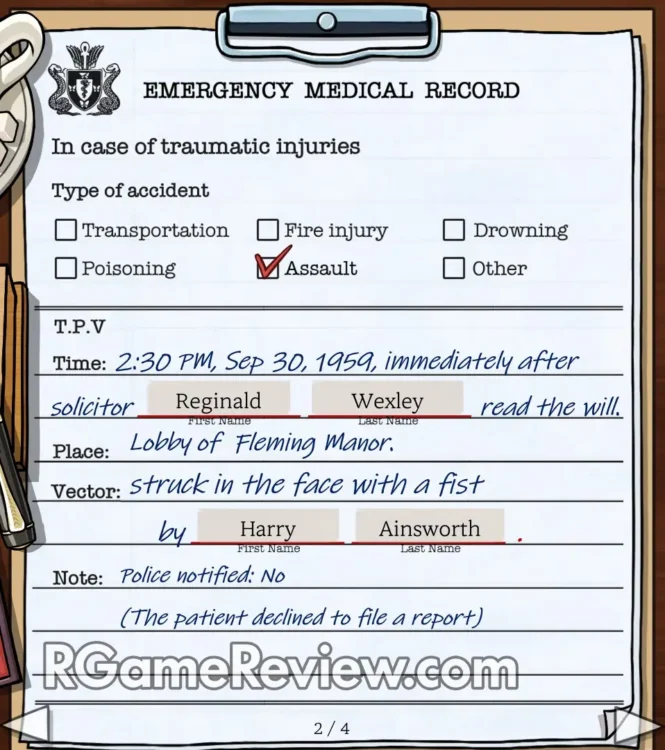
Harry has punched George, leaving you to identify a jaw fracture and three damaged teeth.
Work through the record in order: George’s details, the jaw injury, the dental injuries, and then the circumstances of the assault.
Before filling those fields, make sure you have collected the medical book’s terms:
- Jaw regions: Condylar, Coronoid, Ramus, Angle, Body, Symphysis
- Fracture classifications: Complete, Incomplete, Simple, Complex
- Dental injuries: Intrusion, Extrusion, Fracture, Avulsion
Enter George’s Details and Calculate His Age
Start with these entries:
- Name: George Ainsworth
- Occupation: accountant
- Age: 34
- Identify the Jaw Fracture: Angle, Rt
- Type: Complete and Simple
Complete the three dental entries as follows:
- #11 tooth: avulsion. The tooth is completely out of its socket. This matches the report’s description of a tooth being rinsed with saline, repositioned, and stabilized.
- #21 tooth: fracture. This is the front tooth that has lost its crown.
- #12 tooth: Intrusion. This tooth has been driven farther into the gum than its neighbors.
Move to the circumstances of the injury and fill the remaining entries:
- Type of Accident: Assault
- Name in the Time section: Reginald Wexley
- Vector: Harry Ainsworth
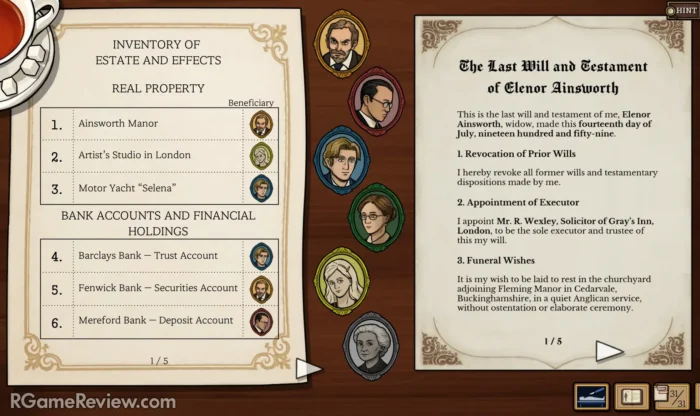
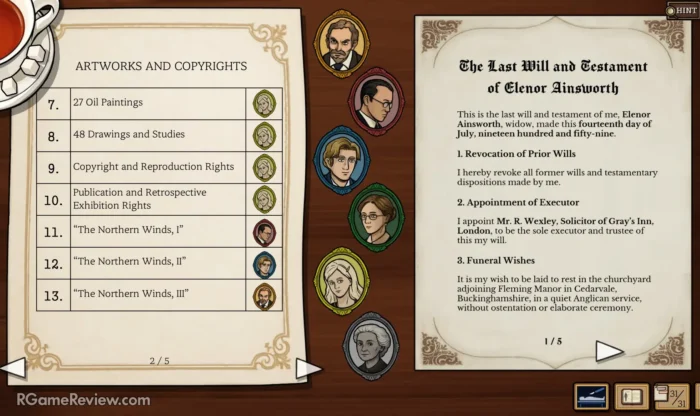
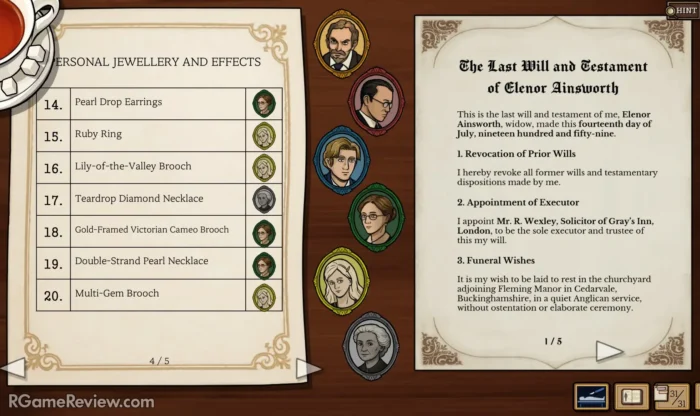
Inventory of the Estate
Children’s Drawings
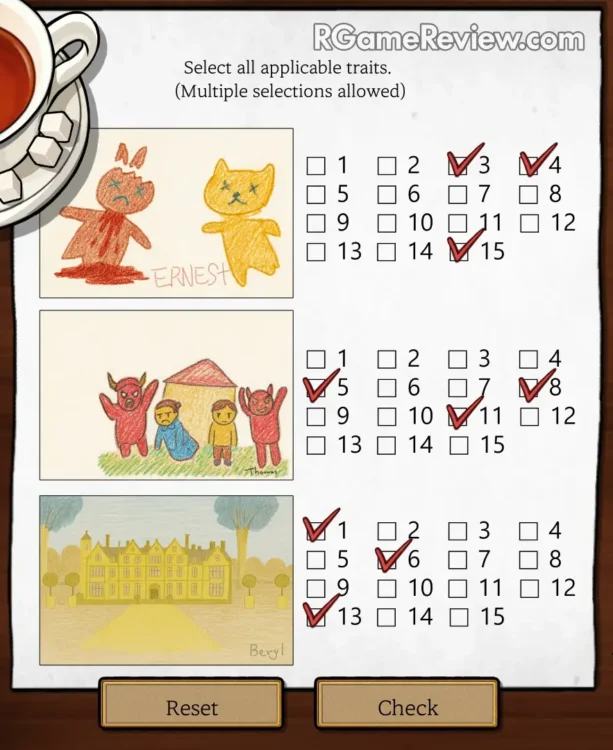
Answer George’s Final Question
Your responses to the next two questions do not prevent George from asking:
“What is the chance for our daughter to have a color vision deficiency?”
Select 0%.
This answer assumes George is Beryl’s biological father and follows the inheritance model in the medical book’s Punnett square. Under that model, a father without the condition cannot supply the affected X chromosome required for his daughter to have it.
That conflicts with the evidence in Beryl’s drawing. Florence’s letter also indicates that she has had a suitor for some time, giving the family an uncomfortable explanation for the mismatch.
This is getting a bit too long, as you can see, so I will stop here and create a new page for the remaining episodes.
If you still have questions or if you notice that I somehow omitted anything, let me know in the comments down below!
If you enjoy reading my walkthroughs, I have a few of them posted on the website, and I invite you to check them out: