
Rusty Lake’s Servant of the Lake is, in my opinion, the best game they have ever released. Complex, engaging, beautiful… it’s everything you want from a slightly spooky adventure game. And it’s also pretty difficult.
For that, I am here to help with a complete text walkthrough for Servant of the Lake – step by step solution so that you can complete the game, unlock everything there is to be unlocked in it, and do so with the help of screenshots, too.
So let’s jump right in and check out the Servant of the Lake walkthrough below!
Day 1 – The Arrival Walkthrough
1. Start by clicking the door of the mansion to get out of the carriage. The brief tutorial begins.
2. Click the left window, drag it up and get the tin cup.
3. Tap the flower pot under the window and get the carrot. Feed it to the horse.
4. Go left to the carriage, open its door and get another tin cup.
5. Click the right window, drag it up, and place the two cups there. Arrange them based on the number of lines on them, starting with one on the left:
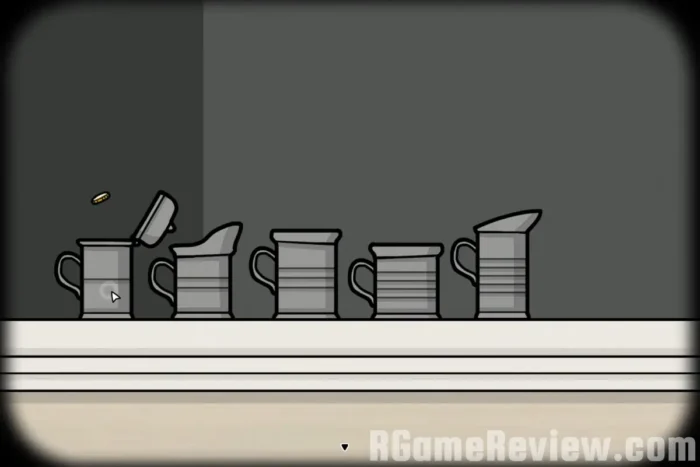
6. Get the coin from the first tin cup and give it to the carriage’s conductor
7. After the carriage leaves, get the iron bar on the ground. Use it to pry open the loose board in front of the flower pot. Get the key and use it to enter the mansion.
8. Talk to the maid and get the crow feather. Tap the table on the right, place the feather in the ink and sign the contract. Talk to the maid again and get the notebook – then open it and go through it, then talk to the maid again.
Day 1 – Preparing Breakfast Walkthrough
1. Enter through the door to the left and zoom into the table. Check out the recipe on the left, then get the bowl of oats.
2. Go back and grab the pile of wood from the chair.
3. Go back, and enter the middle door. Go through the door next to the cat and grab a bottle of milk from the crate.
4. Climb up the stairs to the right of the maid and get the small pot and mouse from the cupboard.
5. Go back to the room with the cat and feed her the mouse. When the cat leaves, pick up the box of matches behind her.
6. Go back and left and prepare the breakfast: add the wood to the stove, place the pot on top of it, then the oats, then the milk and finally use the matches on the wood. Finally, pick up the small pot with porridge and go talk to the maid, who says you can enter Mr Aldous’ room. You can do so by going up the stairs and entering the now-open room.
Day 1 – Waking Up Aldous Walkthrough
1. After entering the room, tap the small table on the left and check out the piece of paper to know the order in which you must wake up Aldous. Also, pick up the bowl on the table.
2. Open the bottom two drawers and get the spoon and slipper.
3. So go back and open the curtains of the bed.
4. Go left and tap the small statue by the clock – pick up the clock hand from the statue, then place it on the clock. Rotate the hands of the clock until they show exactly 7 o’clock.
5. Go back and you will see Mr. Aldous is up. Before clicking him, click the small tile on the floor – it’s a puzzle in which you must match the patterns on the circle. Here’s how to do it:
- drag the arrows tile to the left into the circle and rotate the circle right
- drag the brown tile at the bottom into the circle, then rotate right again
- place the brown tile into its corresponding spot on the left, then rotate right x2
- get the light brown tile on the right into the circle and rotate once, then place the tile in its spot at the bottom
- finally, rotate the circle to put the remaining two tiles in their place.
6. Get the razor and tap Mr. Aldous. Start shaving him and when done, pick up the earlobe.
7. Go back and pick up the slipper on the floor, then go to the right side of the room. Swipe away the pants on the clothes rack and get the cloth.
8. Open the window and give the earlobe to the crow. After it leaves, pick up the key from the nest and use it to open the top drawer under the clock. Get the berries.
9. Go back to Aldous and use the cloth on his ear. Then place the bowl in his hand, and the porridge in the bowl. Add the berries on top, then the spoon.
10. Tap the bowl of porridge and you will notice a bug moving there, entering through a hole. Place a berry on that hole, and keep doing it until the bug stops moving. When it does, squash it.
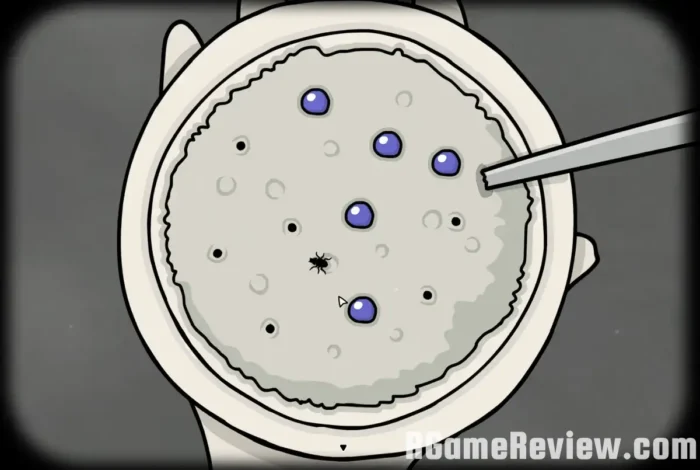
11. Feed the man until he says he’s had enough, then go back. It’s time for his exercising! Go to the toy soldier statue and click it to see the patterns for Aldous’ stretching, then go to the man and tap in the following order:
- left, right, down, right, right, down
12. Now, dress him up! Place the white shirt, then the brown vest, the hat, the pants and the slippers.
13. When done, talk to him again, and look out of the window to see the carriage coming – you can click it to move.
Day 1 – Preparing the Reception Walkthrough
1. Talk to the maid – she asks for your help to clean the floor. Go upstairs and wipe the scratches and dirt on the floor, then go back to the entry room and do the same with the trash there. Go into the room to the left (the kitchen) and clean it up as well.
2. While in the kitchen, tap the table and get the candle.
3. Go back once and climb up the stair to place the candle in the chandelier.
4. Go back to the maid and she will tell you to dust the paintings. Go back once and dust the Alexandra Vanderbook painting (notice she shows two fingers). Dust the man’s painting above (notice he closes his eyes three times in a row).
5. Go back once and dust Aldous’ painting. Notice that he moves the hand with the clock four times.
6. Go upstairs and drag right the door on the cupboard to reveal a box. Use the code from the paintings to open it (2-4-3) and get the candle.
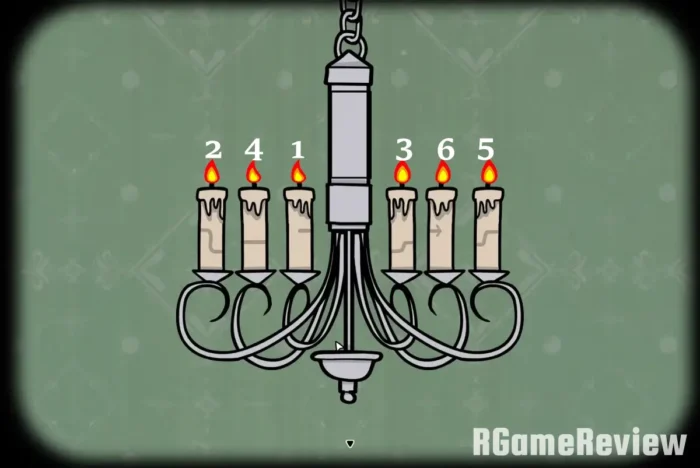
7. Go back and talk to the maid. She will give you another candle. Go back once and place the two candles in the chandelier. You must light them up using the matches in your inventory, but in a specific order (so that the lines on them always connect).
Here’s the correct order in which to light them up:
8. Go back and talk to the maid, then enter the garden. It’s time for a new chapter!
Day 1 – Welcoming the Guests Walkthrough
1. Get the milk jug on the floor and fill it with milk from the goat. After doing this, you will see the goat poop and move her feet. Tap the ground area where it moved and you will see a key – get it.
2. Use the small key on the postbox and get the stone tablet. Then, read the letter in the envelope to see how to prepare for the arrival of the guests.
3. Go back and tap the area with a wood log and rocks – it’s a quick minigame in which you must guide all the cockroaches into the opening. You will do so by moving the stone – wherever you place it, cockroaches will move either up, down, left or right.
After successfully guiding all the roaches into the hole, get the stone tablet from under the pile of wood.
4. Go back and tap the flower pot. You must arrange them as seen in the sketch on the pot – the flowers with petals, from the shortest to the highest on the left, the red button ones on the right (from the tallest to the shortest) and finally the ones without flowers at the bottom:
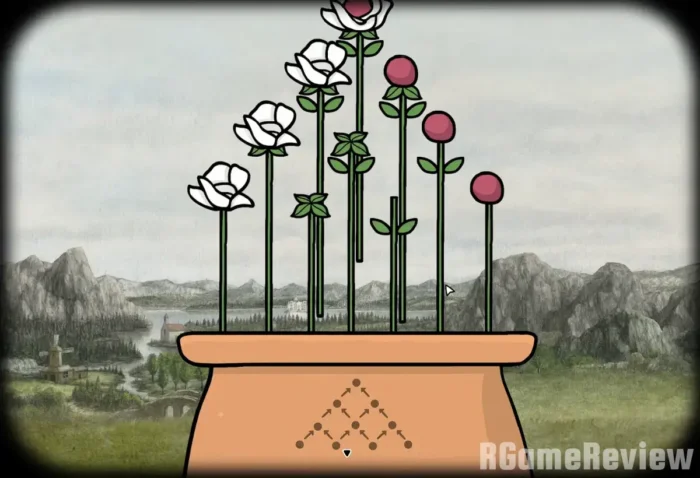
After solving this puzzle, get the flowers and another stone tablet
5. Go back and tap the small box on the floor. Place the tablets there and arrange them in the correct order, as seen below:
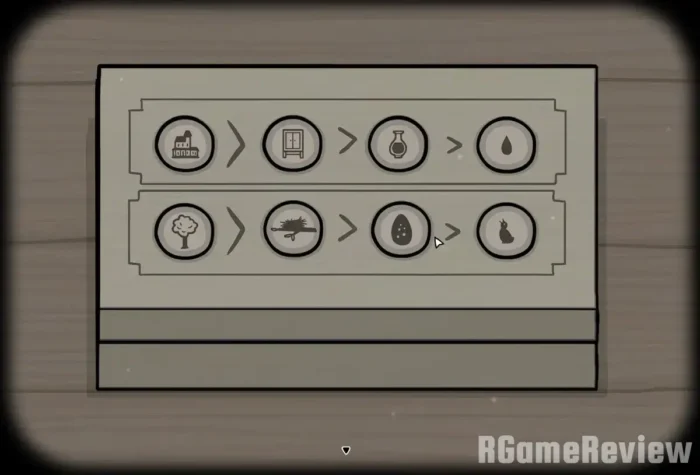
6. Get the flag and place it on the left side of the pole, then pull the right rope to get it up.
7. When the carriage arrives, tap the basket and briefcase to remove them, then open the curtains. Help the woman out, then talk to her again and give her the flowers.
8. Go back and tap the basket. Move it around to see the code behind the baby. Then, click the briefcase and use the code to open it (3-7-4).
9. Inside the briefcase, arrange the clothes in a perfect pattern, then get the coin and bill:
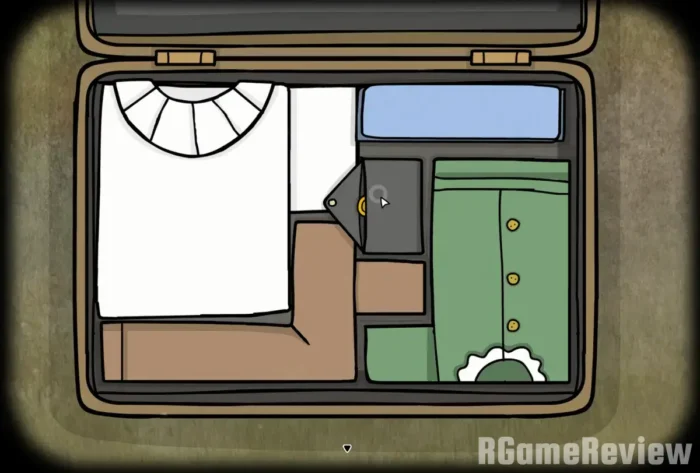
10. Click the carriage driver and give him the coin, then feed the bill to the horse. Talk to the carriage driver again, and after he leaves, talk to the woman. It’s time to make her a cup of tea!
Day 1 – Serving Tea Walkthrough
1. Tap the cat, then repeatedly tap it until it pukes. Take the sticky substance.
2. Go to the room to the left and talk to the maid and get the sugar. From the table, take the tea, and from the stove – the kettle with hot water.
3. Go back to the room before Aldous’ room and get the cup from the cupboard. Then, go back to the woman and prepare her tea!
4. Give her the cup, then pour the hot water, drag the tea over it, then the milk. She will drop it!
5. Go back and zoom into the broken cup. Rearrange it, then add the sticky substance to it to hold it in place.
6. Get the tea cup and give it to the woman again. Then put water in the cup, add the tea, add the milk, and finally add the sugar over it twice.
Day 1 – Opening the Reunion Walkthrough
1. Open the cupboard to the right and get the glass.
2. Tap the large box and notice the password on the note: 1753. Rotate the squares on the box until they resemble the numbers, as seen in my screenshot below:
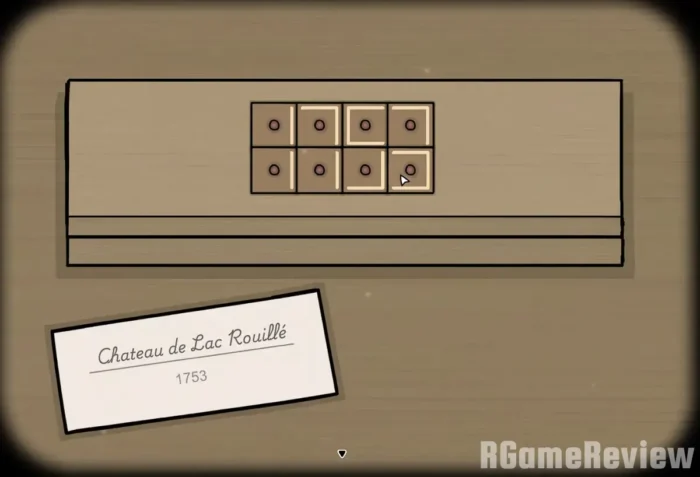
Get the bottle.
3. Go back to the man, give him the glass and drag the bottle over it.
4. The man’s brother arrives. Make him come inside by opening the window, then tap him and give him the entire bottle. He wants his favorite cigar.
5. Tap the broken glass on the floor and solve the puzzle. Notice the direction of the arrow.
6. Go back and tap the pile of wood to get them, then go back to the right and zoom into the cupboard. Tap the other box and press the buttons as the arrow on the bottle showed you (or use my screenshot below for reference):
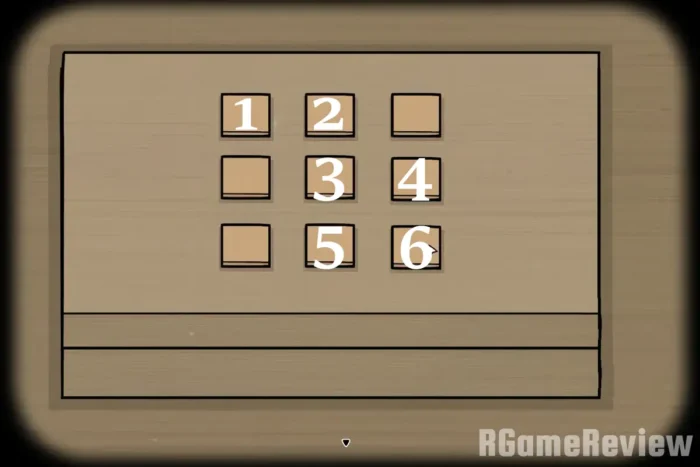
7. Get the cigar and put it in the man’s mouth, then open it with the matches. Tap his mouth and solve the fire puzzle.
8. The teeth to the left and right control where the water will pour, and the middle one activates it. So press the teeth in this order:
- center, left, center, left, center (all the fires to the left should be gone)
- right x3, center, right, center, right, center, right, center
When the fire is put out, get the spoon.
9. Go back and talk to Aldous. He asks if everyone got their bite. Go back and tap the painting on the wall and notice the items listed there: Timepiece, Book, Elixir and Fish. Tap the paintings in that order and get the Fish.
10. Go right and tap the top side of the cupboard to zoom into the tree-like thing. The point of this tree puzzle in Servant of the Lake is to guide the fly on the left side through each of the flowers. To do so, you must place the arrows to the right in the correct order.
Here are screenshots with the position for each flower:
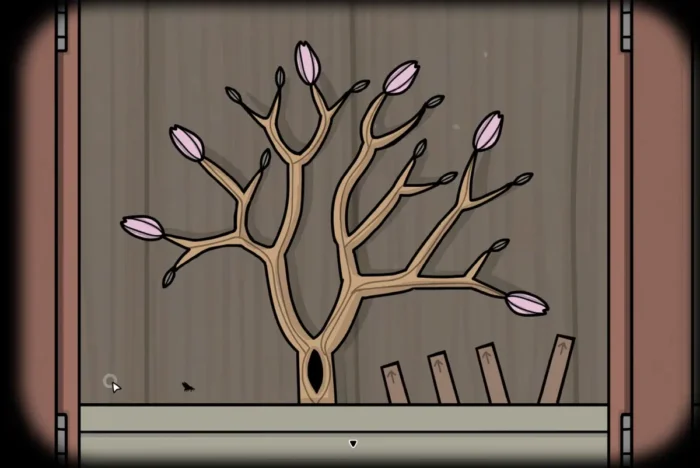
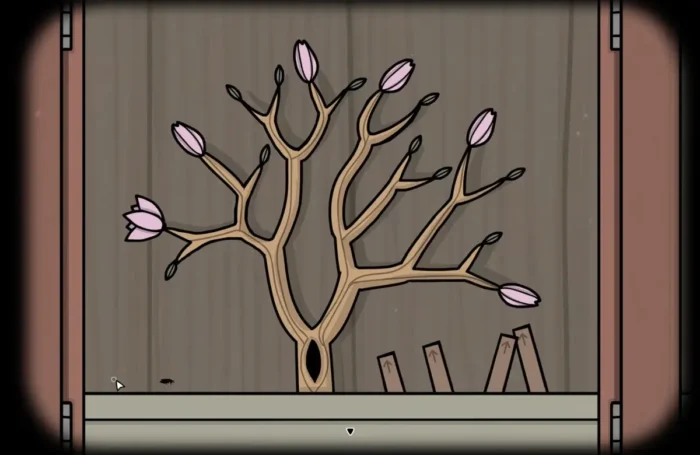
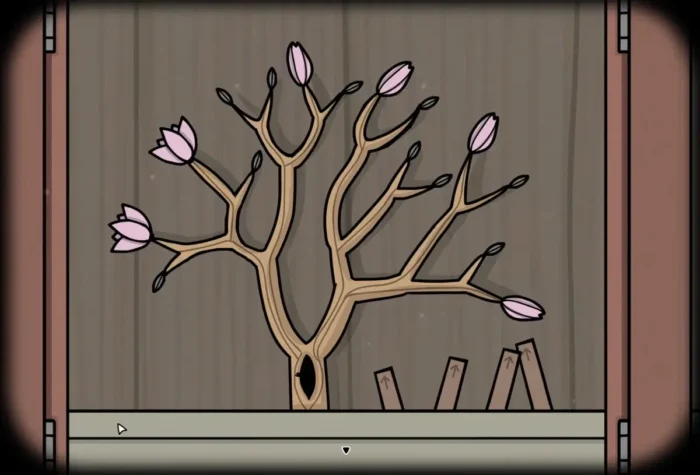
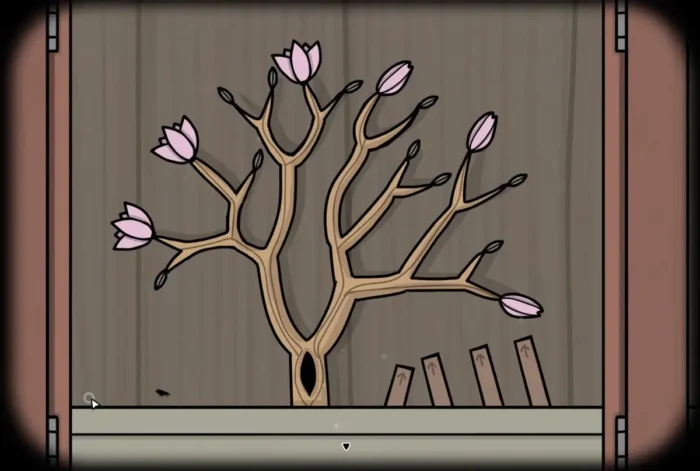
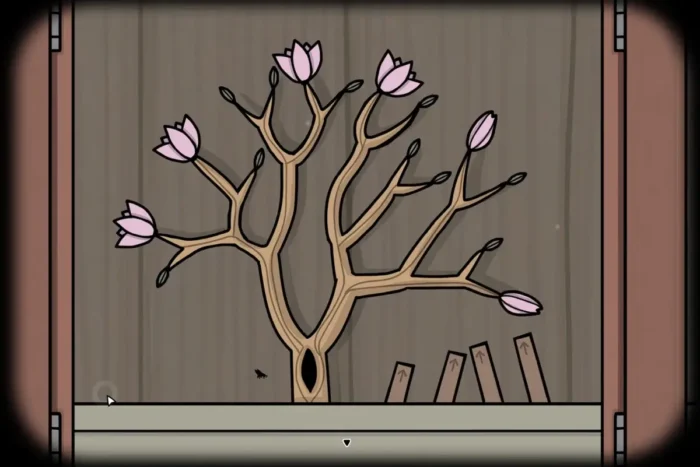
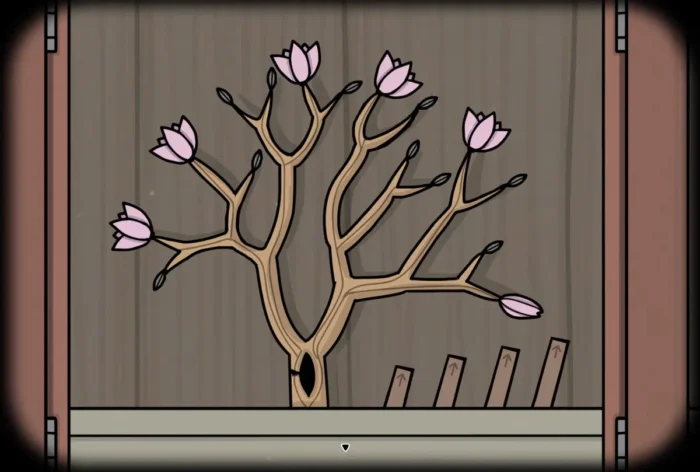
After completing this, get the fly eggs.
11. Place the pile of wood in the fireplace, use the matches on it and add the fish. When it’s ready, get the grilled fish.
12. Place the grilled fish on the plate on the table and add the fly eggs. Get the three pieces of fish.
13. Now you must feed the fish in the correct order: give the head to the brother, the middle piece to the woman, and the tail to Aldous. Then, tap the glass with the spoon and he will start his speech.
14. Tap the woman, then tap the baby’s eyes. Tap the moon. Tap the baby, then the woman’s ring, then her green necklace, her mouth, the clouds, and finally the woman’s eyes.
15. Go back to Aldous and he will continue his speech. Tap the brother and click his right eye. Based on where he looks, you will have to tap a specific item. So, after tapping the eye for the first time, tap in this order: hat, hat, necktie, necktie, ear, necktie, ear. Now Aldous can finish his toast.
Day 1 – The Night Watch Walkthrough
1. Enter the room to the left and talk to the maid. You must check the hallways first.
2. Go through all the rooms up to the one before Aldous’ room, then get back to the maid and tap a candle.
3. Go and tap the top painting – the man is not in its correct position. Go back to the maid and tap the bell.
4. Go all the way back to the room before Aldous’ and get back to the maid and tap the bell. Do the same thing again, but this time tap a candle.
5. Go back to the room with the paintings and tap the window on the top floor to see a masked ghost. Go back to the maid and tap the bell.
6. Go back to the room with the paintings and tap the one on the ground floor. Go back to the maid and tap the bell.
7. Go to the main hallway and tap the wooden crate. You will see the cat there. Go back tot he maid and tap the bell.
8. Finally, go all the way to the room before Aldous’ and return to the maid – tap the final candle.
9. Go back to the main hallway and talk to the Brother – he has a quest for you which involves searching through the attic for an old scroll. He also gives you a walking stick.
10. Go to the room to the right and use the walking stick on the tile on the ceiling. Go up the stairs.
Day 1 – Searching the Attic Walkthrough
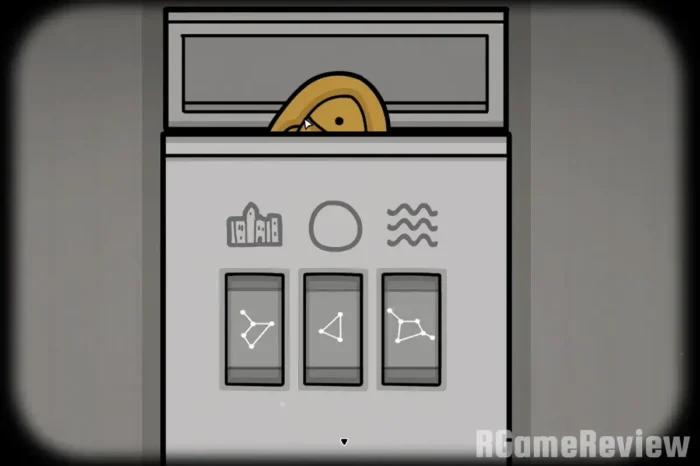
1. Let’s start by opening the box on the bottom left side. To do so, we must head to the window and slide the clouds in the right positions – when we do so, they will reveal the correct constellation for the house, the moon and the waves.
Here is the solution:
- House: Slide the clouds until it lights up. Notice the pattern of the 5-star constellation.
- Moon: Slide the clouds until the moon becomes red. Notice the 3-star, triangle-like constellation
- Waves: Slide the clouds until the water turns black. Notice the 6-star constellation.
2. Go back to the box and set the correct constellations and get the small statue. Here is the solution, in case you can’t figure it out:
3. Zoom into the table and arrange the items in the box so that they perfectly match each space. They are grouped by type: fingers go in the bottom right, wood and leaves next to the fingers, bits of rocks to the left and the remaining ones in the top container.
If you can’t figure it out, use my screenshot below for help:
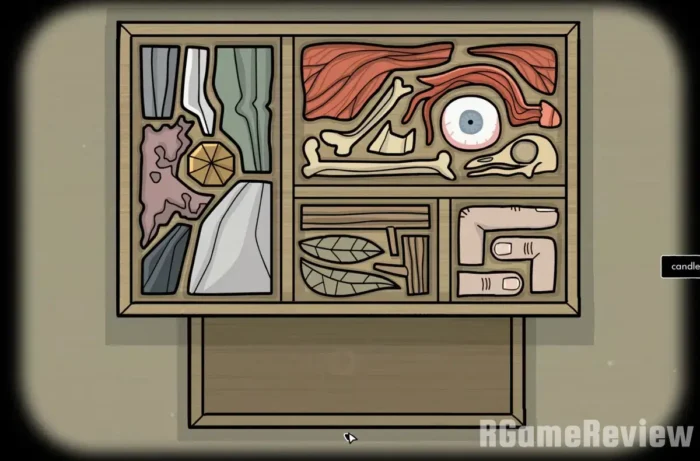
After completing it, get the candle.
4. Open the lantern to the left and place the candle inside, then light it up with the matches.
5. Scroll to the left and you will see the hooded figure leaving. Tap the box on the floor and get the other small statue. Open the box for the instructions. Based on those instructions (“There was a young man named Vanderboom” and so on), you must drag items onto the piece of paper. Here is how to do it:
- Drag the leftmost blue toy soldier.
- Remove the soldier and drag the woman.
- Remove the woman and drag the square and triangle (so they make something that looks like a house).
- Remove the house and drag the two blue toy soldiers and the woman.
- Remove a toy soldier and the woman, and add the horse.
- Remove the horse and add the man with a gun.
- Remove the men and add the triangle, then put the woman on top of it.
- Remove the triangle and put the square next to her.
Get the small key.
6. Go back right and use the key to open the purse. Get the small statue.
7. Tap the drawers and get a rung and another small statue from there.
8. Tap the yellow box on the drawers and add the small statues based on the habitat of the animal on them.
From left to right, this is the correct order: fly, bird, monkey, fish, deer.
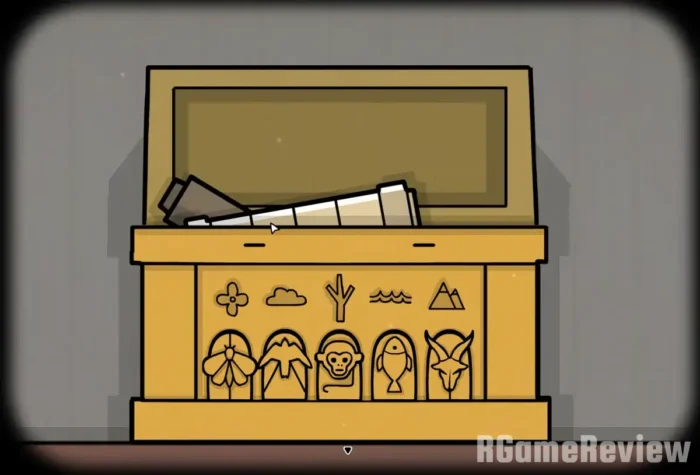
Get the special scroll and rung.
9. Go back and tap the ladder. Add the rungs to the missing spots and slide the door open.
Day 2 Walkthrough: Preparing Coffee
1. Talk to the maid. She tells you the order in which you must wake up each of the brothers up, then tells you it’s time to make coffee.
2. Go to the left and try to open the box on the table. We need a code for that. Go to the room upstairs (near the Brother’s painting) and tap the painting. Light up all the windows – you will see each has a number.
If you check the paintings, you will see that the Brother (William) points left, the woman points up and Aldous points Right.
Go back to the room with the painting and windows. Based on the silhouettes of the characters and the directions they’re pointing, the code is: 315. Use it on the box on the kitchen table and get the coffee beans.
3. Go back to the room with the painting and place the coffee beans in the grinder. Get ground coffee.
4. Go back to the kitchen and place the ground coffee into the coffee maker on the woodstove. Then go to Aldous and give him coffee. Go to the top floor with the painting, talk to the maid and go left to give William his coffee.
Day 2 Walkthrough: Waking Up William
1. Drag the screen left and get the top hat. Check out the pocket watch in the suit: it shows it’s 9:00.
2. Go back and get the spoon from the table near William. Look at the family photo above and notice the position of the items (pipe, glass and so on).
3. Tap the clock and set the time to match the pocket watch. Open the door below and tap the cat to shoo it away. Then open the box and arrange the items as seen in the family photo:
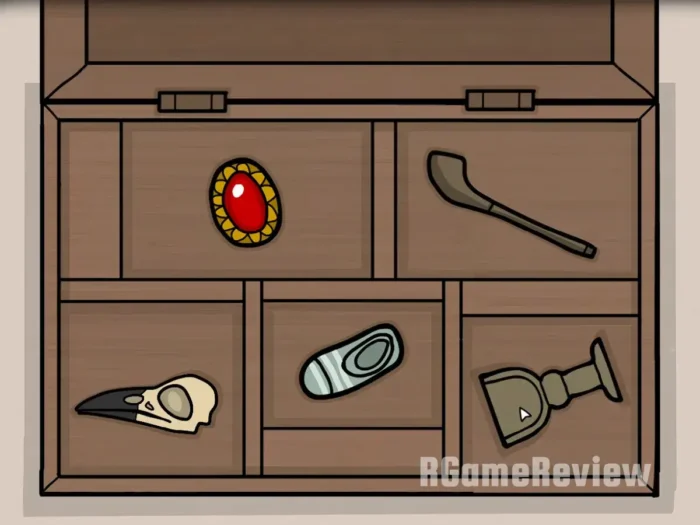
Get the chalice.
4. Tap William’s mouth and use the chalice to fill it up.
5. Go right and pick up a seed from the ground.
6. Tap the plant pot and use the chalice on it, then add the seed. Tap the flower and get the bird seeds.
7. Tap the bird and feed it the seeds, then get a feather.
8. Use the feather to tickle William’s big toe. Notice that it starts moving – the number of moves it makes tells you which other toe you need to tap. That one will move as well, and so on.
From top (big toe) to bottom, tap in this order:
- big toe (with the feather)
- small toe, big toe, 4th toe, 2nd toe, 3rd toe, 4th toe, 2nd toe.
William draws his foot and now you can pick up a small key from the floor.
9. Use the small key to open the small box on the table and get the eye drops and knob.
10. Use the knob on the window and open it. Fill the chalice with rainwater.
11. Use the filled chalice on the plant again and get a new set of seeds. Feed them to the bird and get the egg.
12. Go to William and tap his eyes to open them, then add the eye drops into each. Then pour coffee into his mouth.
13. William wakes up. Give him his hat, then place the egg in his hand. Crack it open with the spoon. Then, go place the scroll on the table.
14. To actually open the scroll, you must tap each of its moving parts to complete a long fish (tail to the left and head to the right).
If you can’t figure it out, use my screenshot below for guidance:
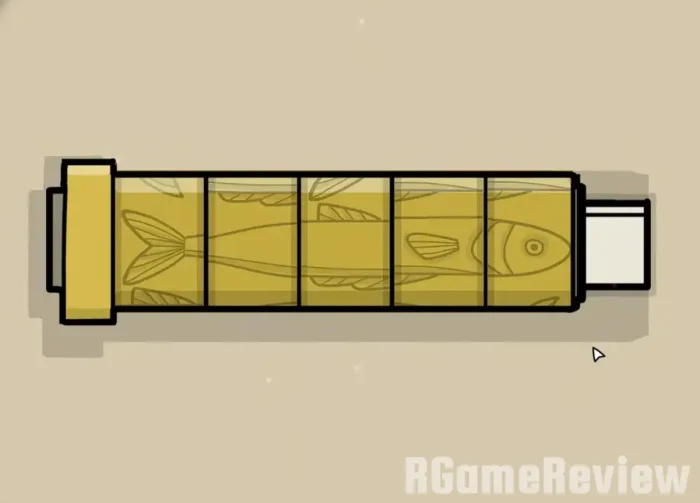
15. Drag the scroll out and read the instructions on the left, then match them with the figures on the right by dragging the correct image under William’s finger:
- Estate, cave, stairs, clocks, book, bottle, person.
Note: You have to be careful when moving the piece around – the finger must never touch other items but the ones mentioned above in the exact order mentioned above.
16. Talk to William again to conclude this episode.
Day 2 Walkthrough: Cleaning the Floors
1. Go to the top room upstairs and talk to the Maid. From the purse next to her, get the scrubber and take a look at the photo.
2. Tap the floor that needs to be cleaned and use the scrubber on the stains, starting with the drop that has one big shape on it, continue with the one with two and so on.
3. Go to the room to the right and clean the floor. Starting with the one on the top right, continue scrubbing based on the direction shown on each blotch.
4. Go to the kitchen and clean them in pairs. I don’t think the order matters, but this is how I did it – I’ve marked the correct order in my screenshot below:
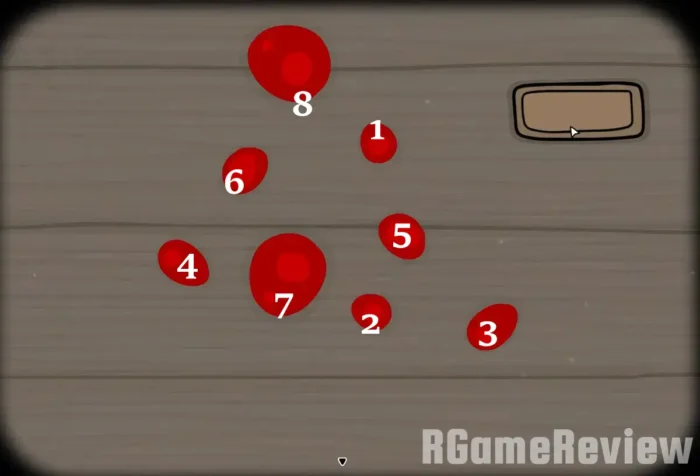
5. Go upstairs and to the right and talk to the maid, then tap the door to the right (Bathroom) and look through the keyhole.
6. Then, open the Balcony doors and go down to Aldous. The hunt is on!
Day 2 Walkthrough: Going Hunting
1. Talk to Aldous and take the rifle.
2. Go back, but before tapping the tree stump, check out the piece of paper on the table. It tells you where to find each animal.
3. Now, tap the tree stump and get the shells. It’s time to do some hunting (make sure to load a shell each time the rifle is empty)
- First, look up in the sky and to the right to notice the bird – shoot it.
- Another bird is in the tree to the right, under the area the previous bird flew by.
- Go down to the base of the same tree, then left until you see an opening between two trees. A small black shadow can be see near the left tree – shoot it twice (I’m also marking it below):
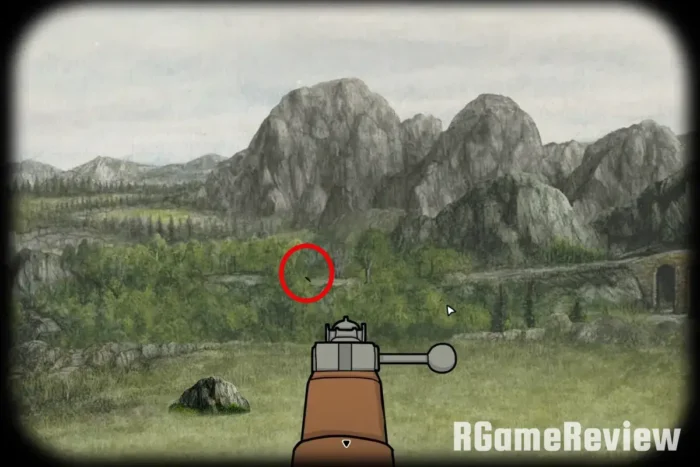
4. You’re out of shells, but no worries – just go back and get 5 more, then continue hunting:
- Shoot at the large rock under the area where the boar lies, and a rabbit will appear – shoot it.
- Shoot at the man by the river, then shoot at it again.
- A deer will appear near the river – shoot it too.
5. Go back twice and get the piece of paper and read it.
6. Talk to Aldous and solve the strange puzzle. Based on the piece of paper we read about using all the senses, we need to figure out which of the senses like which parts of the parts on the table.
Start by separating the snout, tongue, eye, claw, and ear in an empty area not touching any of the other parts. Then, drag and drop the ones each of the organs react to.
If you can’t figure it out, drag as follows:
- snout: the brown bit marked with 1 slit
- tongue: the bird leg (VII)
- eye: the long bone (IX)
- claw: the Y-shaped bone (with II marked on it)
- ear: the bit marked with VI
Now, you have to mix and match those numbers until you can open the shed’s lock. To save you that trouble, here’s the code you must use: 91276. Get the cloth and butcher knife.
7. Go back to Aldous and give him the butcher knife. When he gets his eyes covered, tap the purse he’s wearing and get the silver timepiece. After that, use the cloth on his face.
Day 2 Walkthrough: Doing the Washing
1. Get the dirty sock on the table, then go to the room to the left.
2. Get all the dirty clothes in the room, including the baby and read the note.
3. Go to the top room and talk to the maid. She will take care of the baby. Give her the baby and get the diaper from the maid.
4. Before leaving, tap the door to the left and William will give you a new piece of dirty clothes.
5. Go back to the room I called kitchen so far (the one on the left of the hallway) and place all the clothes in the tub on the fire stove. Get the tub with wet laundry.
6. Go to the room to the right of the maid and place the laundry on the string on the balcony.
7. You must rearrange them based on the number of lines on the clothes. From left to right, this is the correct order: shirt (no lines), briefs, diaper, pants, socks, towel. Get the key from the shirt’s pocket.
8. Use the key to open the bathroom door to the right and get inside.
Day 2 Walkthrough: Helping with Bathing
1. Talk to the woman, then fill the bath with the water from the tub in your inventory. Talk to the woman again and she tells you to add soap to the bath.
2. Scroll right and get the cookie on the table. Then, it’s time to solve the bathroom puzzle by placing each square in the indicated spot on the board. This sounds easy, but it’s very difficult.
Remember: the squares only move horizontally and vertically until they hit an obstacle, so you must use the squares themselves to act as blockers until the pieces fall in the right place.
Here are some screenshots to help you complete the bathroom puzzle in Servant of the Lake:
First set of steps:
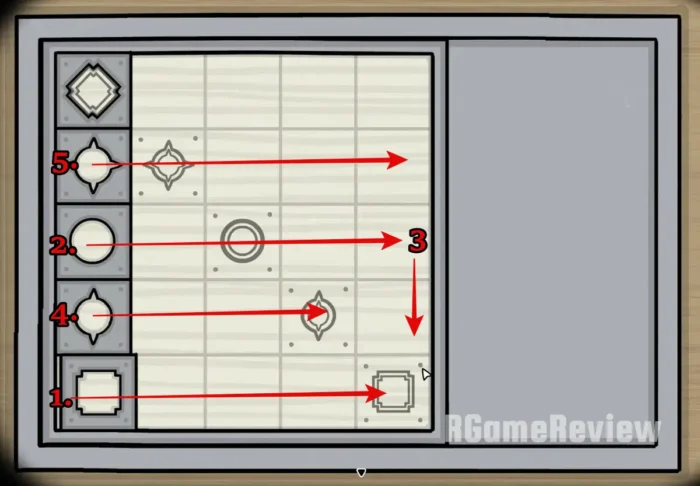
Second set of steps:
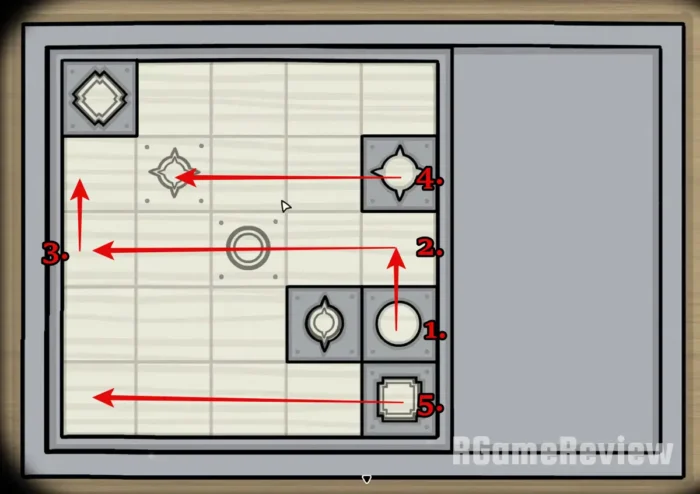
Third set of steps:
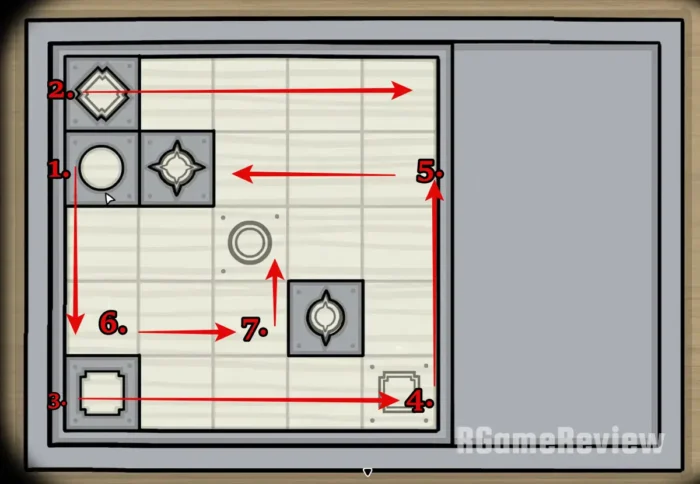
Final set of steps:
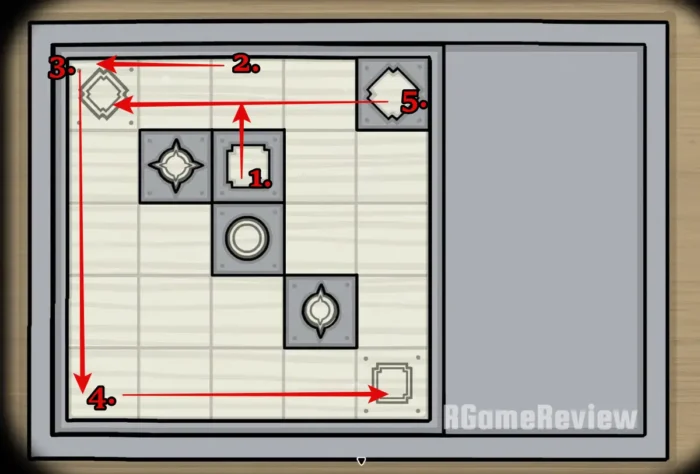
Get the soap, add it to the bath and click the woman again.
3. Remove her hat and hair pin. You must find the comb now.
4. Tap the tiles above the bath to zoom in. You must click the items belonging to the same “family” in a row:
- the four flowers
- the furniture pieces (armchair, bathtub, small table, large table)
- man, woman, man and baby
- eye, hand, ear & nose
- the four animals
- finally, the four remaining tiles.
One of the tiles drops and you can pick up the scissors.
5. Go back to the woman and use the scissors on her cut. Get the maggot from there.
6. Swipe right and tap the small hole at the bottom of the wall. Place the cookie there and a mouse will come eat it. Press it again and when it starts eating the crumbs, use the hair pin on the mouse. Place the maggot on it, then get the bone comb.
7. Go back to the woman and use the comb on her hair.
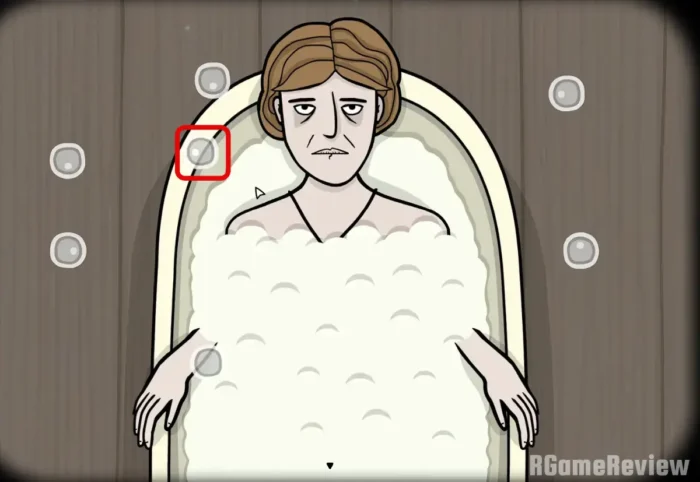
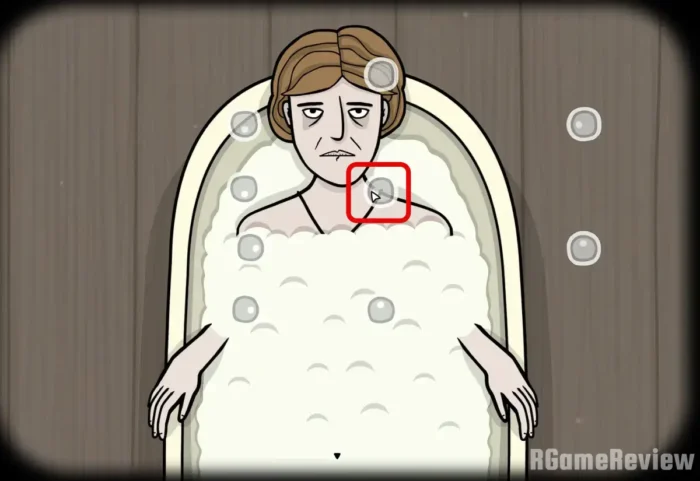
8. Unbutton the back of her dress and she will get into the bathtub. Click her and tap the bubbles. There’s a set of puzzles in which you must click the correct bubble so it touches all of them.
Here is how to complete the bathroom bubbles puzzle in Servant of the lake:
First one is easy: just click the right bubble.
Second one: click the top left bubble.
Third one: click the bubble marked in my screenshot below:
Fourth one:
9. Use the hair pin on the hand until it goes away.
10. After she tells you she will rest, use the scissors on the necklace and get the pendant around her neck.
11. Go back and swipe left. Place her hat on the clothes tree and get one note from the hat and another note from the dress.
12. Tap the table and add the two notes near the existing one. Note the Xs which tell you what numbers to remove to get a code.
13. Tap the briefcase on the bathroom’s floor and open it using the code (281).
14. Place the pendant on the wooden box inside the briefcase and get the bronze timepiece.
Day 2 Walkthrough: Night Time Duties
Coming soon!
This is such a complex game, and I’m still working on it! Check back soon for the rest of the walkthrough!
Until it’s ready, make sure to check out my previous articles related to either Rusty Lake or similar adventure games: