
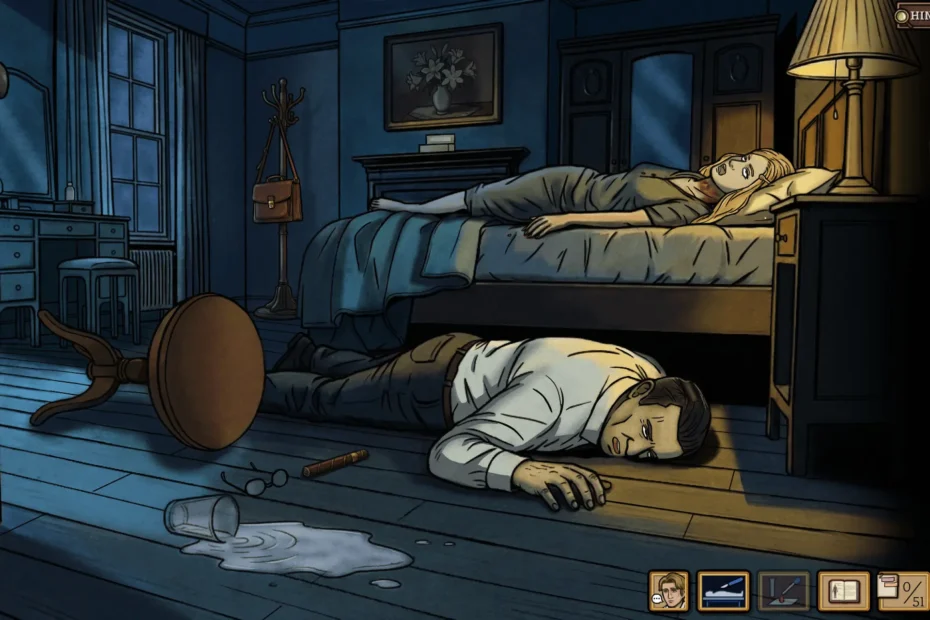
Today, we continue our adventure through Death at Fleming Manor with episodes 6 through 9. In this second part of the series, I will share everything you need to know to complete each of the new episodes, and I’ll follow a similar method to that of the first part of the Death at Fleming Manor walkthrough.
In other words, I will first give you tips and hints to help you solve each part (usually, filling out the forms) by yourself. If you still can’t do it, I will also have the full solution, so you can progress and take on a new challenge.
This should be pretty straightforward, so let’s get started. If you’re interested in a specific episode and don’t want to scroll down through them all, click the links below, and you’ll jump directly to it.
- Episode 6: The Unidentified
- Episode 7: Midnight Call
- Episode 8: The Human Cannonball
- Episode 9: The Dying Message
Episode 6: The Unidentified
Scene 1, Shed
- Corpse leg, tourniquet: Linen Strip
- Dagger: Dagger
Scene 2, Medical Book
- Hypovolemic, Cardiogenic, Distributive, Obstructive, Elapid, Viperid, Colubrid, Non-Venomous, Algor Mortis, Rigor Mortis, Entomology, Amputation, Avulsion, Stab, Penetrating, Abrasion, Laceration
Form 1: Blood Test
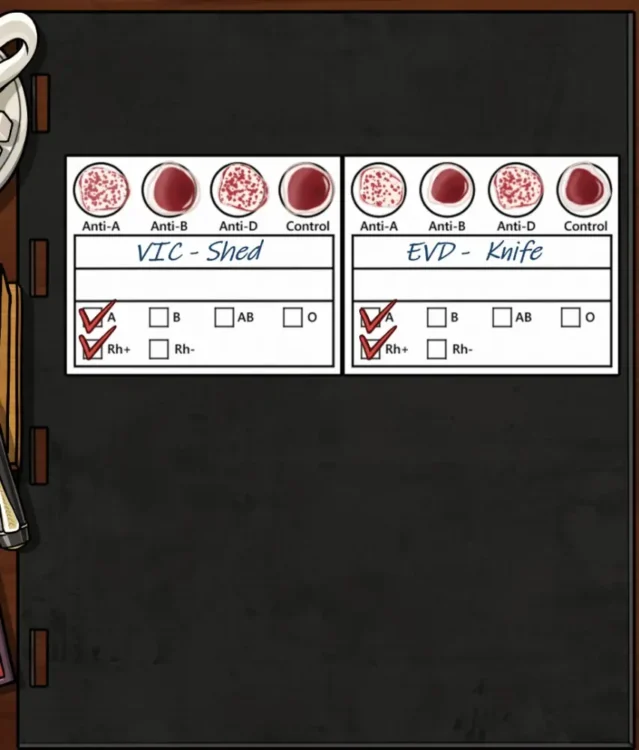
You have two samples: the bloody dagger, and the sample the pathologist takes from the victim’s chest. The chart is the same as in Episode 1, so the blood typing rules are the same too.
- VIC-Shed: Vial A, blood type A with Rh+
- EVD-Knife: Vial B, blood type A with Rh+
Form 2
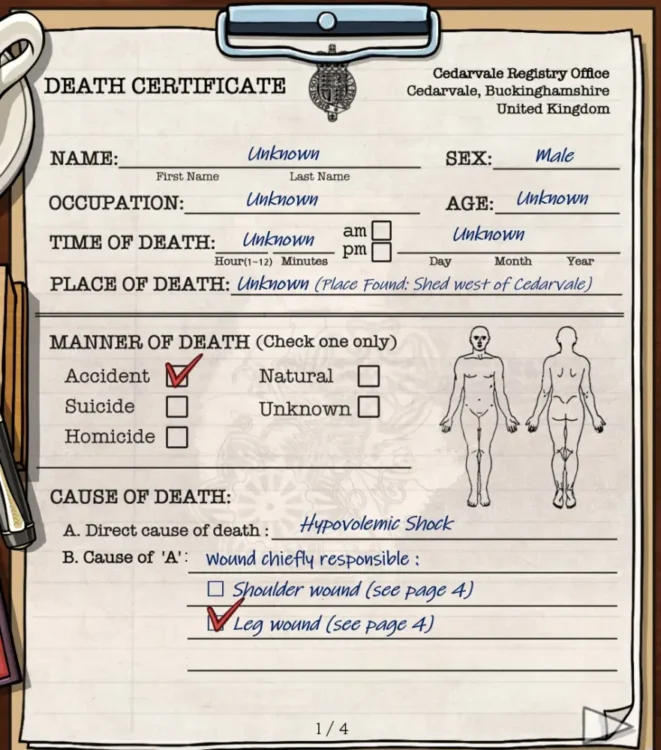
This form cares about what killed him, when he was found, and your best estimate for the time of death. Almost all of that information sits with the pathologist today, so if you get stuck, go back and talk to him before touching anything else.
The victim was found in a locked shed, and the police report says they had to break the door down. Either the killer found a way out, or the victim died in there alone. Keep that in mind when you reach the manner of death.
The cause of death hinges on hypovolemic shock. Internal bleeding as a cause of death counts as a form of hypovolemic shock. Anatomical reporting also uses the victim’s left and right, not yours, which cost me a wrong answer I did not need to give.
The victim was bitten by a snake and tried to tourniquet the bite with cut-up linen. Somehow they were also stabbed in a way that did not lose much blood. Plenty of questions stay unanswered, so go with whatever the evidence you have supports.
For the time of death, the narrowest window wins. An entomology result saying the victim died within the last 24 hours tells you next to nothing new. Listen closely to the pathologist, because sometimes he gives hours counted back from that exact minute and sometimes hours counted from before the body was discovered.
The snake venom question lets you select every option that applies. A neurotoxin is hard to read, but the other two types would leave visible signs.
The only document carrying a time and date is the bag of hair at the pathologist’s. The timestamp marks when you arrived, and the inspector showed up within an hour after the report.
If this still didn’t help, here’s how to fill it up:
- Manner of Death: Accident
- Cause of A: Leg wound
- Time: 10 am, Day 13, Month 10
- Method of Time Estimation: Algor Mortis
- Estimated Time: From 4 am to 5 am, Day 13, Month 10
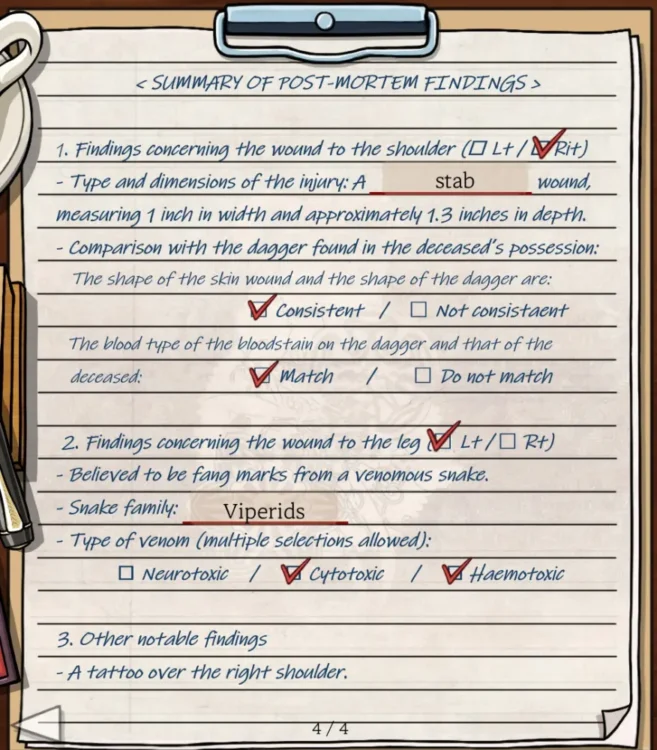
- Shoulder: Right
- Injury: Stab
- Shape of Wound: Consistent
- Blood Type: Match
- Leg: Left
- Snake Family: Viperids
- Type of Venom: Cytotoxic and Haemotoxic
Two More Bodies Turn Up
Right after you submit the first certificate, two more bodies are found, which adds new scenes and new words. Interact with every sparkling object in them to gather more clues.
Scene 3, Cemetery
- Note the footprints
- Footprints on the left: Footprints
- Tombstone: Elenor, Ainsworth
- Right worker, work schedule: Frank, Harper, Hans, Muller, Albert, Colins, Samuel, Dawkins
Scene 4, Lake
- Note the blood on the sack and the bloodstain on the oar
- Sack pulled out of the lake: Shovel, Hammer, Nails, Rake, Crowbar, Pliers
- Sandbag: Sandbag
- Boat: Oar, Rope
Scene 5
- New pages add Drowning, TBI and SCi
Form 3
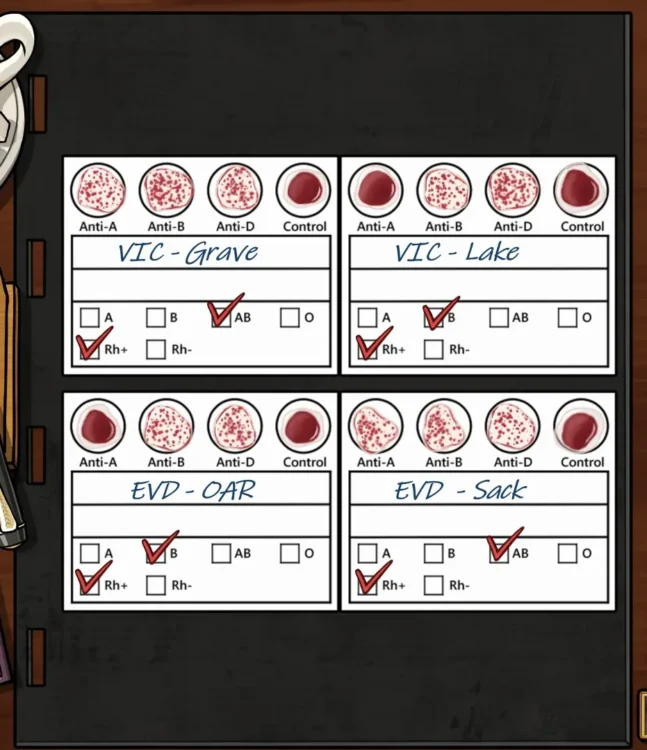
You now have four samples to sort: one from each new victim at the pathologist’s, plus one from the oar and one from the sack.
- VIC Grave: Vial E, blood type AB with Rh+
- VIC Lake: Vial C, blood type B with Rh+
- EVD Oar: Vial D, blood type B with Rh+
- EVD Sack: Vial F, blood type AB with Rh+
The Inspector’s Records
Take a fingerprint from all three victims. With the tattoos, fingerprints, and blood types on record, the inspector asks which records you need.
The correct answer is Criminal Organizations. All three victims share the same tattoo, and the note in the grave makes the whole thing sound like a robbery gone bad.
The Victim Identification Puzzle
This one is subtle, so the answers below come with their own reasoning. For each body, you have a height (with a margin of an inch either way), a blood type, a fingerprint pattern, and a rough face sketch. Every candidate profile also carries a couple of extra details, such as a criminal record or another identifying mark. You need all of it to get anywhere.
The shed victim is 5’5″, and five of the possible identities sit within an inch of that.
The first and third bodies tie on the main categories alone. If you read the note on the cemetery body, you might recognize a Colin among the profiles, but he is the wrong height for all three victims, so pay him no mind. One of the profiles is a face you have seen before.
The lake body is the real problem, since you could not get a good print from him. What you have is that he wears his watch on his right wrist and he is notably heavyset. Outside of that, there are no clear marks.
- Shed body: Clyde Bell. Height, blood type and fingerprint all match, but that leaves him tied with Marek, so the face sketch has to break the tie.
- Cemetery body: Malcolm Briggs. Height alone identifies him, since he is the only person within an inch of 6’0″, and the fingerprint clinches it. The note on his body also calls him Mal.
- Lake body: Barry Sutton. Blood type and height leave Thomas or Barry. The pathologist noticed no marks, which rules out Thomas, who has an anchor tattoo. The smashed watch on the right wrist also points to a left-handed victim, like Barry.
The Last Three Forms
The next three forms are a death certificate for each new victim and then a reconstruction of the whole night. Two bits of housekeeping before the specifics:
- Use military time for the math. If the game hands you a large number of hours, break it into multiples of 12, since those are the chunks that change the day and AM/PM. For example, 60 hours before 9 am on Day 15 is 24 plus 24 plus 12, which lands on 9 pm on Day 12.
- Birth years live in the criminal profiles. Both bodies were found on the same day, because the inspector and the officer interrupted you at the same time.
Before you fill in anything, nail down how these three victims are connected. It matters more later, but now is the time to get a feel for what they did and what they touched.
The moment you see a body in Elenor Ainsworth’s grave, the story clicks: her will has something to do with it. The cemetery victim’s plan and map tell you everything else, which is to dig up the necklace, cross the lake in a boat, go past the barn and leave at the train station.
Estimating the time of death is partly done through the pathology tests. You already estimated the time of death for the shed victim, and these two appear to have died before he did. You also have footprints for everyone except the cemetery victim.
With these in mind, let’s get to actually filling up the forms!
Malcolm Briggs’s Death Certificate: The Cemetery Victim
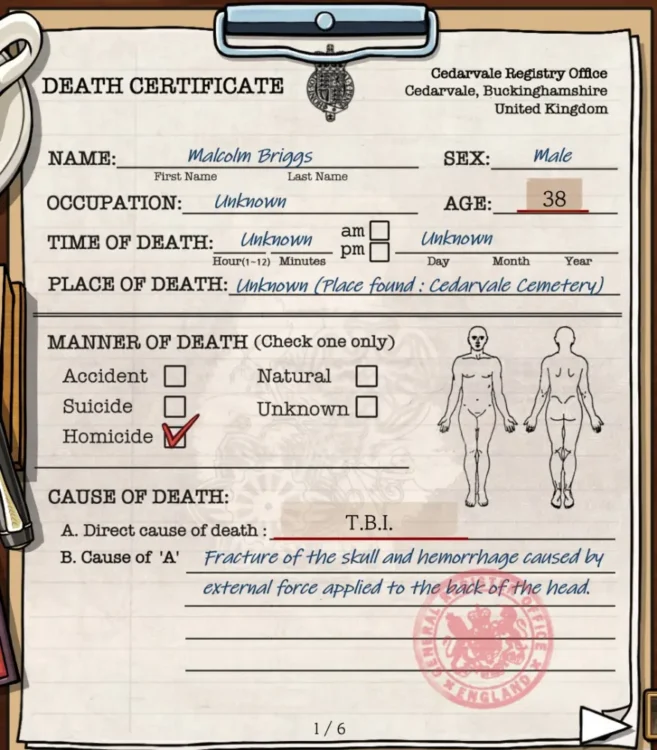
Malcolm was born in 1921, which gives you his age. The two witnesses who found him give you more to work with.
The cemetery map question asks which square he was found in. Sketching it out yourself helps, but this time we have more landmarks and a more predictable pattern. Count the graves: how many graves away is Elenor’s grave from the west path, and how many from the north path?
For the weapon, his blood is on the sack, but that does not narrow the pool in any meaningful way, because the sack stores four different weapons. The pathologist describes the wound as narrow and deep, and the laceration is four inches long. You get a pretty good view of it from the crime scene itself. Think about what has a long, thin, flat edge and is something the killer would have had on hand while digging up the grave. The forensic results also say the killer was left-handed.
For the timing, you got a meteorology report right before the bodies were identified. Avery mentions that the weather would have to be very specific for the footprints at the cemetery to be as solid as they are, and that pairing of footprints and weather is what produces the 2 am estimate.
- Age: 38
- Manner of Death: Homicide
- Direct cause of death: T.B.I.
- Body discovered by: Frank Harper
- Reported to police by: Albert Colins
- Row: E
- Column: 5
- Found inside the grave of: Elenor Ainsworth
- Time found: 9 am, Day 15, Month 10
- Back of head: Laceration
- Site of injury: Left
- Assailant’s dominant hand: Left-handed
- Murder weapon: Shovel
- Minimum time before discovery: 36 hours
- Maximum time before discovery: 60 hours
- Forensic entomology: 48 hours
- Estimated time of death: From 9 pm Day 12 Month 10 to 9 am Day 13 Month 10
- Time from application of force to death: Instantaneous death
- Location of body and place of death: Same location
- Evidence for time estimation: Footprint
- Estimated time of death based on response: 2 am, Day 13, Month 10
- Final estimated time of death: 2 am to 9 am on Day 13, Month 10
Barry Sutton’s Death Certificate
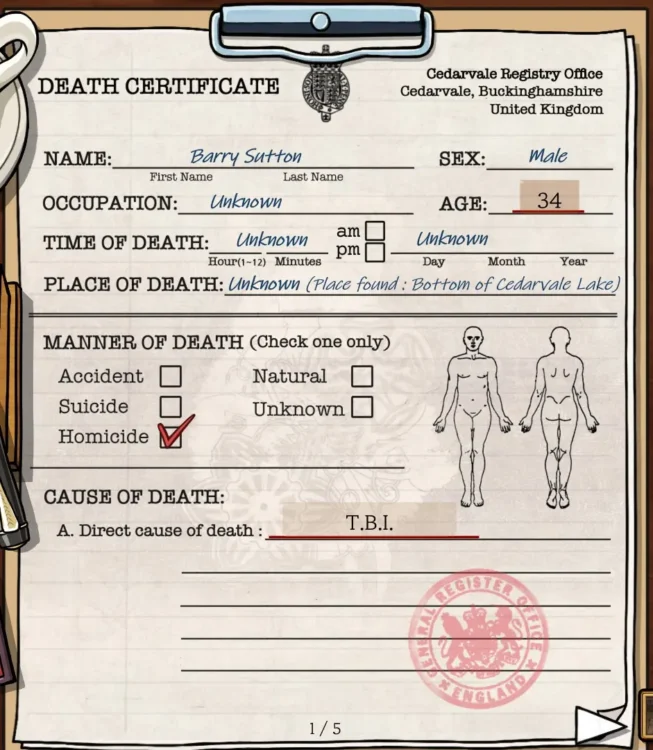
Barry was born in 1925, which gives you his age. The central question is whether he was knocked out and drowned in the lake, or killed first and put in the lake afterwards. The medical book describes the characteristics of each.
The report asks for something at the scene that helps date it and involves the weather report. His blood type matches the oar, which settles the weapon. For the time of death, the only way of estimating it is from the state of the body. His boots are also pretty dirty.
With a skull fracture present and no pulmonary edema, the entries describe a man who was killed first and dumped afterwards.
- Age: 34
- Manner of Death: Homicide
- Direct cause of death: T.B.I.
- Tied around body: Rope
- Body attached to: Sandbag
- Time found: 1 pm, Day 15, Month 10
- Method of time estimation: Rigor Mortis
- Estimated time of death: 1 am to 11 pm on Day 13, Month 10
- Evidence for time estimation: Footprint
- Estimated time of death based on response: 2 am, Day 13, Month 10
- Final estimated time of death: 2 am to 11 pm on Day 13, Month 10
- Instrument responsible for head injuries: Oar
- Skull fracture: Present
- Pulmonary edema: Absent
The Order of Events
By now you know most of the sequence, since you had to work through it to make sense of the deaths. Head back to the shed and ask where the dagger came from.
The note on the cemetery victim says he gets half after Colin backed out, with the other two splitting the remaining half. Every person who backs out, or is otherwise made unavailable to cash out, means more money for those who are left. A dead person cannot commit murder, so each killing has fewer possible culprits than the one before it.
The fight on the lake is the tricky part, because you have to decide who threw the first punch. The boat layout means the two men faced each other while one of them rowed.
For the location, the note calls one man Mal and another Mouse, and you need to know where Mouse comes from. The crew breaks down into a tall one, a heavyset one and a short one, so work out which of the three Mouse is.
- First perpetrator: Barry Sutton
- Second perpetrator: Clyde Bell
- Location: Wolverhampton
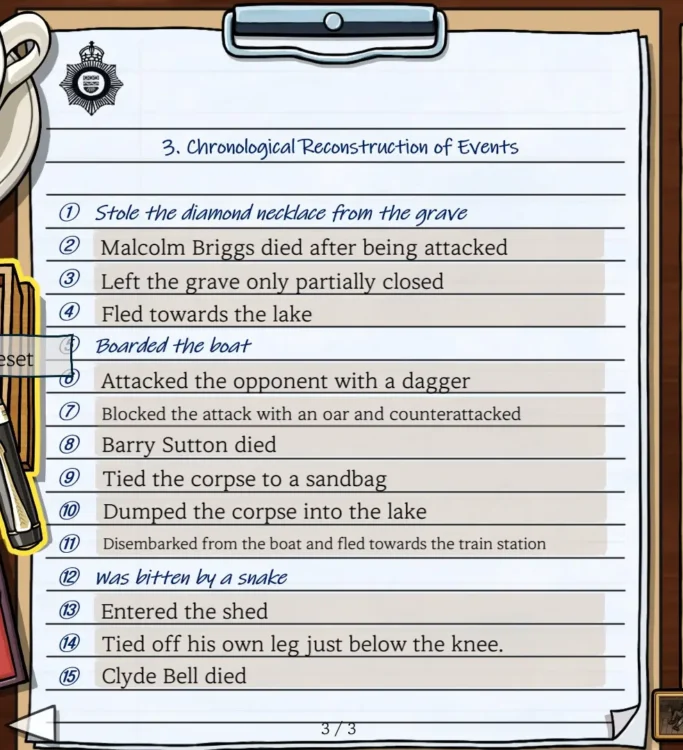
The chronological order, using the form’s own slot numbers:
- 2: Malcolm Briggs died after being attacked
- 3: Left the grave only partially closed
- 4: Fled towards the lake
- 6: Attacked the opponent with a dagger
- 7: Blocked the attack with an oar and counterattacked
- 8: Barry Sutton died
- 9: Tied the corpse to a sandbag
- 10: Dumped the corpse into the lake
- 11: Disembarked from the boat and fled towards the train station
- 13: Entered the shed
- 14: Tied off his own leg just below the knee
- 15: Clyde Bell died
Episode 7: Midnight Call
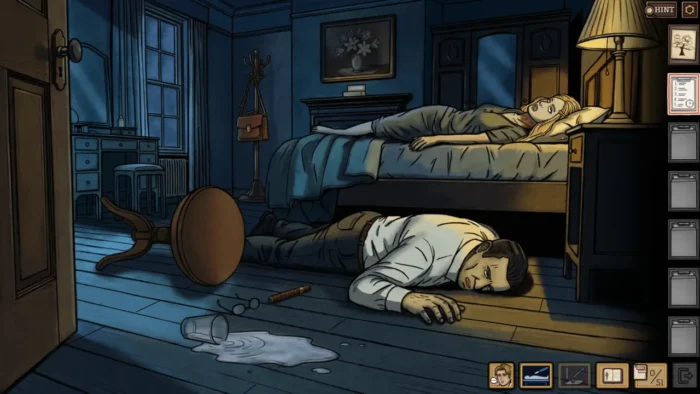
Scene 1: Drawing Room
Inspect the bullet lodged in the painting, the firearm on the floor, and the second bullet resting near Oswald. Unlocked words:
- Revolver: Revolver
- Fireplace: Fireplace
Scene 2: Upstairs Hallway
Examine the suspicious stain on the carpet to log the physical anomaly.
Scene 3: Left Bedroom
Check the heating unit against the wall, which will matter a whole lot once you realize how warm the manor feels.
- Radiator: Radiator
Scene 4: Middle Bedroom
Inspect Florence’s broken fingernail closely, then click around the room to bank five essential terms:
- Jewelry Cleaner: Jewelry Cleaner
- Spilled Glass: Glass
- Cigar: Cigar
- Painkiller Box: Painkiller
- Florence’s Head: Hairpin
Scene 5: Right Bedroom
Check the men’s neckwear draped over the chair for one final physical clue.
- Tie on Chair: Tie Clip
Scene 6: Medical Book
Open your medical reference guide and fill it up based on your discoveries. All 30 terms are listed below:
- Medical Terms: TBI, Asphyxia, Suffocation, Strangulation, Smothering, Choking, Hanging, Ligature, Manual, Complete, Incomplete, Contact, Close-Range, Intermediate, Distant, Perforating, Penetrating, Graze, Salicylate, Acidosis, Morphine, Barbiturates, Cardiac Arrest, Cyanide, Respiratory Failure, Arsenic, Organ Failure, Amphetamines, Cerebral Hemorrhage, Succinylcholine
Scene 7
Check both reference charts to lock in the cast of characters and the exact floor plan names:
- Family Tree: Ainsworth, Clara, Harry, George, Florence, Oswald
- Guest Lodge Guide: Drawing, Stairs, Lily Room, Laurel Room, Rose Room, Upper-Floor Corridor
Form 1
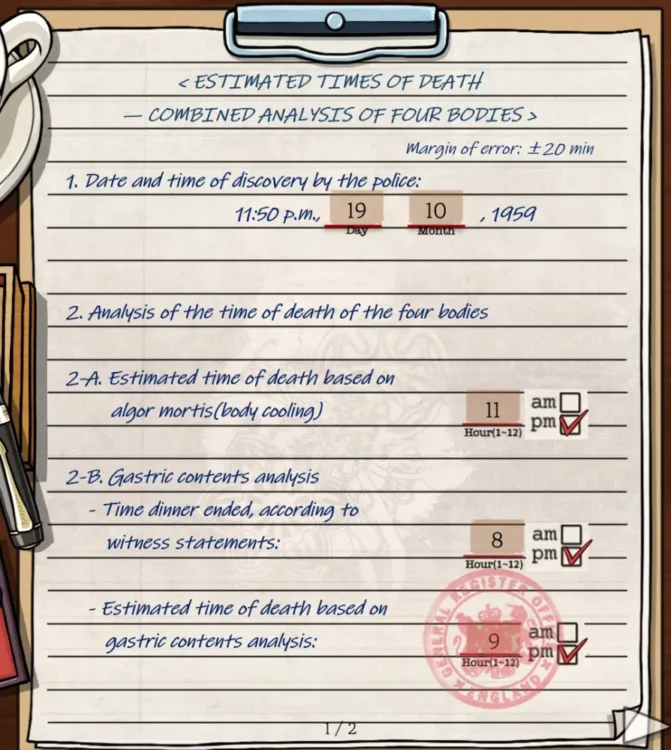
All four victims appear to have died simultaneously, and your opening assignment is pinpointing when they dropped. If you got spoiled in the previous chapter by having Avery run the Algor Mortis numbers for you, brace yourself: you have to punch in the math manually now!
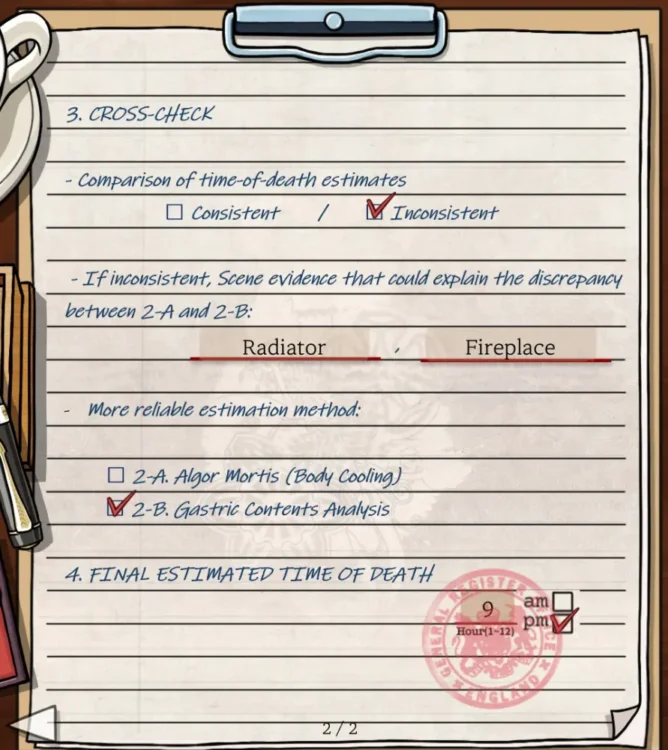
The formula you need is CurrentTemp = 98.6 – 1.5*Hour. Every body registers right around 97.1, so plugging that in gives you 1 hour before discovery. That points to 11 pm, which becomes tricky when you realize dinner ended at 8 pm and gastric contents place the time of death at 9 pm.
Why the two-hour discrepancy? Algor mortis only works reliably at normal room temperature. Extreme cold accelerates heat loss and makes corpses look older, while extreme heat slows cooling so bodies appear freshly dead.
Somebody in this house knew their forensics and set every Radiator on high while keeping the Fireplace going strong on an otherwise mild night to buy themselves a fake alibi.
As for the calendar date, inspect George’s medication box: it holds a 3-day supply of 3 daily packets (9 packets originally), allowing you to count out the exact discovery date.
Also, take a quick look at the medical book’s gunshot wound classifications alongside Oswald’s leg injury and Harry’s head wound right now. You will notice that Oswald’s witness statement clashes with basic ballistics, even if the maid’s timeline holds up.
Fill out Form 1 with these entries:
- Discovery by the police: Day 19, Month 10
- Estimated time of death based on algor mortis: 11 pm
- Time at which the dinner ended: 8 pm
- Estimated time of death based on gastric contents: 9 pm
- Comparison of time of death estimates: Inconsistent
- Scene evidence: Radiator and Fireplace
- Reliable estimation method: 2-B Gastric Contents Analysis
- Final estimated time of death: 9 pm
Form 2: Harry Ainsworth
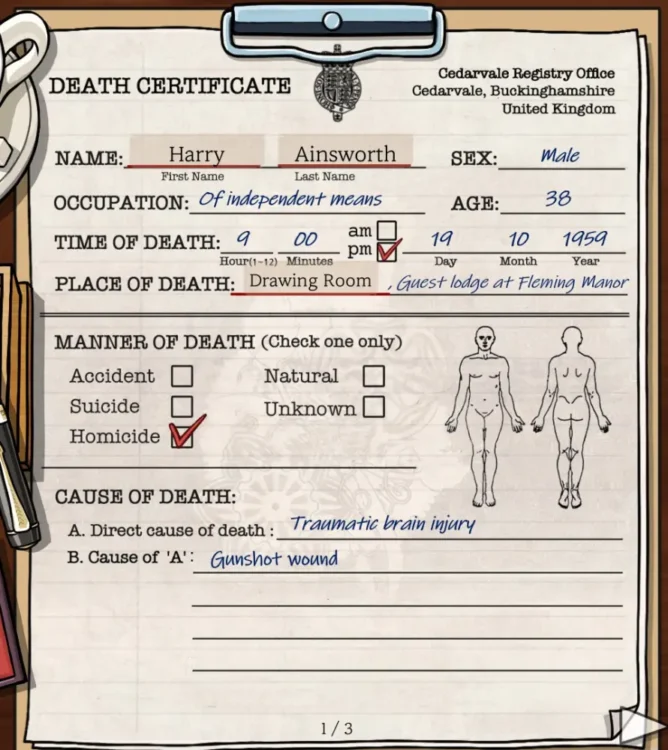
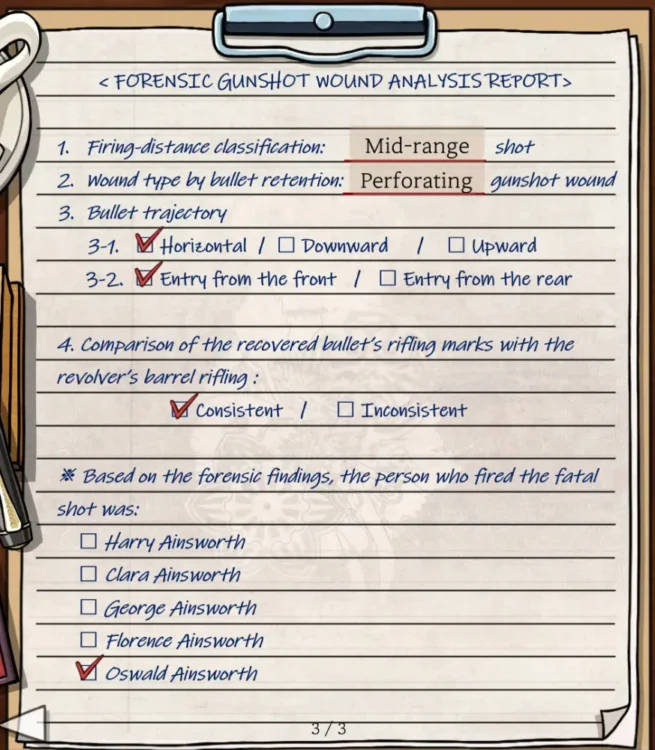
Harry took a fatal shot in the drawing room, and the bullet exited cleanly through his skull. Connecting the entry and exit wounds draws a straight, level line across the room, proving the shooter stood at middle distance directly in front of him.
- Name: Harry Ainsworth
- Time of death: 9 pm
- Place of death: Drawing Room
- Manner of death: Homicide
- Firing-distance classification: Mid-range
- Wound type by bullet retention: Perforating
- Bullet trajectory 3-1: Horizontal
- Bullet trajectory 3-2: Entry from the front
- Comparison of the recovered bullets: Consistent
- Person who fired the fatal shot: Oswald Ainsworth
Form 3: Clara Ainsworth
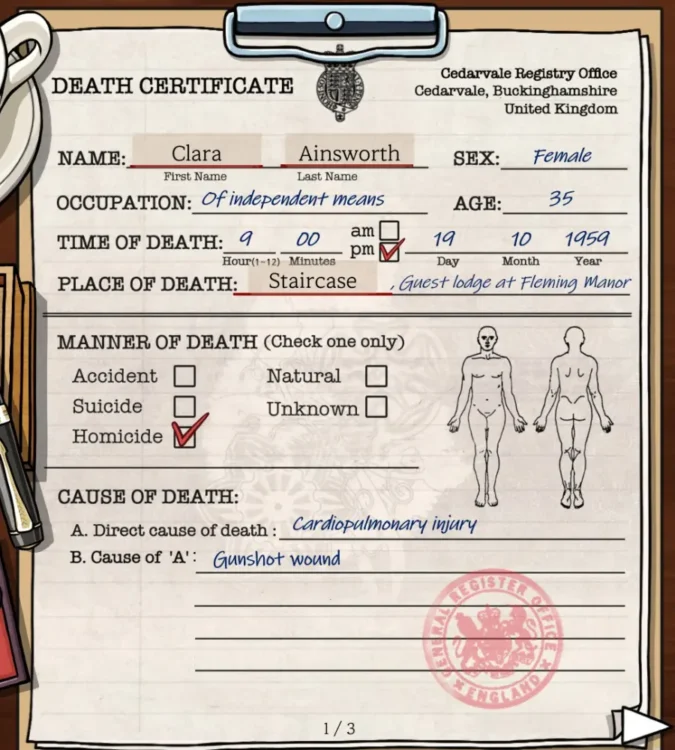
Unlike Harry, Clara has no exit wound, and her chest X-ray clearly shows the slug lodged inside her torso. The staircase and the upper-floor corridor count as separate locations in your paperwork.
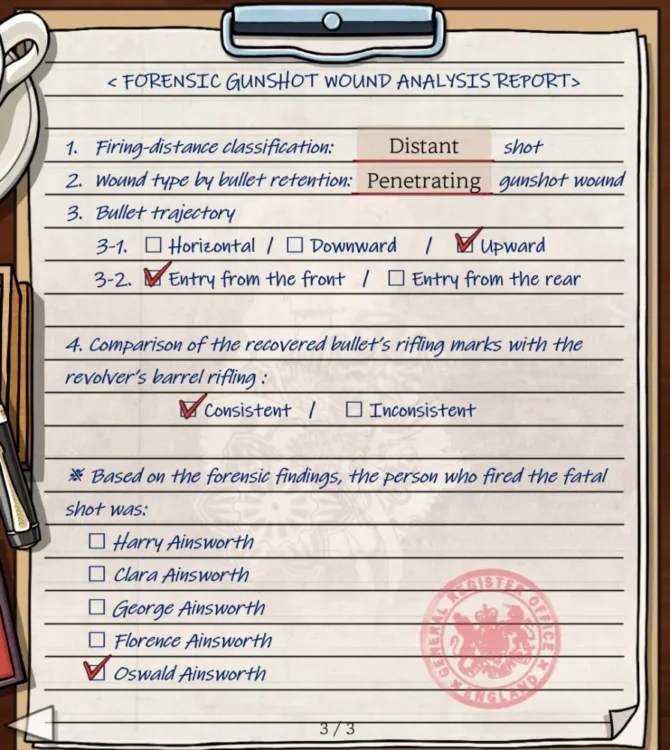
Luminol proves she was shot while standing on the Staircase from an upward angle below in the drawing room, collapsed from a frontal shot, and had her body dragged up into the corridor afterward.
- Name: Clara Ainsworth
- Time of death: 9 pm
- Place of death: Staircase
- Manner of death: Homicide
- Firing-distance classification: Distant
- Wound type by bullet retention: Penetrating
- Bullet trajectory 3-1: Upward
- Bullet trajectory 3-2: Entry from the front
- Comparison of the recovered bullets: Consistent
- Person who fired the fatal shot: Oswald Ainsworth
Forensic Toxicology Analysis
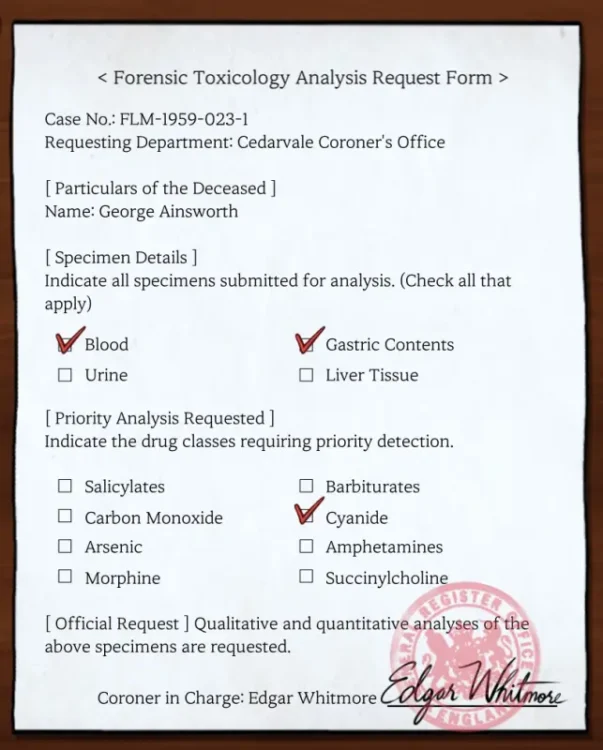
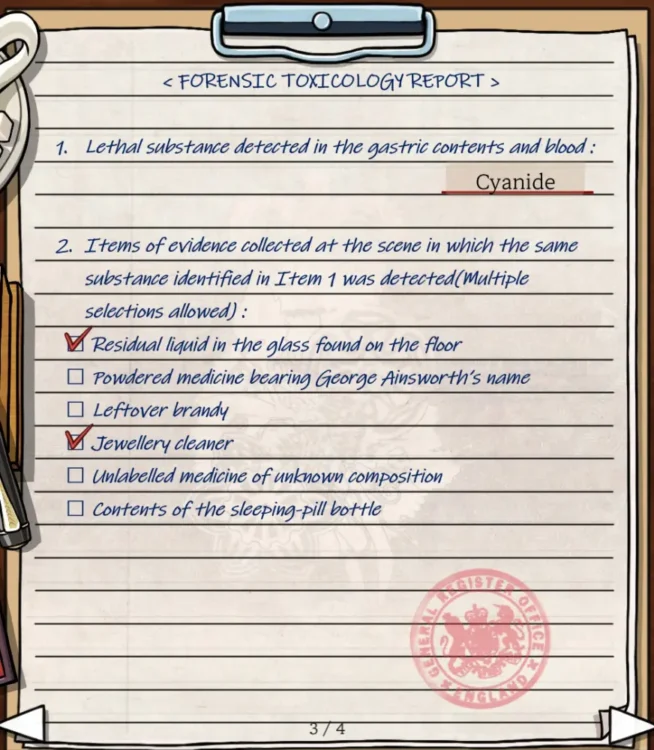
With Harry and Clara’s certificates done, it is time to tackle George and Florence. Avery’s examination of George turns up bright red skin, a corroded stomach lining, severe cyanosis, and a faint trace of Luminol-reactive blood around his mouth. Only one poison in your medical book fits every symptom: Cyanide.
Keep in mind a quirky two-step pacing mechanic here: your initial toxicology results will not come back until after you complete Florence’s death certificate, at which point you must submit a second toxicology request (selecting Cyanide as your priority drug once more) and return for the final report.
Forensic Toxicology Request Form
- Specimen Details: Blood and Gastric Contents
- Priority Analysis: Cyanide
- Follow-Up Toxicology Report: Select Cyanide as your priority drug again after completing Florence’s form.
Blood Test Results
Alongside toxicology, you have eight blood vials to test under the microscope and cross-reference against the agglutination chart in your medical book:
- Harry A: Vial D – Blood type A with Rh-
- Clara A: Vial B – Blood type A with Rh+
- George A: Vial G – Blood type A with Rh+
- Florence A: Vial E – Blood type A with Rh+
- Oswald A: Vial A – Blood type AB with Rh+
- Tissue (nail): Vial C – Blood type A with Rh+
- Bullet (wall): Vial F – Blood type A with Rh-
- Bullet (floor): Vial H – Blood type AB with Rh+
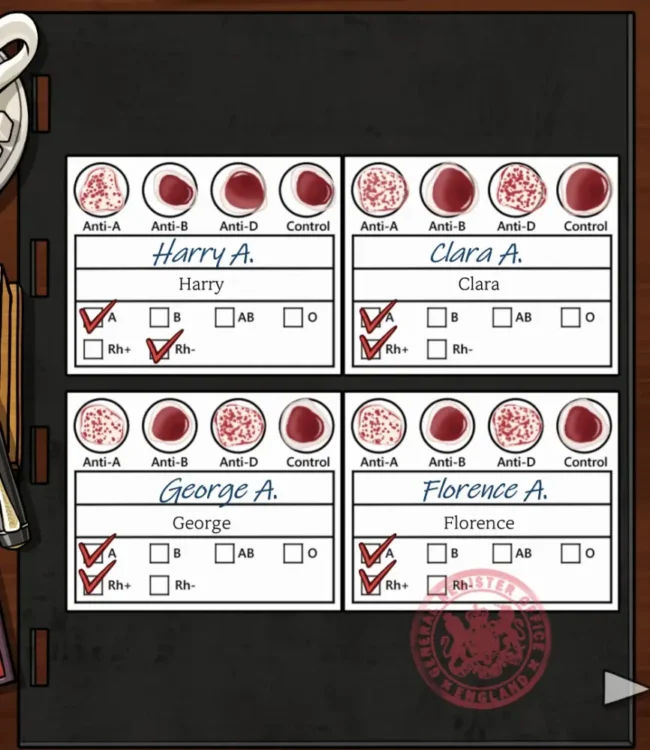
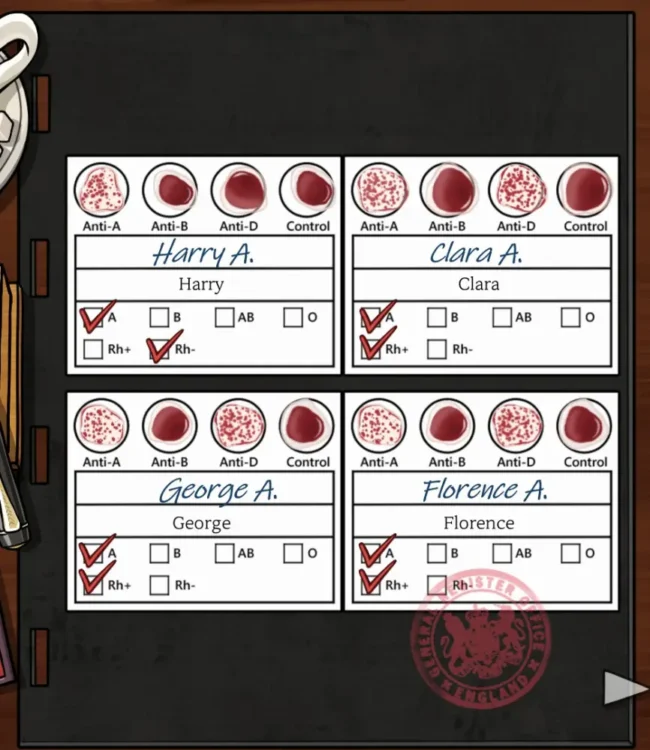
Form 4: George Ainsworth’s Death Certificate
You already know Cyanide killed George, but now you must also figure out how it entered his system and who put it there. He could not have been poisoned during the 8 pm dinner, because fast-acting cyanide would have dropped him face-first into his soup in front of the entire family.
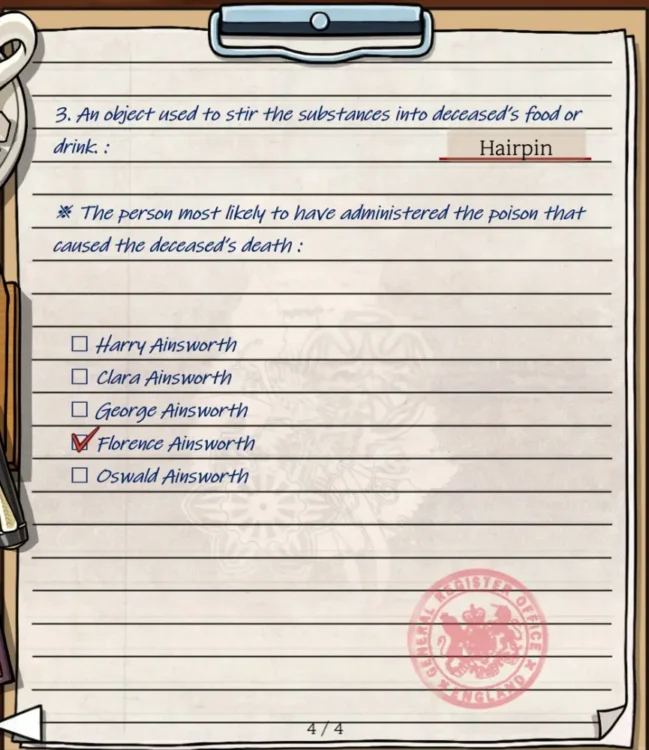
Look at the spilled water glass in the bedroom instead. According to your medical book, cyanide cleans silver yet corrodes gold, which points straight to Florence’s Hairpin as the makeshift stirring rod and implicates Florence Ainsworth as the poisoner.
- Name: George Ainsworth
- Time of death: 9 pm
- Place of death: Lily Room
- Manner of death: Homicide
- Direct cause of death: Resp. failure
- Cause of A: Cyanide
- Lethal substance in gastric contents: Cyanide
- Items of evidence collected: Tick the first and the fourth boxes
- Object used to stir substances: Hairpin
- Person most likely to have administered poison: Florence Ainsworth
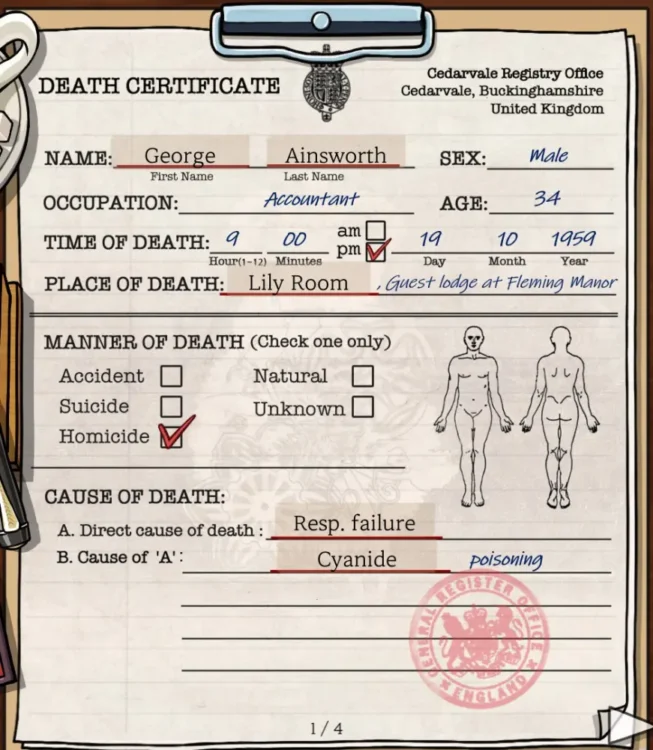
Form 5: Florence Ainsworth’s Death Certificate
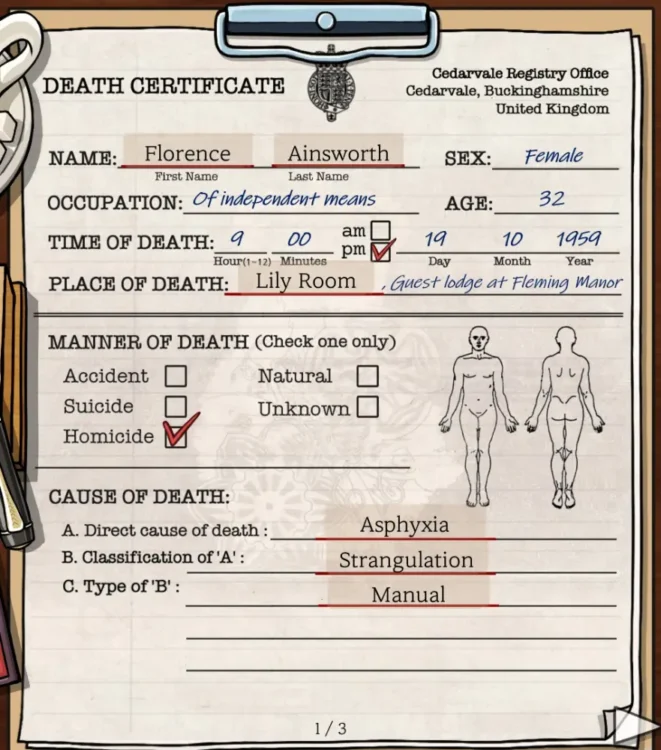
Florence clearly died of Asphyxia caused by Manual Strangulation, as there is no ligature or strangling weapon anywhere near her body.
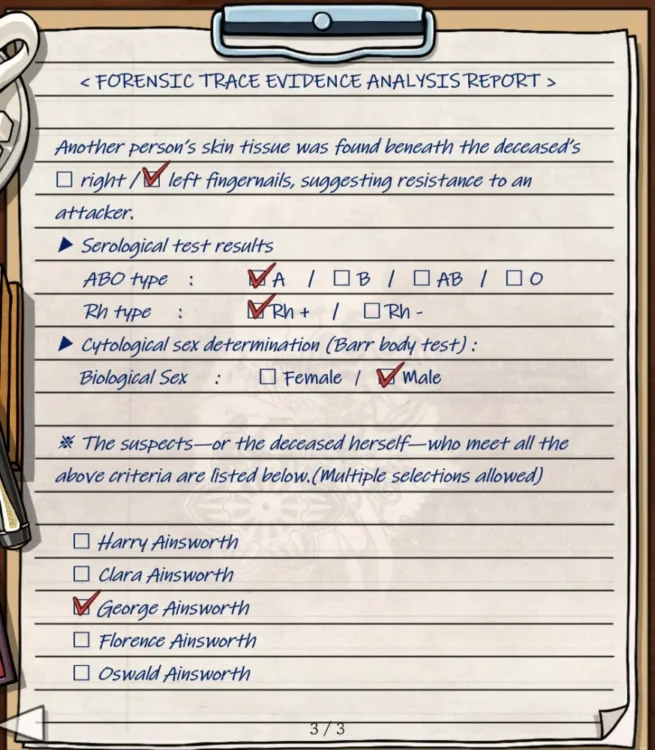
To nail down her killer, match the skin tissue trapped beneath her left fingernails. Serological typing shows A and Rh+, which eliminates Oswald and Harry, while the Barr Body test confirms the DNA belongs to a Male, leaving George Ainsworth as the only person who could have strangled her with his dying strength after she poisoned him.
- Name: Florence Ainsworth
- Time of death: 9 pm
- Place of death: Lily Room
- Manner of death: Homicide
- Direct cause of death: Asphyxia
- Cause of A: Strangulation
- Type of B: Manual
- Skin tissue found beneath: left fingernails
- Serological test for ABO type: A
- Serological test for Rh type: Rh+
- Biological Sex: Male
- The suspect: George Ainsworth
Form 6: Dismantling Oswald’s Witness Statement
For the final showdown of Episode 7, you have to tear apart Oswald’s written testimony. Almost every sentence he gave investigators is a fabrication, but you still have to prove it. If a claim contradicts what you know happened, such as details tied to the gunpowder hand test that are not available as clickable rebuttal cards here, leave it untouched.
Flag these contradictions to close the case:
- Page 1, Statement 5 (“At 11 PM”): Gastric Contents (proves the victims died at 9 pm, not 11 pm)
- Page 2, Statement 3 (“Harry was strangling my sister-in-law Florence”): Broken Fingernail (the A Rh+ male tissue under Florence’s left fingernails rules out Harry, who is A Rh-, and proves George strangled her)
- Page 3, Statement 2 (“Fired at Clara in the upper-floor corridor”): Clara’s Chest X-Ray (proves an upward bullet trajectory from the stairs rather than a level shot in the corridor)
- Page 3, Statement 5 (“he shot me in the leg from the other side of the room”): Oswald’s Leg Wound (the injury is a point-blank contact wound, making a long-distance shot across the room impossible)
- Page 4, Statement 5 (“he pressed the muzzle firmly against his forehead”): Harry’s Head Wound (Harry suffered a mid-range gunshot wound rather than a contact muzzle wound)
Episode 8: The Human Cannonball
Scene 1: Circus
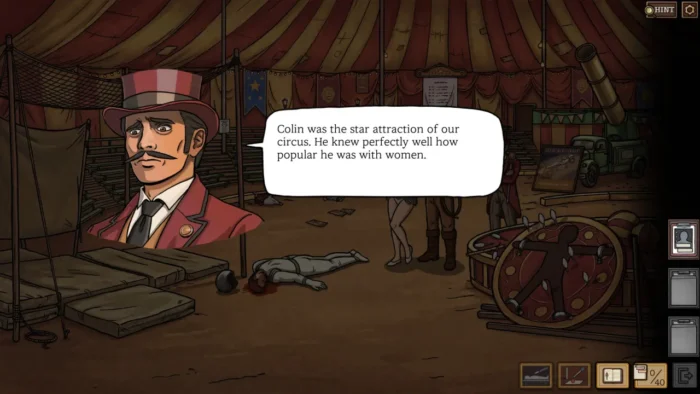
Inspect the safety equipment, the promotional posters, the ringmaster’s gear, and the dartboard setup on the main floor:
- Safety Net: Safety Net
- Bouquets: Bouquet
- Circus Poster: Hargreaves
- Bearded Man, Whip: Whip
- Ringmaster’s Cane: Cane Knob
- Darts by Target: Blowpipe
- Darts on Dartboard: Dart
- The Human Cannon! Poster: Colin, Stella
Scene 2: Dressing Room Front
Search the paperwork on the desk and the props scattered around the front dressing area:
- Operating License: Silas
- Wage Ledger: Thorne, Riley, Sinclair, Jenkins
- Insulating Tape: Insulating Tape
- Balloon: Balloon
- Air Pump: Air Pump
- Wig Stand: Tom
- Rubber Balls: Rubber Balls
Scene 3: Dressing Room Back
Head into the rear dressing room and inspect the tools, posters, and clothing:
- Toolbox: Needle
- Lion Poster: Arthur, Leo
- Whisky Bottle: Whisky
- Vest: Barnaby
Scene 4: Medical Book
Flip through your medical manual to bank all 16 clinical terms needed for this episode’s toxicology and autopsy reports:
- Medical Terms: TBI, SCI, Salicylates, Acidosis, Morphine, Cyanosis, Barbiturates, Cardiac Arrest, Strychnine, Opisthotonus, Cyanide, Respiratory Failure, Arsenic, Organ Failure, Amphetamines, Succinylcholine
The Names Form
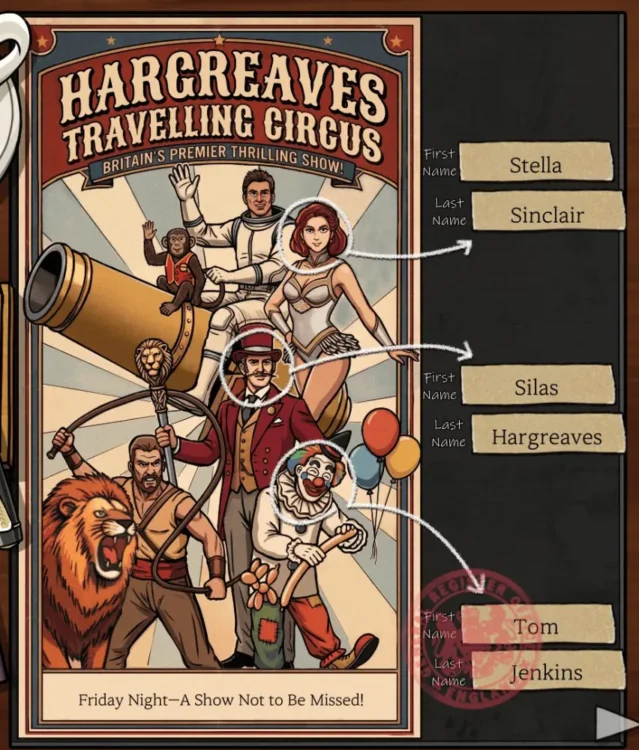
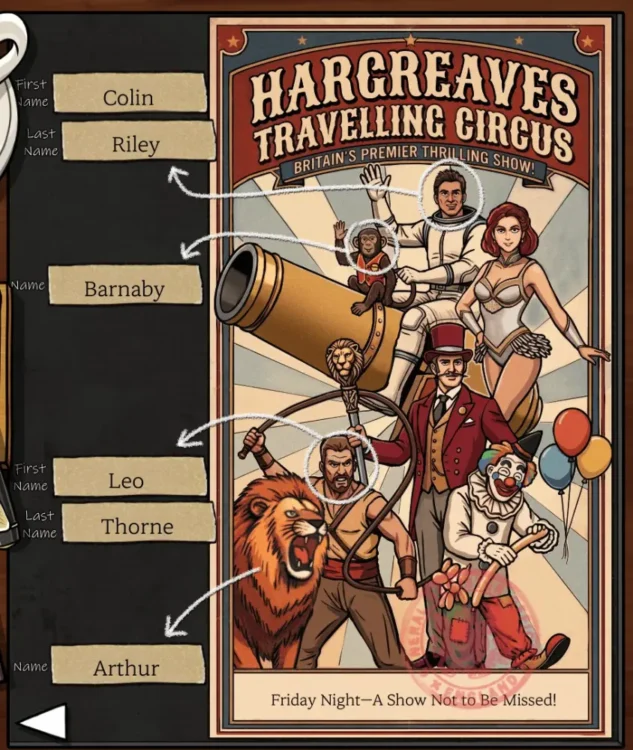
Your first piece of paperwork asks you to match seven names on the circus poster. If you remember Episode 6, an acrobat named Colin with a pet monkey should immediately ring a bell.
The wage ledger hands you the last names of all four performers, though it notes that Jenkins does not get paid in cash (a detail that comes back to bite you on the very last form of the episode).
Watch out for the lion taming poster trap: it prints the names Arthur and Leo without clarifying which one is the human tamer and which one is the big cat. Check the feeding records to see that Arthur eats 60 kilos of beef a week, proving Leo Thorne is the tamer and Arthur is the lion.
Enter the seven names:
- First name: Stella Sinclair
- Second name: Silas Hargreaves
- Third name: Tom Jenkins
- Fourth name: Colin Riley
- Fifth name: Barnaby
- Sixth name: Leo Thorne
- Seventh name: Arthur
Form 2: Forensic Toxicology
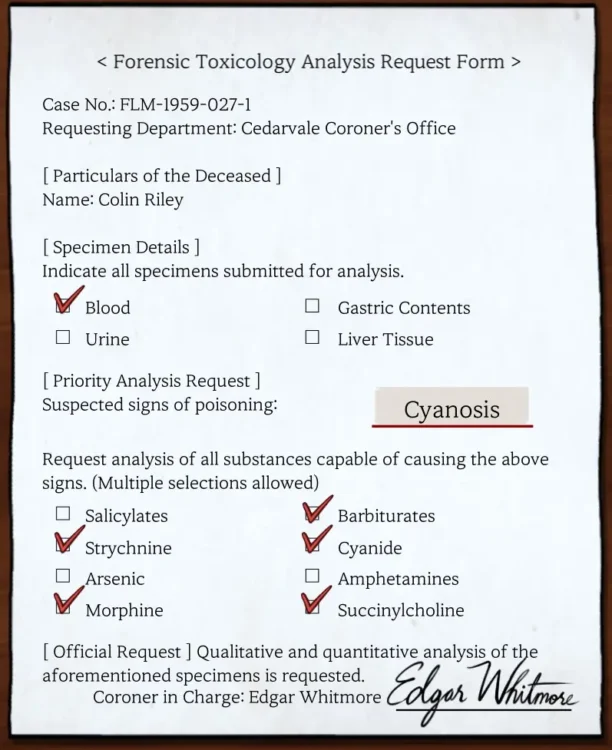
Before you can write up a death certificate, you need to order a lab screen on Colin Riley. Blood is the only sample available to submit right now, and a quick look at the corpse reveals a bluish tint on his extremities, known as Cyanosis. Do not try to guess a single poison at this stage and instead tick all that match its symptoms.
Submit the initial toxicology request with these selections:
- Specimen Details: Blood
- Suspected signs of poisoning: Cyanosis
- Request Analysis: Tick Barbiturates, Strychnine, Cyanide, Morphine, and Succinylcholine
Form 3: Initial Death Certificate
Because Avery is out of the office, this section plays out just like Episode 2: you have to file an initial deduction based strictly on the evidence currently on your desk.
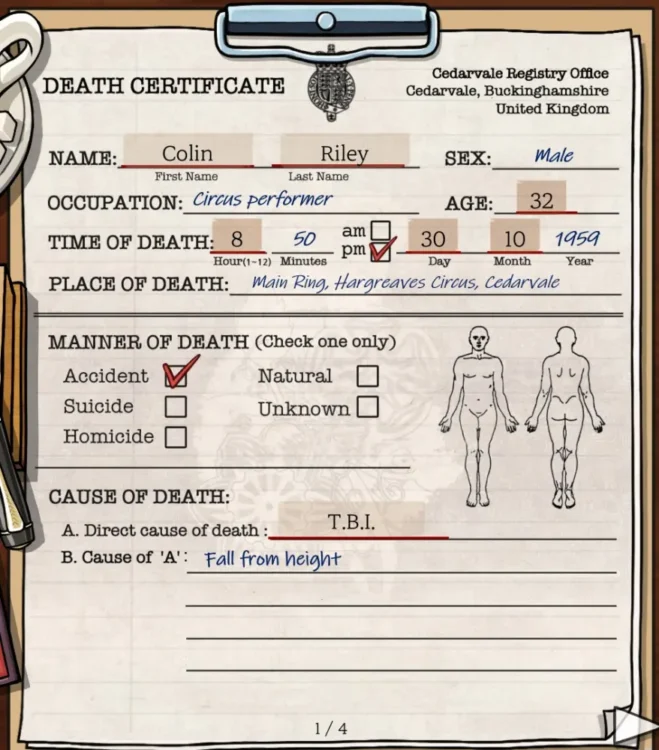
On paper, Colin simply botched his landing and fractured his skull. Check his records to see when he was born and deduct his age.
Next, check the equipment inspection log: the cannon and net were inspected every Wednesday before the Friday show. To nail down the exact timestamp, look at the show schedule. It is divided into six 20-minute sections, and because Colin died mid-act during the human cannonball routine rather than at a clean interval break, it’s easy to find his time of death.
Finally, copy the exact phrasing from your clean lab screen for the blood test line. And if you still can’t do it, here’s the full solution:
- Name: Colin Riley
- Age: 32
- Time of death: 8:50 pm, Day 30, Month 10
- Manner of death: Accident
- Direct cause of death: T.B.I.
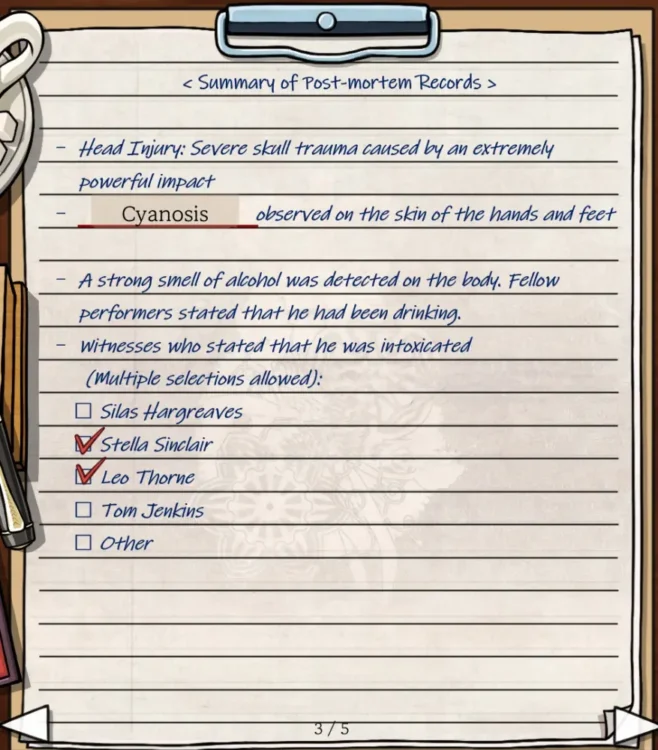
- Observation on the skin of hands and feet: Cyanosis
- Witnesses: Stella Sinclair and Leo Thorne
- Lethal substances detected in blood test: Non detected
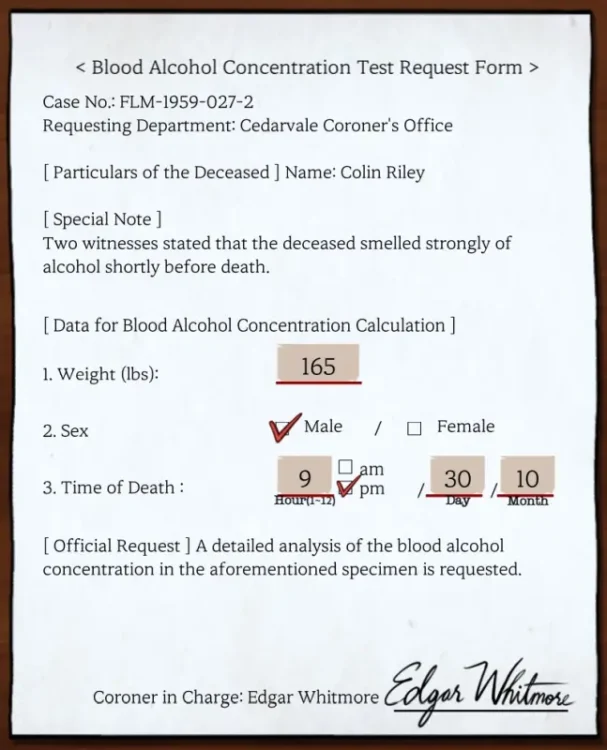
(BAC) Test Request
With the initial blood toxicology coming back clean, witnesses Stella Sinclair and Leo Thorne claim Colin was drunk on the job. To test their story, submit a Blood Alcohol Concentration request:
- Weight (lbs): 165
- Sex: Male
- Time of Death: 9 pm, Day 30, Month 10
Form 5: Second Toxicology Screen
Once Avery returns, he points out that a fast-degrading variant of succinylcholine breaks down in the bloodstream before standard lab tests can catch it. That means you need physical trace evidence from the circus floor.
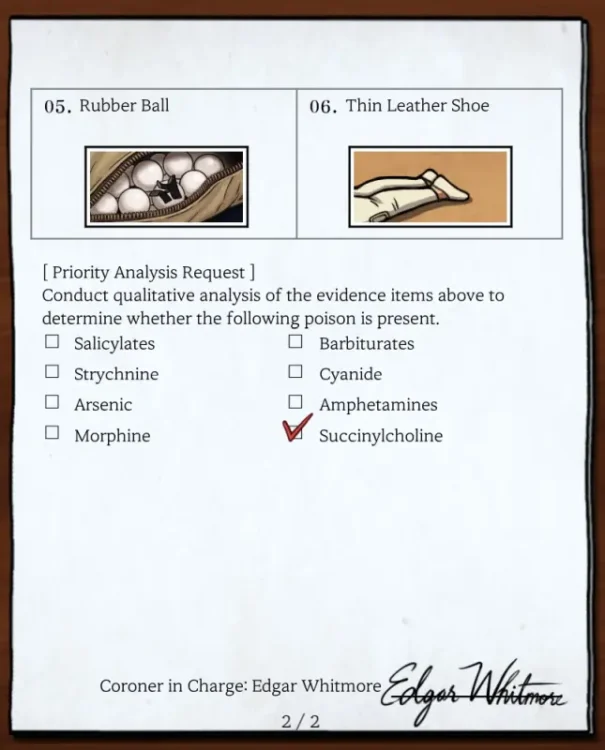
Head back to the main scene and inspect the victim’s shoes, the ringmaster’s cane, the blowpipe, the needle on the dartboard, a dart on the dartboard, and check inside the landing mattress to pull out a hidden rubber ball.
Open your second Forensic Toxicology request, tick Succinylcholine as your priority analysis, send it off, exit the form, and read the incoming lab report.
Answering the Inspector’s Questions
Right after you read the updated lab results, the inspector corners you with two questions. Pay close attention to Question 2 if you are hunting achievements:
- Question 1 (What 3 things make us think it was a murder?): Select Puncture wound, hidden poison, and discrepancy between witnesses and test results (listed in-game as discrepancy between witness testimony).
- Question 2 (What is the single most necessary test?): The correct answer is Fingerprints (or The suspects’ fingerprints), so you can prove who handled the poison.
Form 6: Fingerprint Examination Report
Now comes the biggest headache of Episode 8: matching a latent fingerprint lifted from the insulating tape against 46 reference prints.
Staring at the screen is brutal because the print on the tape is crooked and tilted at a completely different angle from the upright reference cards.
Save your eyesight with a quick workaround: take a screenshot (or even a photo with your phone) of the crooked tape print, open it in any basic image editor, rotate it until the ridges sit vertical, and compare it side-by-side against your suspects.
If you don’t want to go through all the fingerprints, here’s the solution:
- Person Identified: Stella Sinclair
- Hand Identified: Right
- Finger: Index
From 7: Amended Death Certificate
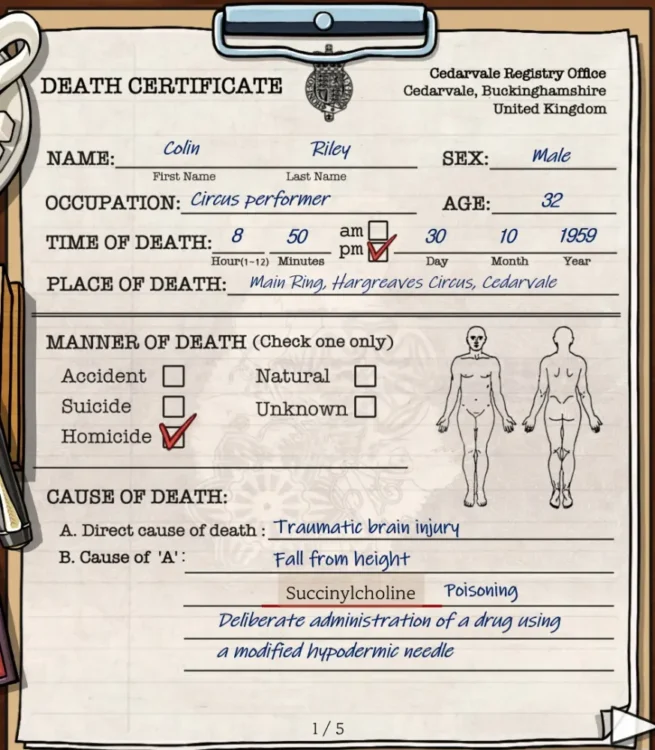
With the hidden poison and fingerprint match confirmed, open Colin Riley’s death certificate one more time to file the official homicide amendment.
- Name: Colin Riley
- Manner of death: Homicide
- Cause of A: Succinylcholine
- Observation on the skin of hands and feet: Cyanosis
- Witnesses: Stella Sinclair and Leo Thorne
- Lethal substances detected in blood test: Non detected
- Blood Alcohol Concentration: 0%
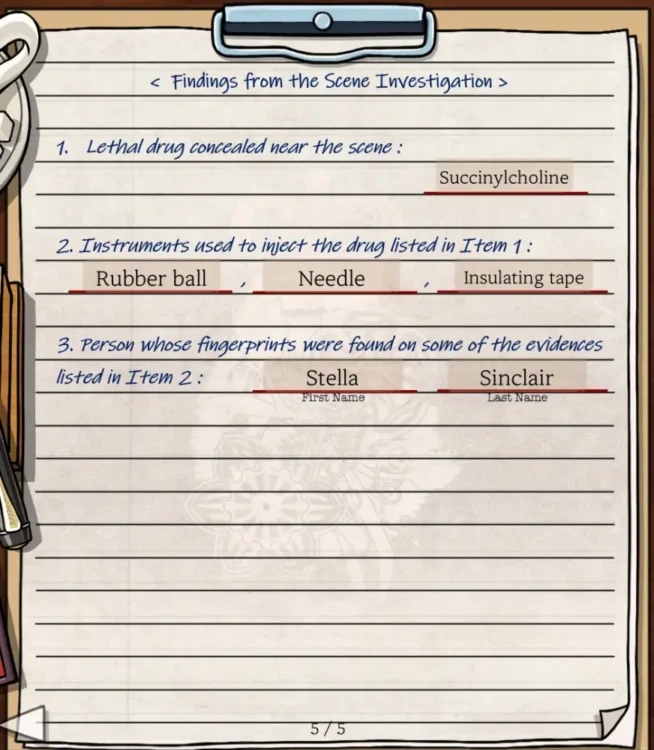
- Lethal drug concealed near the scene: Succinylcholine
- Instruments used to inject drug: Rubber ball, Needle, Insulating tape
- Person whose fingerprints were found: Stella Sinclair
Here are screenshots of the most important pages, if it’s easier for you this way:
Circus Floor Redux & The Clown
Do not celebrate just yet! Before Episode 8 wraps up, revisit the circus floor one final time and inspect the Wanted Poster to unlock six new keywords in your notebook:
- Wanted Poster: Derek, Walker, Daisy, Brown, Rupert, Fleming
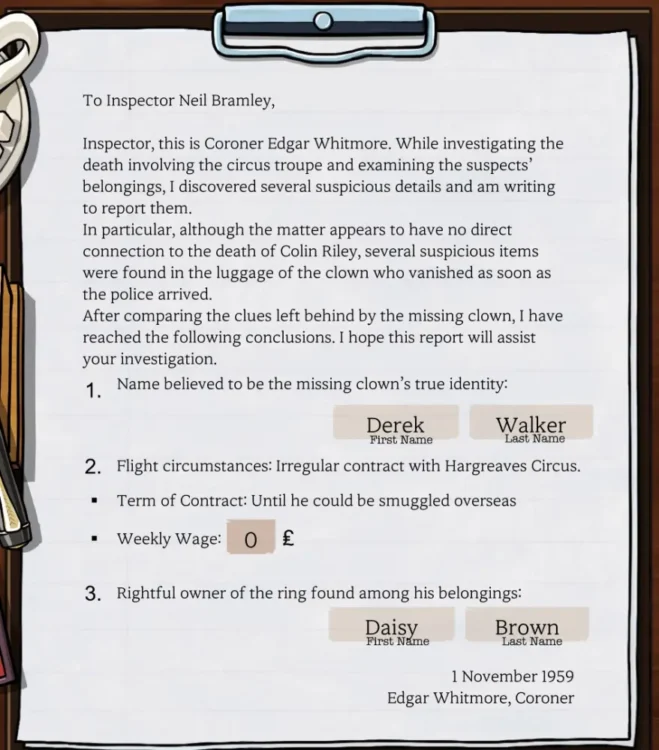
Your final form is a straightforward reading comprehension check tying up the subplot of the missing clown. If you can’t mix and match the new clues, here is the final form:
- Name believed to be the missing clown’s true identity: Derek Walker
- Weekly Wage: 0
- Rightful owner of the ring: Daisy Brown
Episode 9: The Dying Message
Just when you think you have seen the worst this game can throw at your detective notebook, Episode 9 of Death at Fleming Manor, The Dying Message, drops you into a charred mortuary alongside eight burned corpses whose heads and bodies have been mixed and matched like a gruesome jigsaw puzzle. Let’s jump in!
Scene 1: Burnt Mortuary
Take a close look at the posture of the corpse lying on the floor, then inspect the mouth and the two metal tools nearby:
- Mouth of Floor Victim: Gold Crown
- Iron Pipe: Iron Pipe
- Crowbar: Crowbar
Scene 2: Exterior
Check the outside area around the burned building to clear the scene, though no vocabulary terms unlock here.
Scene 3: Mortuary Fire Report
While standing inside the mortuary, click the clipboard in the upper-right corner of your screen to read the fire report and bank 11 keywords:
- Fire Report Terms: Frederick, Wright, Contract, Sophia, Fleming, Stanley, Barker, Statement, Wilfred, Hampton, Playing Cards
Scene 4: Medical Book
Open your medical reference guide to unlock all 11 clinical terms required for this chapter’s toxicology and cause-of-death fields:
- Medical Terms: Saylicylates, Morphine, Barbituriates, Carbon Monoxide, Cyanide, Arsenic, Argentines, Succinyocholine, Asphyxia, Suffocation, Strangulation
Form 1: Stanley Barker’s Death Certificate
Setting a mortuary ablaze looks like a textbook attempt to destroy evidence, yet the death certificate only cares about one forensic distinction: whether the victim died before or after the fire began. In structural fires, smoke inhalation is the most common killer, and checking the airways and lungs confirms Soot present, proving the victim was alive and breathing when the flames started.
To verify the victim’s identity, match the Gold Crown in his mouth to a reference photo of Stanley Barker, whose employment contract lists a birth year of 1912. Building the timeline takes a little calendar math:
- Frank Harper discovered the body on the 12th, and the fire report is dated Friday the 13th.
- Hampton testifies that he last saw Stanley alive after dinner on Tuesday, which lands on Day 10, Month 11.
- Stanley’s contract included room and board with dinner served on the property. Because he was seen right after Tuesday’s dinner and never showed up for work or any subsequent meals, he died that same night.
- Intense fire heat expands and melts delicate watch gears, freezing the hands at 11:30 (and five seconds), which pins down 11:30 pm, Day 10, Month 11.
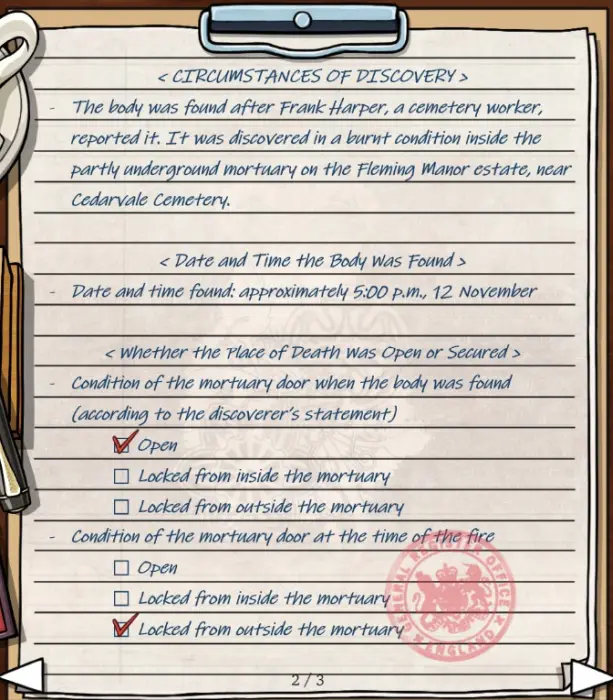
Pay close attention to the mortuary door mechanics. The single entrance has an exterior latch that cannot be locked from the inside.
More disturbingly, the door was open when Frank Harper found the body on the 12th, which means a third party returned to the burned mortuary after the fire and walked away without reporting the corpse.
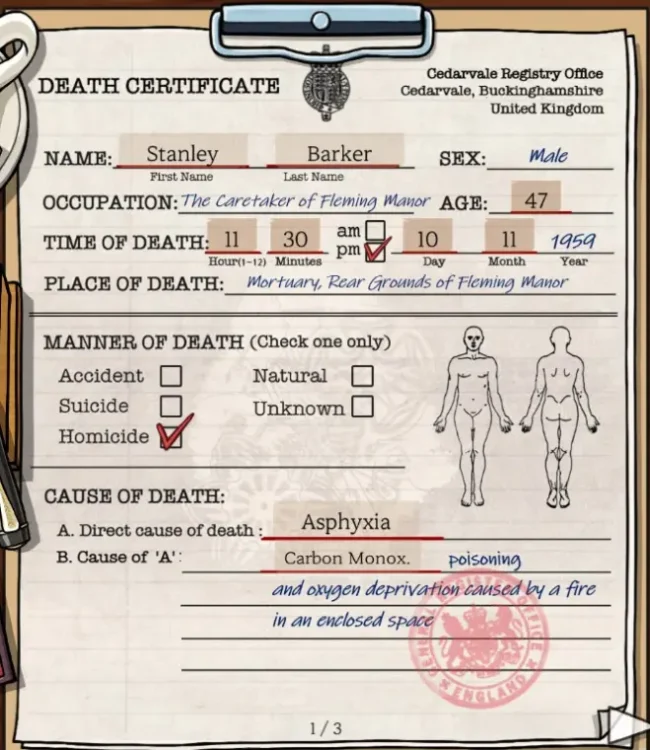
Fill out Form 1 with these exact entries:
- Name: Stanley Barker
- Age: 47
- Time of death: 11:30 pm, Day 10, Month 11
- Manner of death: Homicide
- Direct cause of death: Asphyxia
- Cause of A: Carbon Monox.
- Condition of the mortuary door when the body was found: Open
- Condition of the mortuary door at the time of the fire: Locked from outside the mortuary
- Physical evidence: Gold Crown
- Findings in the airways and lungs: Soot present
- Estimated time of death: Death occurred after the fire began
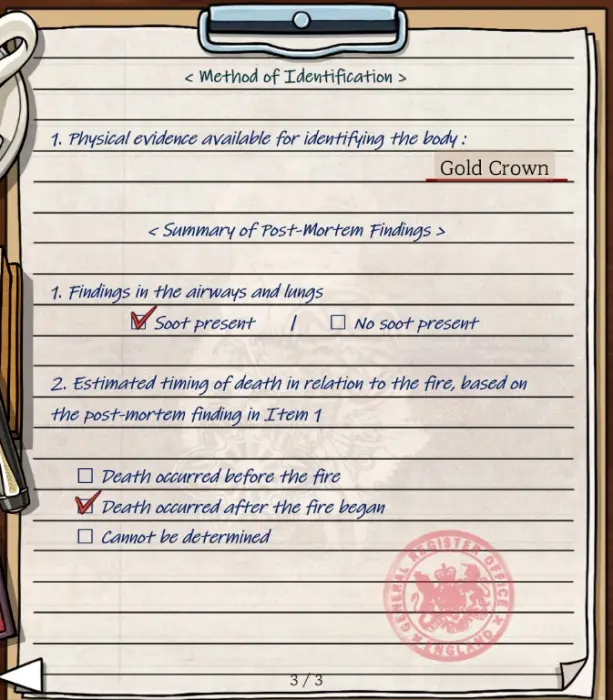
Form 2: Identifying All Eight Burnt Victims
Now comes the main event of Episode 9: sorting out eight charred cadavers whose heads have been severed and placed onto the wrong bodies.
Make sure every one of the eight victims ends up with both a head and a body assigned before you submit, and keep these rules in mind:
- Strict Victim Pool: All eight heads and bodies belong exclusively to the victims from the last three episodes: the three bandits (Clyde Bell, Barry Sutton, Malcolm Briggs), all four Ainsworths (Harry, Clara, George, Florence), and the acrobat (Colin Riley).
- No Original Pairs: Because every cadaver has the wrong head attached, no victim can have the same number for both their head and their body.
- Forget Soft Tissue: Fire destroyed skin and muscle, so soft-tissue markers like Clyde’s tattoo or snakebite swelling are completely gone. Rely on skeletal fractures, bullet wounds, and dental X-rays from earlier cases (if you spent time solving George’s dental chart earlier, his skull will jump right off the screen).
- Use Sex Angles Last: Your medical book illustrates how to determine biological sex from jaw shape and hip X-rays using the subpubic angle method (the angle dead center at the bottom of the pelvis). Six of the eight victims have obvious skeletal trauma; save the four featureless parts (Clara and Clyde’s heads, plus George and Florence’s bodies, which sit on Bodies 4 and 7) for the end.
- Watch the Arm/Hand Overlap: Do not confuse Malcolm Briggs and Harry Ainsworth’s bodies. Malcolm suffered fractures to both arms and hands, whereas Harry’s report introduces a new detail: deformed finger bones caused by boxing.
Match all eight victims using the solution below, if you can’t do it yourself or still have doubts:
- Deceased No. 1: Clyde Bell
- Clues: Very short frame with a stab wound on the shoulder (Body); masculine jaw with no other skull traits (Head).
- Form Entry: Head is on body number 4 and Body is on body number 5
- Deceased No. 2: Barry Sutton
- Clues: Skull cracked across the left temple with an oar (Head); notably fat build, making him the only overweight cadaver (Body).
- Form Entry: Head is on body number 8 and Body is on body number 2
- Deceased No. 3: Malcolm Briggs
- Clues: Long gash across the back of the skull from a shovel blow (Head); fractures of both arms and hands (Body).
- Form Entry: Head is on body number 6 and Body is on body number 3
- Deceased No. 4: Harry Ainsworth
- Clues: Bullet entry wound dead center in the forehead (Head); deformed finger bones from boxing (Body).
- Form Entry: Head is on body number 1 and Body is on body number 6
- Deceased No. 5: Clara Ainsworth
- Clues: Feminine skull with no distinguishing trauma (Head); bullet lodged in the chest alongside an old fracture on one arm (Body).
- Form Entry: Head is on body number 7 and Body is on body number 1
- Deceased No. 6: George Ainsworth
- Clues: Fractured mandible, injured front teeth, and the skull fracture from his dental report (Head); masculine pelvic subpubic angle with no other skeletal trauma (Body).
- Form Entry: Head is on body number 5 and Body is on body number 7
- Deceased No. 7: Florence Ainsworth
- Clues: Broken hyoid bone from manual strangulation (Head); feminine pelvic subpubic angle with no other skeletal trauma (Body).
- Form Entry: Head is on body number 2 and Body is on body number 4
- Deceased No. 8: Colin Riley
- Clues: Severely shattered skull with no prior X-ray on file (Head); broken clavicle and ribs (Body).
- Form Entry: Head is on body number 3 and Body is on body number 8
Answering Avery’s Final Two Questions
Right after you submit the cadaver identification report, Avery wraps up the investigation by asking you two final questions about the carved playing card discovered inside the victim’s stomach:
- Question 1 (Why do we think the carved card was in the victim’s stomach?): Select He swallowed it to protect the dying message.
- Question 2 (What does ice house mean?): Select A place once used to store ice.
We’re getting really close to completing the game and I will have the rest of the walkthroughs posted ASAP.
Until then, if you’re wondering what to play, I recommend a few other HOPAs and adventure games I have walkthroughs for below:
- Servant of the Lake Walkthrough
- The Mr. Rabbit Magic Show Walkthrough
- Boxes: Lost Fragments Chapter 1 and Boxes: Lost Fragments Chapter 2
- Brain Puzzle 3: Crazy Mind Answers (for a fun mobile alternative that forces you to think out of the box)